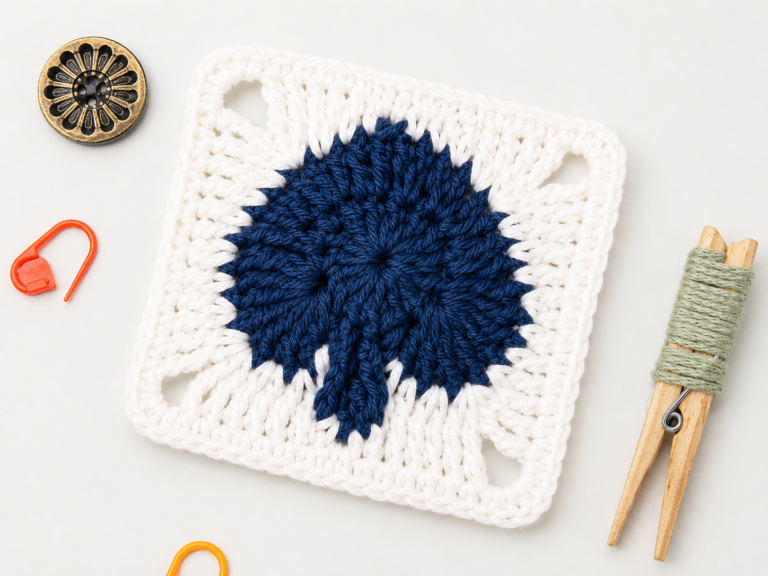
Leaf Granny Square: Free Pattern with Step-by-Step Tutorial
A leaf granny square is a textured crochet motif that features a bi-color leaf applique worked with a special Y-stitch technique, set against a contrasting background with a central vein and stem detail. Tip: Master the dtr-dc Y-stitch by practicing on a swatch first, this special stitch is what gives the leaf its beautifully shaped outer contour.
As an Amazon Associate we earn from qualifying purchases: some supply links in this post are affiliate links, at no extra cost to you.
If you’ve been making granny squares for a while, you know the nature-inspired ones are some of the most fun to crochet. This leaf square pairs a two-tone leaf appliqué with the border so it looks good on its own or joined into an afghan. Building a seasonal throw, a fall table runner, or just using up green and yellow scraps, it delivers without being fussy.
It’s an easy-rated pattern and a good next step once you’re comfortable with the basics of crochet for beginners. The standout technique is the dtr-dc Y-stitch, which builds the curved edge of the leaf quickly, and it’s simpler than it looks. Never worked a granny square pattern? No problem; every round is spelled out below.
This leaf square is part of our growing set of botanical motifs. If you like it, the tulip granny square and the African flower granny square use similar stitch tricks to get their shapes. Browse our free crochet patterns any time you need a new project. Let’s get started.
For further reading and pattern inspiration, we recommend visiting the Craft Yarn Council for standardized yarn weight and hook size references. You can also explore community-created variations of the leaf granny square on Ravelry, where crocheters from around the world share their own colorways and modifications.
What Makes the Leaf Granny Square Special
At a glance this looks like a plain square with a leaf sewn on, but that’s not what’s happening. Instead of making the leaf separately and stitching it down, you crochet it right into the border structure, the chain loops that form the border base double as anchor points for the leaf. No sewing step, and the leaf looks like it grows out of the square.
The real trick is the Y-stitch. A traditional leaf shapes its sides with increasing doubles or trebles, which gives a slightly stepped, angular edge. The dtr-dc Y-stitch here spans the height of two stitches, so the curve comes out smooth and flowing instead of pixelated, a small detail that makes the whole square look more finished.
The other nice detail is the surface slip-stitch work. Once the square is done, you add the midrib and a short stem in brown yarn worked over the existing stitches, depth and realism with no extra bulk. If you’ve ever fought with a crooked granny square, you’ll appreciate how the border rounds keep this one flat and square. Finished, it’s about 3.35 by 3.35 inches, handy for blankets, pillows, and seasonal decor.
Materials and Tools
Gathering the right supplies before you begin will make the entire process smoother and more enjoyable. Here is everything you need to complete one leaf granny square:
- Yarn, 3 colors: One skein or partial skein each of yellow (for the leaf’s highlight color), green (for the leaf’s main body), and brown (for the midrib and stem). A well-balanced crochet tension is easier to achieve with a smooth, plied yarn, so opt for a quality wool or cotton blend rather than a fuzzy or novelty yarn. Weight 3 (DK/Light Worsted) is ideal because it provides excellent stitch definition for the Y-stitch details while keeping the finished square at a manageable size.
- Crochet hook, 3.00 mm (US C/2): This smaller hook size creates tight, neat stitches that really show off the leaf shape. If you are unsure which hook brand to choose, our guide to the best crochet hooks for beginners covers several ergonomic options that are comfortable for extended stitching sessions. You may also want to review our crochet hook sizes chart to understand how millimeter sizing translates to US and UK letter/number systems.
- Scissors and yarn needle: For trimming ends and weaving in the color-change tails that occur during the leaf construction.
- Stitch marker (optional): Helpful for marking the first stitch of each round if you tend to lose your place. Not strictly required, but a nice safety net.
One quick note on yarn substitution: if you prefer a larger or smaller leaf granny square, you can adjust the size by changing your yarn weight and hook size proportionally. Moving up to a 4.00 mm hook with worsted weight yarn will produce a square closer to 4.5 inches, while dropping down to a 2.50 mm hook with fingering weight yarn will give you a dainty 2.5-inch motif. Just remember that the stitch counts in the pattern remain the same regardless of your yarn and hook choices. For more on adapting patterns, see our how to read a crochet pattern guide.
Stitch Abbreviations (US Terminology)
This leaf granny square pattern uses standard US crochet terminology. If you are accustomed to UK terms, be aware that what Americans call a “double crochet” (dc) is the UK “treble crochet,” and what Americans call a “single crochet” (sc) is the UK “double crochet.” For a comprehensive conversion reference, check out our crochet abbreviations for beginners guide. Below is the full list of abbreviations used in this pattern:
- MR: Magic Ring (also called a magic circle). If you need a refresher, our magic circle crochet guide walks you through two different methods.
- Ch: Chain
- Sl.st: Slip Stitch
- Sc: Single Crochet
- Hdc: Half Double Crochet. Review the basics in our half double crochet tutorial.
- Dc: Double Crochet. This is the workhorse stitch of the pattern. See our double crochet stitch tutorial if you need a refresher.
- Tr: Treble Crochet
- Dtr: Double Treble Crochet
- Y-st: Y-Stitch (special stitch explained in detail below)
- BLO: Back Loop Only
- FLO: Front Loop Only
Understanding these abbreviations will make it much easier to read crochet patterns of all kinds, not just this leaf granny square. Keep this list handy as you work through the rounds, especially the Y-stitch, which is unique to this design.
Special Stitch: The Y-Stitch (Y-st)
The Y-stitch is what makes this pattern click. You work a tall stitch, a double treble (dtr), then, instead of moving on, you work a shorter double crochet into the post of that dtr. The two share a base and split at the top, so the shape looks like the letter Y from the side.
Here is exactly how to execute the dtr-dc Y-stitch used throughout the leaf portion of this pattern:
- Yarn over three times and insert your hook into the designated stitch or chain space.
- Yarn over and pull through: you now have 5 loops on your hook.
- Yarn over and pull through two loops four times in succession. After this sequence, you have completed one dtr. Do not cut the yarn or remove the hook.
- Now look at the post of the dtr you just made. You will see four sets of parallel loops running horizontally along the post (one set for each “yarn over and pull through two” step). Starting from the bottom of the post, count up to the second set of loops.
- Insert your hook under the strands of that second set, yarn over, and pull through (2 loops on hook).
- Yarn over and pull through two loops once more. You have now completed a dc worked into the post of the dtr, forming the Y-stitch.
If you’re unsure, practice on a swatch first. Chain 15, work a row of dc, then try a few Y-stitches along it. The tricky part is finding that second set of loops, that’s where most people stumble. Once your Y-stitches look even, you’re ready for the leaf.
How to Change Colors
This leaf granny square uses three colors, which means you will be changing yarn at several points during the leaf construction. Clean color changes are essential for a polished look, and fortunately, the technique is straightforward once you know the right moment to introduce the new yarn.
To change colors cleanly in this crochet leaf square, follow these steps every time you switch from one color to the next:
- Work the last stitch of the old color as you normally would, stopping at the final yarn over. For example, if the last stitch is a dc, you would yarn over, insert the hook, yarn over, pull through, yarn over, pull through two loops, and then stop, leaving two loops on your hook.
- Drop the old color and yarn over with the new color.
- Pull through both remaining loops with the new color. This completes the stitch and locks the new color in place.
- Continue working with the new color. Do not cut the old color unless the pattern specifically tells you to, you may need it again in a few stitches.
- When the pattern calls for you to return to a previously dropped color, simply pick it back up, leaving a small loop of slack to prevent puckering, and resume stitching.
As you go, lay the unused tail over the previous stitches and crochet over it, that secures the color change so you don’t have to weave it in later. It’s especially handy here since the colors switch often along both sides of the leaf. If you get gaps at the change points, tighten your tension a touch on the stitches right before and after. Good crochet tension makes all the difference.
Leaf Granny Square Pattern: Step by Step
Now let us walk through the leaf granny square pattern round by round. The construction is divided into five distinct phases: the leaf appliqué, the border base, squaring, the second border, and the final midrib and stem. Work through each phase carefully, and do not hesitate to rip back and redo a section if something does not look right, that is part of the learning process.
The Leaf Appliqué
The leaf is the heart of this leaf granny square, and it is worked first as a standalone motif that will later be enclosed by the border rounds. You will use two colors for the leaf: yellow for the center highlight and green for the outer body.
With yellow yarn, chain 11. This chain forms the central spine of the leaf and serves as the foundation for all the stitches on both sides. Working from the hook end toward the slip knot, you will now build the leaf by working stitches into the chain on both sides.
Starting in the 4th chain from the hook, work 1 dc. Then work 1 tr in each of the next 2 chains. At this point, you have established the base stitches along one side of the leaf’s upper half.
Now it is time for the first Y-stitch: work 1 dtr-dc Y-st in the next chain, remembering to find the second set of loops on the dtr post and work your dc into that spot. This Y-stitch begins the curved outer tip of the leaf.
Work 1 tr in the next chain, then 1 dc in the next chain. You have now reached the center of the chain, the tip of the leaf. Change to green yarn on the last yarn over of that dc.
Now you will mirror the stitches down the other side of the chain. Work 1 dc in the next chain (working back toward the starting end), then 1 tr in the next, then 1 dtr-dc Y-st in the next. Work 1 tr in each of the next 2 chains, and finally 1 dc in the last chain, which brings you back to the base of the original chain-11.
Fasten off. Your leaf appliqué is complete! It should look like an elongated oval with a visible two-tone transition where the yellow center gives way to the green outer edges. If your leaf looks asymmetrical, compare the stitch counts on each side, they should mirror each other exactly. This leaf will now be surrounded by the border rounds that turn it into a proper leaf granny square.
Border Base
The border base round creates a framework of chain loops all the way around the leaf appliqué. These loops serve a dual purpose: they establish the stitch count for the squaring round, and they provide the anchor points for the second border. This round is worked with the same green yarn (or a background color of your choice).
Join your green (or background color) yarn with a slip stitch anywhere along the outer edge of the leaf. Now work your way around the entire perimeter, placing chain-3 loops along the straighter sides of the leaf and chain-4 loops at the more curved sections (the tip and the base). The exact distribution will depend on how tightly or loosely you crochet, but aim for approximately 24-28 total chain spaces around the entire leaf.
For the straight portions of each leaf side, work approximately 1 chain-3 loop for every 2 stitches of the leaf edge. At the top tip and the bottom base of the leaf, where the curvature is greatest, work chain-4 loops to compensate for the extra distance. Join with a slip stitch to the first chain of the round and fasten off.
Lay the work flat and check that the chain loops are evenly spaced, uneven loops make the next round ruffle or cup, so it’s worth a minute to get the spacing right.
Squaring
This is the round where your circular border base transforms into a proper square shape. The squaring round uses double crochet stitches worked evenly around the chain loops, with special corner treatments to create the 90-degree angles. If you have ever made a solid granny square pattern, the corner concept will feel familiar, but the stitch distribution is adapted to fit the chain-loop structure of this leaf granny square.
Round, Squaring: Join your background color yarn with a slip stitch in any chain-3 space. Work 1 dc in each slip stitch along the border base. When you reach a chain-3 space, work the standard corner sequence: 2 dc, chain 3, 2 dc all in the same space. When you reach a chain-4 space, work 4 dc evenly spaced in the chain to maintain the correct stitch count.
Repeat this around all four sides. You should have four corners, each with a 2dc-ch3-2dc sequence, and straight sides filled with 1 dc per stitch. Join with a slip stitch to the first dc of the round.
Critical check: Count your stitches on each side. They should be equal (or within 1 stitch of equal) for the square to lie flat. If one side has noticeably more stitches than the others, your leaf granny square will not join neatly with other squares in a blanket. This is also the round where tension issues tend to show up most clearly, so keep an eye on your gauge as you work.
The Second Border
The second border round adds stability and definition to the leaf granny square, bringing the overall size to its finished measurement of approximately 3.35 by 3.35 inches. This round is simple and rhythmic, making it a satisfying finish after the concentration required for the leaf and squaring rounds.
Round, Second Border: Join your background color (or a contrasting color for visual pop) with a slip stitch in any stitch. Work 1 dc in each dc around the entire square. At each corner, the chain-3 space from the squaring round, work the same corner treatment: 2 dc, chain 3, 2 dc in the corner space.
Join with a slip stitch to the first dc of the round and fasten off. This round should feel effortless and relaxing. The leaf granny square now has a clean, finished border that frames the leaf motif beautifully. If you want a larger square, you can repeat this border round with an additional dc-in-each-dc round and corners, which will add roughly half an inch to each side. The granny square crochet pattern tradition often includes multiple border rounds, so feel free to customize.
Adding the Midrib and Stem
The final phase of this leaf granny square is the surface detail work that brings the leaf to life. You will add a midrib (the central vein running down the middle of the leaf) and a short stem at the base, both worked in brown yarn using the surface slip stitch technique.
Midrib: Thread a length of brown yarn onto your yarn needle (or, if you prefer to work with your hook, join the brown yarn with a slip stitch at the base of the leaf). Working from the base to the tip along the center chain of the leaf, insert your hook under the top loop of each stitch in the central chain and pull a loop of brown yarn through. Insert your hook under the next stitch and pull through both loops on your hook. Continue this surface slip stitch all the way to the tip of the leaf. This creates a raised line of brown stitches that mimics the natural midrib of a real leaf.
Stem: At the base of the leaf, where the midrib ends, chain 4 with the brown yarn. Work 1 slip stitch in the 2nd chain from the hook and in each remaining chain to create a small, tapered stem. Fasten off and weave in the end.
These two small details make an enormous difference in the finished appearance of the leaf granny square. The midrib gives the leaf structure and dimensionality, while the stem grounds it visually and makes the motif read unmistakably as “leaf” rather than an abstract shape. Admire your finished leaf granny square, you have just completed a project that combines appliqué construction, special stitches, color changes, and surface embellishment all in one compact motif!
Color Ideas for Your Leaf Granny Square
One of the most enjoyable aspects of making this leaf granny square is experimenting with color combinations. The original pattern calls for yellow, green, and brown, a classic autumnal palette that evokes changing foliage. But the design is versatile enough to look stunning in many different colorways. Here are several palette suggestions to spark your creativity:
- Spring green: Lime green leaf body with white center highlight and a dark forest green midrib. Pair this with a cream or white background for a fresh, bright look that would work well for a spring table setting or baby blanket.
- Autumn warmth: Burnt orange leaf body with golden yellow center and chocolate brown midrib. Use a warm cream or tan background to keep the cozy fall feeling. This is the original inspiration for the leaf granny square and remains the most popular choice.
- Tropical: Teal or turquoise leaf body with hot pink center highlight and deep purple midrib. A white or light gray background keeps the colors from overwhelming the design. This bold combination would make a striking pillow cover or tote bag panel.
- Monochromatic green: Use three shades of green, light sage for the center, medium green for the body, and dark olive for the midrib and stem, against a soft ivory background. This tonal approach is subtle and sophisticated, well suited to elegant home décor projects.
- Holiday red: Deep red leaf body with cream center and dark brown midrib, set against a dark green background. This colorway transforms the leaf motif into something that looks like a holly leaf or holiday ornament, ideal for winter-themed projects and Christmas gifts.
Do not be afraid to try colors outside your comfort zone. The leaf granny square is a small, quick project, if a color combination does not work out, you have only invested 30 to 45 minutes. Keep notes on which yarns you used for each square so you can replicate successful combinations later. If you are planning a large multi-square project, consider making a few test squares in different colorways before committing to a full blanket’s worth of yarn.
Project Ideas Using the Leaf Granny Square
A single leaf granny square is satisfying on its own, but the real magic happens when you start combining multiple motifs into larger projects. Here are some of our favorite ways to use this versatile pattern:
Seasonal throw blanket: Make 49 leaf granny squares (a 7×7 grid) in autumn colors and join them with a seamless join-as-you-go method or a decorative border. The repeating leaf motif creates a stunning visual rhythm across the blanket surface, and the small size of each square means you can easily customize the color placement, perhaps arranging the squares in a gradient from yellow-green at one corner to deep forest green at the opposite corner. For joining tips, our granny square pattern guide covers several popular techniques.
Fall table runner: Make 9 to 12 leaf granny squares and arrange them in a single row or a 2×5 grid. Add a simple single-crochet border in a coordinating solid color, and you have a beautiful table runner that celebrates the harvest season. This project is relatively quick and makes a wonderful handmade housewarming or hostess gift.
Cushion covers: Just 4 leaf granny squares joined in a 2×2 arrangement create a 6.5-inch panel, add a border round or two to bring it up to standard cushion size. Mix and match different colorways for a patchwork effect, or keep all four squares identical for a clean, unified look.
Market bag panels: Crochet a rectangular panel of 3×6 leaf granny squares, fold it in half, seam the sides, and add handles for a unique market tote. The textured leaf pattern adds visual interest to an otherwise simple bag shape, and the cotton yarn holds up well to daily use.
Wall art: Mount individual leaf granny squares in embroidery hoops or shadow boxes for a nature-inspired gallery wall. Use different colorways for each square to create a collection that puts the versatility of the design on display. This is an excellent project for using up small yarn scraps and would make a lovely gift for a nature-loving friend.
If you enjoy botanical-themed granny squares, be sure to explore other nature motifs in our collection. The tulip granny square pairs beautifully with this leaf design in spring-themed projects, while the African flower granny square adds a geometric contrast that works well in mixed-motif blankets. For even more variety, the 3D flower granny square free pattern and the hexagon granny square pattern offer completely different shapes that can be combined with leaf squares for genuinely unique creations.
Frequently Asked Questions
What is a Y-stitch in crochet?
A Y-stitch (Y-st) combines a tall stitch with a shorter one worked into its post. Here, the dtr gives the height and the dc adds the width, and together they build the leaf’s curved edge in fewer stitches than the usual increasing method. Once you can find that second set of loops on the dtr post, it’s fast and intuitive.
How do I change colors cleanly in the leaf granny square?
Work the last stitch of the old color up to the final yarn over, then yarn over with the new color and pull through. Lay the tails over the previous stitches and crochet over them. Always change on that very last yarn over, too early leaves a dot of the old color, too late leaves a gap.
Can I make the leaf granny square bigger?
Yes. Add more border rounds, or go up in hook and yarn weight. Each extra dc border round with standard 2dc-ch3-2dc corners adds about half an inch per side. You can also set two or more leaf motifs inside one larger square frame for a compound design. To scale up, worsted yarn and a 5.00 mm hook gets you close to a 5-inch square, same pattern, bigger result.
What yarn is best for a leaf granny square?
Weight 3 (DK/light worsted) wool or cotton works best. Wool gives crisp definition for the Y-stitches; cotton holds the border shape. Skip fuzzy or textured yarns like mohair or bouclé, they hide the stitch work that makes this square worth making. Smooth, tightly plied yarn in saturated colors looks cleanest.
Is the leaf granny square suitable for beginners?
Yes, it’s rated easy. If you’re comfortable with dc and tr and can manage a color change, you can make this. The Y-stitch is broken down step by step, and after a swatch it’s straightforward. Brand-new crocheters might want a couple of simple granny square patterns first to get steady with tension and counting; the solid granny square is a good starter that teaches the corner technique used here.