Spade Granny Square: Free 4-Round Crochet Pattern
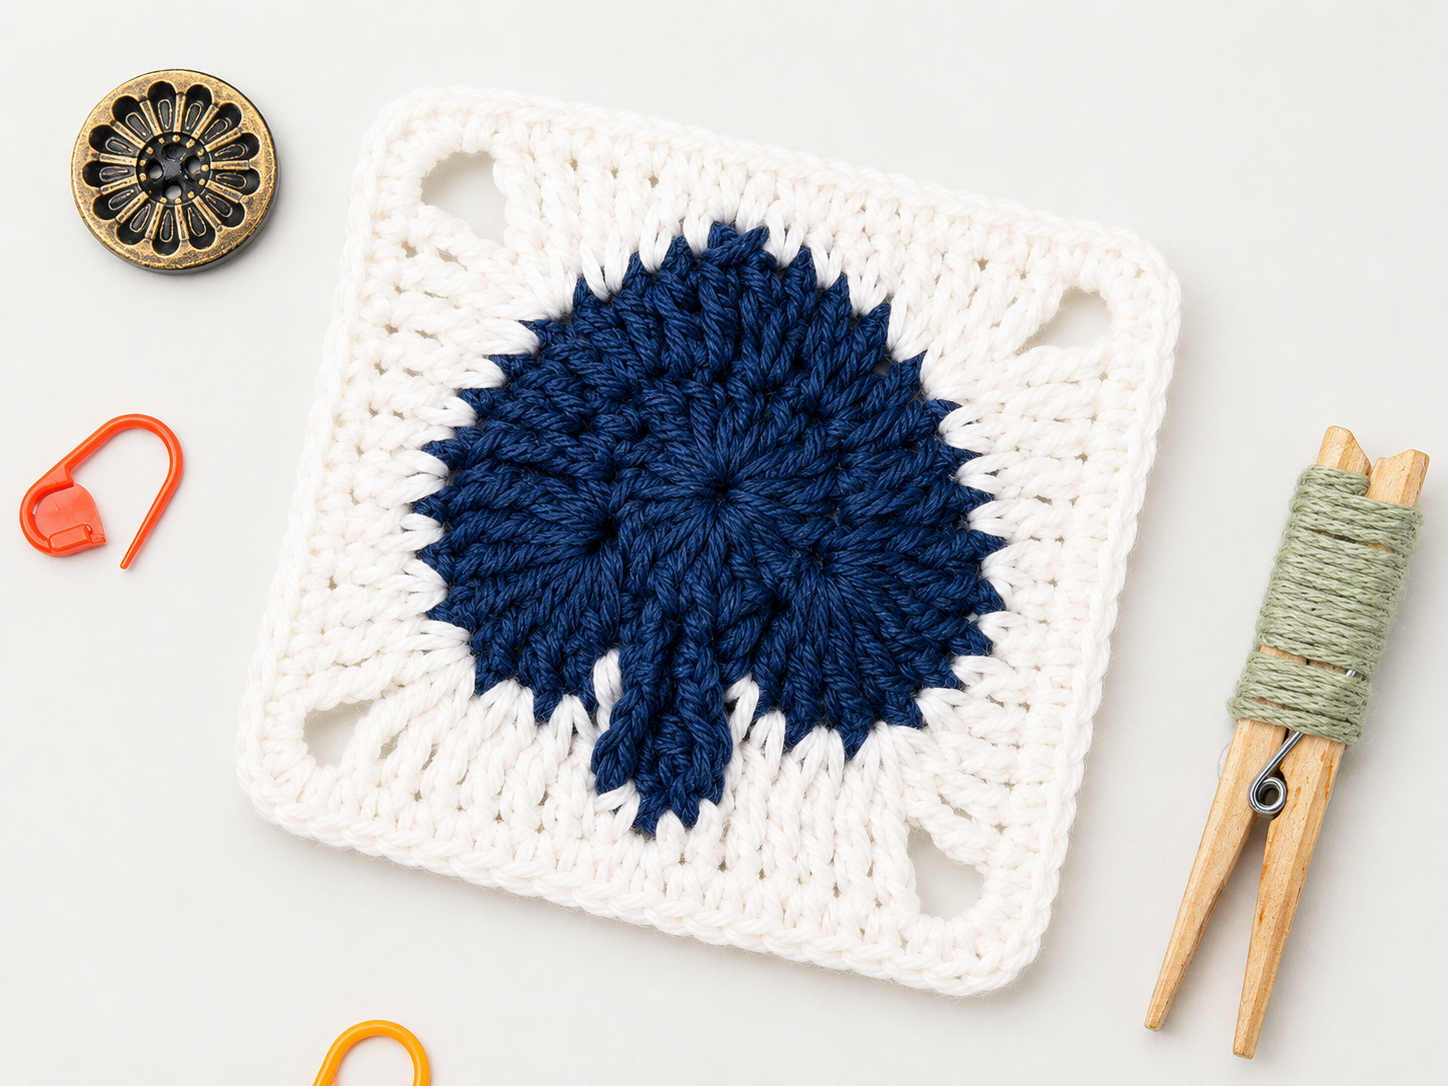
This spade granny square pattern gives a regular granny square a bit more personality: a bold, rounded motif with a subtle pointed tail, framed by a clean solid border. All the shaping happens in the first two rounds. A pair of tall treble-stitch fans build the spade’s rounded top, while a simple chain arch on the opposite side leaves room for the tail to hang below. Worked in a single color, it still reads clearly as a granny square once it’s framed, just with a shape you don’t see very often.
As an Amazon Associate we earn from qualifying purchases: some supply links in this post are affiliate links, at no extra cost to you.
More Granny Squares to Try
Why You Will Love This Spade Granny Square
What sets this one apart from a typical granny flower is the shape of its center. Round 2 doesn’t grow evenly outward in a circle. It builds two fans of tall treble stitches side by side with a small chain notch between them, then leaves the opposite side open with just a chain arch. That’s what pulls the motif into a rounded, slightly asymmetric spade shape instead of a perfect circle. Round 3 then takes that spade and rounds it out into four even corners before the final border squares everything off.
Since the whole spade is worked in a single contrasting color, this is a good project for using up one skein of an accent color while still getting a motif with real visual weight, whether you join a bunch into a blanket or finish just one as a coaster. Pair it with our diamond granny square or floral granny square patterns if you want a mixed-motif blanket with a different shape in every square.
Materials You Will Need
- Yarn: Two colors in a light (#3) weight yarn, such as DK weight. Color A forms the spade motif (navy in the photographed example) and Color B forms the outer square border (cream in the photographed example).
- Crochet hook: A 3.50 mm hook. Sizing up or down will change your finished square size, so keep your hook consistent if you are making multiples for a joined project.
- Tapestry or darning needle: For weaving in ends once your square is complete.
- Stitch marker or marking clip: Helpful for keeping track of your first stitch in Round 2, where the stitch pattern shifts between treble fans, a graduated taper, and a chain arch.
- Scissors: For trimming yarn between color changes.
According to the Craft Yarn Council, light (#3) weight yarns are typically recommended with hooks between 3.0 mm and 4.5 mm, so a 3.50 mm hook in the middle of that range gives the tall treble and double treble stitches in this pattern enough room to sit cleanly without leaving the fabric too loose.
Gauge and Finished Size
Worked with light (#3) weight yarn and a 3.50 mm hook, this spade granny square finishes at approximately 4.5 inches (11.5 cm) across. As with most granny square motifs, exact gauge isn’t critical as long as your tension stays consistent from square to square. What matters most is that every square you make for the same project comes out the same size. For a larger finished square, switch to a worsted (#4) weight yarn with a 5.00 mm hook, or add an extra solid round in Color B after Round 4.
Abbreviations
- ch: Chain stitch
- sl st: Slip stitch (used to join each round)
- sc: Single crochet
- hdc: Half double crochet
- dc: Double crochet
- tr: Treble crochet
- dtr: Double treble crochet
- tog: Worked together (a decrease, combining two stitches into one)
- st(s): Stitch(es)
- sk: Skip the next stitch
- rep: Repeat the instructions that follow
Step-by-Step Spade Granny Square Instructions
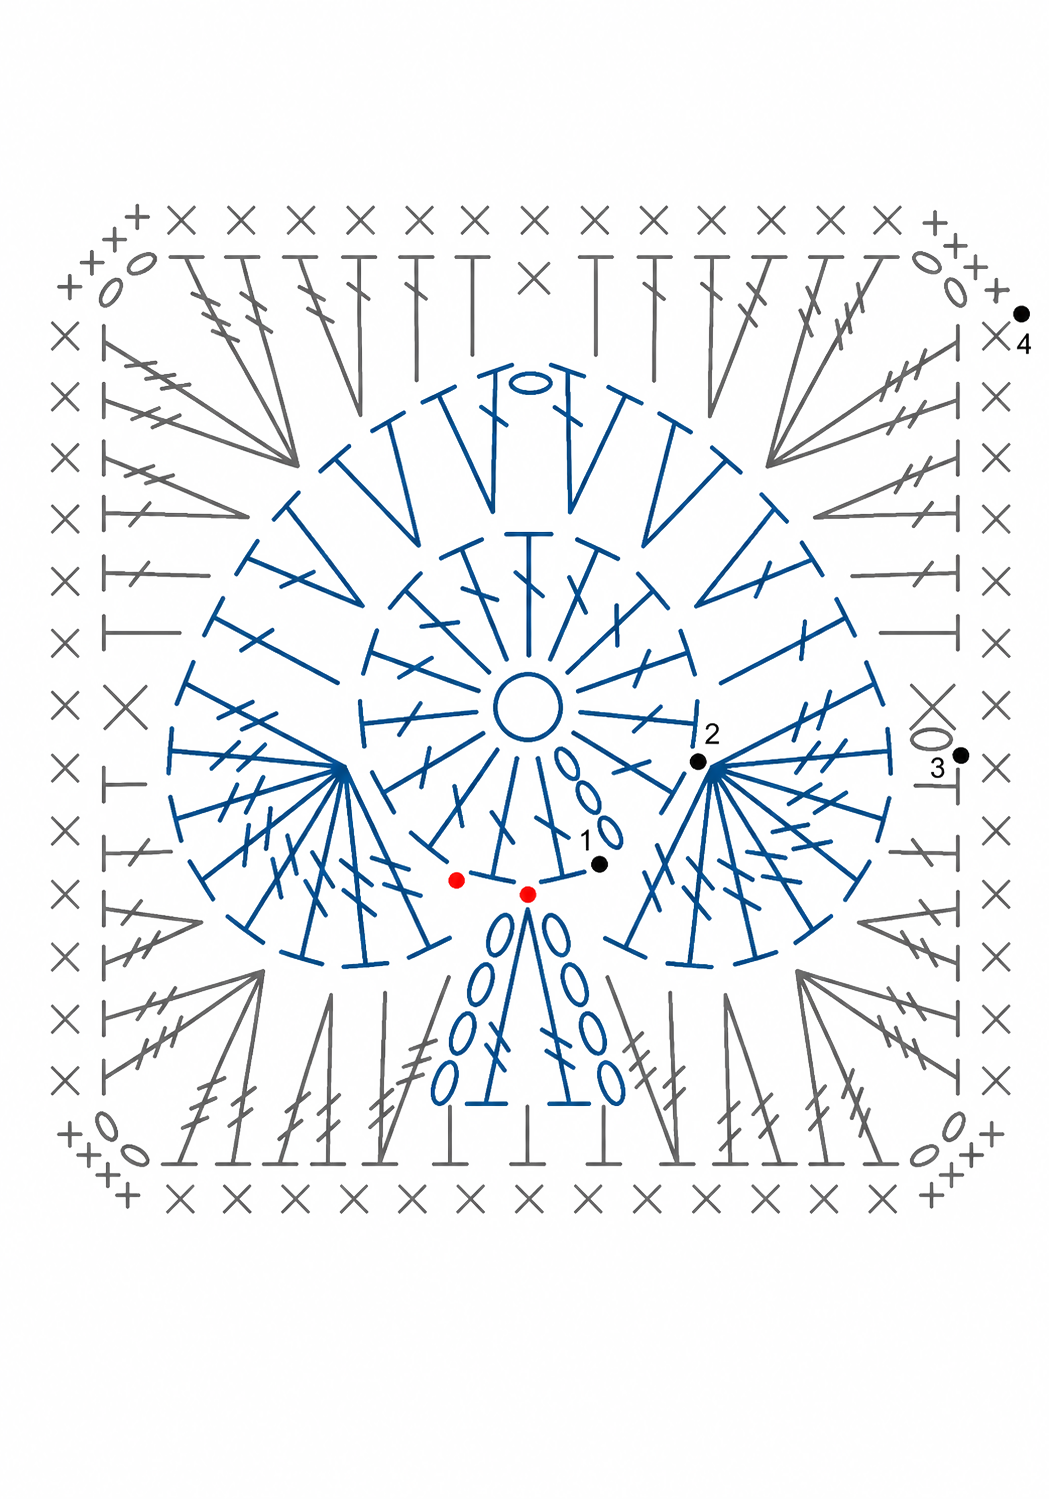
This works in four rounds total, with a color change between Round 2 and Round 3. Rounds 1 and 2 build the spade motif in Color A, then Rounds 3 and 4 round it off and frame it in Color B. The stitch chart below is worth keeping open alongside the written instructions, it makes it much easier to see exactly where the two treble fans and the chain arch land around Round 1’s base stitches.
Round 1: Magic Ring Foundation
Start with a magic ring in Color A. This round lays down a simple ring of 15 double crochet stitches, which gives Round 2 plenty of base stitches to shape the spade’s two fans and chain arch from.
Instructions: Make a magic ring. Chain 3 (counts as your first double crochet), work 14 more double crochet into the ring (15 dc total, counting the starting chain). Join with a slip stitch to the top of the starting chain 3. Pull the magic ring closed.
Round 2: Shaping the Spade
This is the round that gives the motif its name. Two fans of eight treble crochets form the spade’s rounded top, with a graduated taper of double and half double crochet stitches stepping down to a single chain notch between them. The opposite side stays much simpler, just a chain arch over two treble crochets, and that’s what lets the spade’s tail hang free instead of closing into a solid circle.
Instructions: Skip the next stitch. Work 8 tr in the next stitch (your first fan). Work 1 dc in the next stitch, then (1 dc, 1 hdc) in the next stitch, then (1 hdc, 1 hdc) in the next stitch, then (1 hdc, 1 dc) in the next stitch, this is your taper down to the center notch. Chain 1. Work (1 dc, 1 hdc) in the next stitch, then (1 hdc, 1 hdc) in the next stitch, then (1 hdc, 1 dc) in the next stitch, then 1 dc in the next stitch, this mirrors the taper back up. Work 8 tr in the next stitch (your second fan). Skip the next stitch. Join with a slip stitch to the top of the first treble crochet.
Without cutting your yarn, slip stitch across to the remaining unworked stitches from Round 1 on the opposite side of the motif, then chain 4, work 2 tr in the next stitch, chain 4, and join with a slip stitch. Fasten off Color A and weave in your ends. You should now have a rounded spade granny square shape with two fanned lobes on top and a soft chain arch forming the start of its tail below.
Round 3: Rounding the Spade into a Square
Now we switch to Color B and turn the spade’s curves into four even square corners. Two of the corners sit opposite the fans and use a simple, symmetrical graduated shell. The other two corners flank the chain-arch tail, so this round adds a couple of small decreases and a flat run of half double crochet right at the tail to keep that side from puffing out, since there are fewer stitches to work into there.
Instructions: Join Color B with a slip stitch anywhere along the spade’s edge. Twice, work [1 sc, 1 hdc, 1 dc, (1 dc, 1 tr), (1 tr, 1 dtr, ch 2, 1 dtr, 1 tr), (1 tr, 1 dc), 1 dc, 1 hdc] evenly across one side and into the next corner, the (dtr, ch 2, dtr) at the midpoint of each repeat forms the actual corner.
For the third side, work [1 sc, 1 hdc, 1 dc, (1 dc, 1 tr), (1 tr, 1 dtr, ch 2, 1 dtr, 1 tr), 2 tr, (1 tr, 1 dtr) tog, 3 hdc, (1 dtr, 1 tr) tog, 2 tr, (1 tr, 1 dtr, ch 2, 1 dtr, 1 tr), (1 tr, 1 dc), 1 dc, 1 hdc], this works the third and fourth corners while bridging over the chain arch with the two decreases and the flat hdc section in the middle. Join with a slip stitch to the first stitch of the round. Your spade granny square should now look like a rounded square with four chain-2 corner spaces and the navy spade visible inside.
Round 4: Solid Square Border
The final round adds a classic single crochet border, which squares off the edges completely and gives the whole motif a clean, finished frame.
Instructions: Join Color B (or continue if already attached) in any corner chain-2 space. Chain 1. Work 4 sc in the same corner space. Work 13 sc evenly along the side to the next corner. Work 4 sc in the next corner space. Repeat [13 sc along the side, 4 sc in the corner] two more times to complete all four sides and four corners. Join with a slip stitch to the first stitch of the round. Fasten off and weave in all remaining ends.
Tips for Perfect Results
- Mark your first stitch in Round 2. Because the stitch heights and stitch counts change so often in this round, a locking stitch marker in your first skipped stitch makes it much easier to confirm you have worked exactly two treble fans and one chain arch before joining.
- Don’t worry if the tail looks loose after Round 2. The chain arch on the spade’s tail side is meant to sit a little open. Round 3’s decreases and flat hdc section are what pull that side in to match the rest of the square.
- Block your finished spade granny square. A light steam or spray block will square up the corners and even out any tension differences between the treble fans and the solid border round.
- High contrast colors show off the spade best. A strong dark-against-light combination, like the navy-and-cream photographed here, makes the rounded fans and tail read clearly even from across the room.
Frequently Asked Questions
Can I make this spade granny square bigger?
Yes. After completing Round 4, keep adding standard solid granny rounds: 3 dc along each side and (3 dc, ch 2, 3 dc) in each corner, to grow the square to whatever size you like for a blanket panel.
Is this pattern beginner-friendly?
This pattern works best for confident beginners who already know chain, slip stitch, single crochet, half double crochet, and double crochet, and who are comfortable working in the round. Treble and double treble crochet appear in Rounds 2 and 3, but both are simply taller versions of a double crochet with extra yarn overs, so they are quick to pick up even if you have not used them before.
Why does Round 3 use decreases on one side?
The chain arch in Round 2 leaves fewer base stitches on the spade’s tail side than the fan side has. Working two decreases and a flat run of half double crochet there keeps the stitch count balanced around the whole motif, so the square comes out flat and even instead of pulling tight or rippling on one side.
Do I have to use two colors for this spade granny square?
No, you can work the entire square in one color if you prefer a tonal, textured look instead of a high-contrast spade. The shaping stays exactly the same either way, the color change just makes the spade shape easier to see.