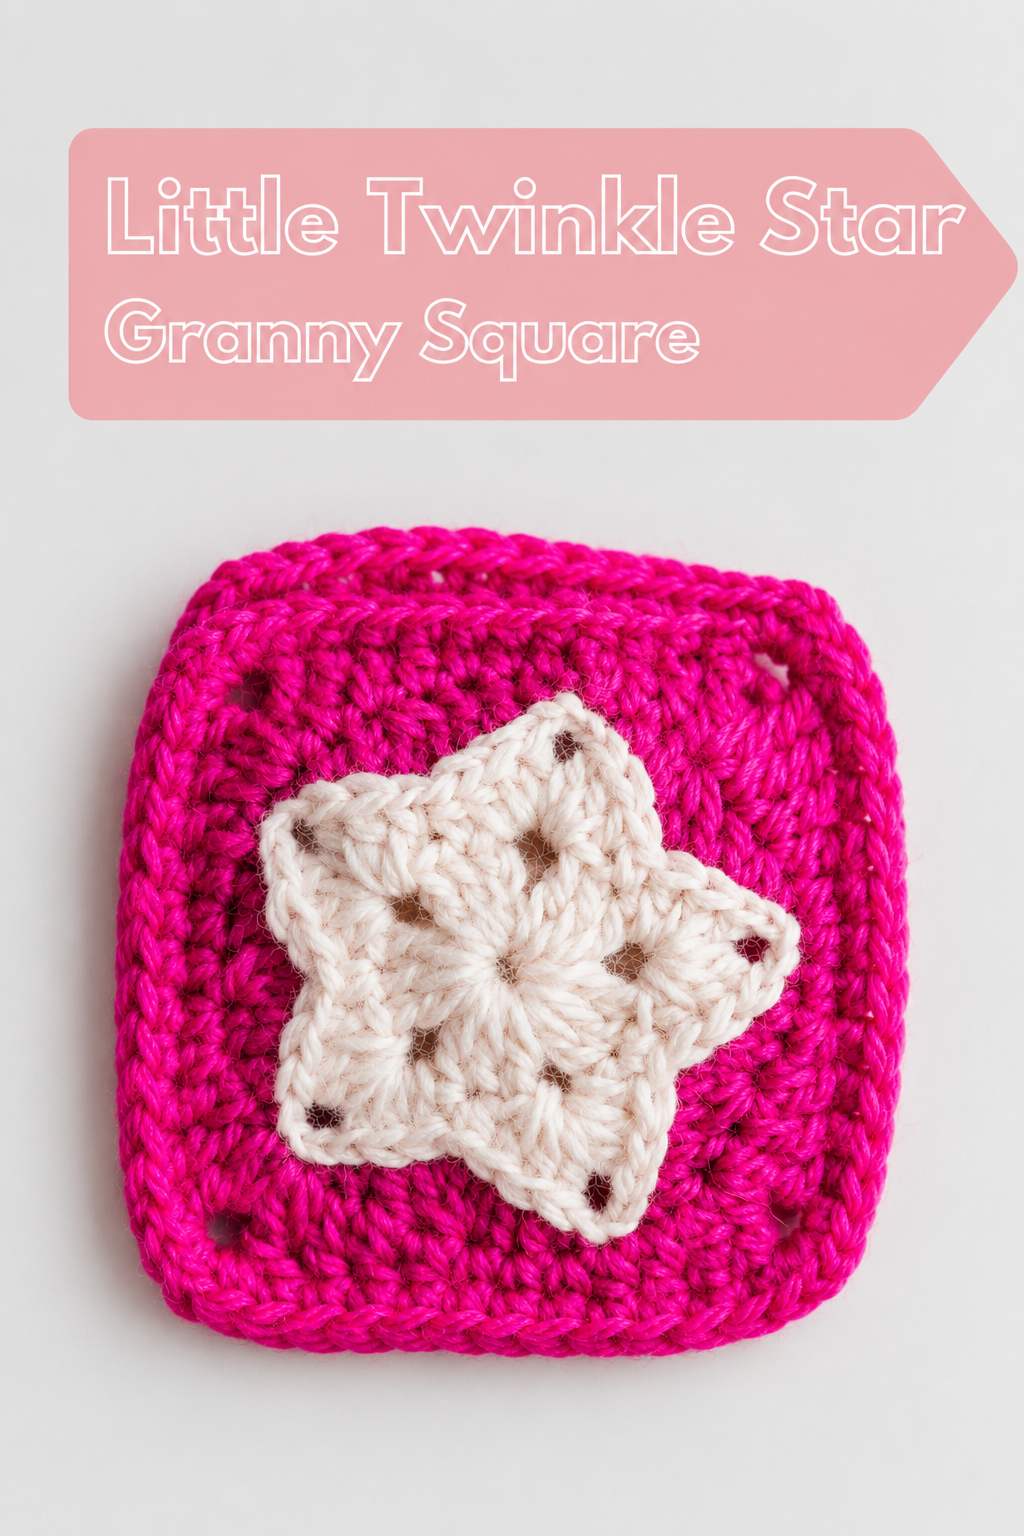
Star Granny Square Free Crochet Pattern — Step by Step Tutorial
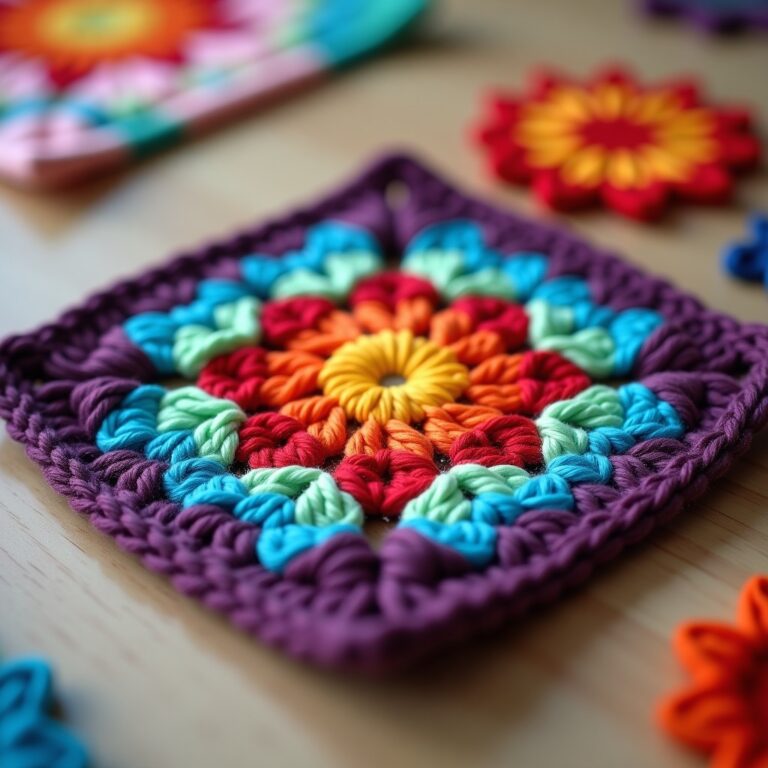
If you have been searching for a stunning star granny square pattern to add a celestial touch to your crochet projects, you are in the right place. This star granny square pattern creates a beautiful flat motif featuring a bold star shape at the center surrounded by a classic granny square border. Whether you are planning a baby blanket, a decorative throw pillow, or a festive holiday garland, this versatile star granny square pattern works beautifully for all skill levels. The design uses just two colors and six rounds, making it an ideal weekend project that even confident beginners can complete with ease.
Why You Will Love This Star Granny Square
There is something magical about working a star granny square pattern that transforms simple stitches into a striking geometric shape. Unlike three-dimensional raised stitch designs, this motif stays perfectly flat from center to edge, which means your finished blanket or accessory will drape smoothly without any puckering. The clever construction starts with a pentagon base that naturally evolves into a five-pointed star, then transitions into a perfectly squared-off frame through a series of strategic decreases. This star granny square pattern is also incredibly scrap-busting friendly, since the center star uses only a small amount of yarn in a contrasting color.
Another reason crocheters return to this star granny square pattern again and again is its excellent gauge consistency. Because the stitch pattern alternates between dense clusters and airy chain spaces, the finished square holds its shape beautifully after blocking. You can easily adjust the size by changing your hook and yarn weight, making this star granny square pattern adaptable for everything from delicate granny square ornaments to full-sized afghan panels. For more creative square ideas, be sure to check out our growing collection of free granny square patterns on the site.
Materials You Will Need
Gathering your supplies before starting any star granny square pattern is always a smart move. Here is everything you need to complete one finished square:
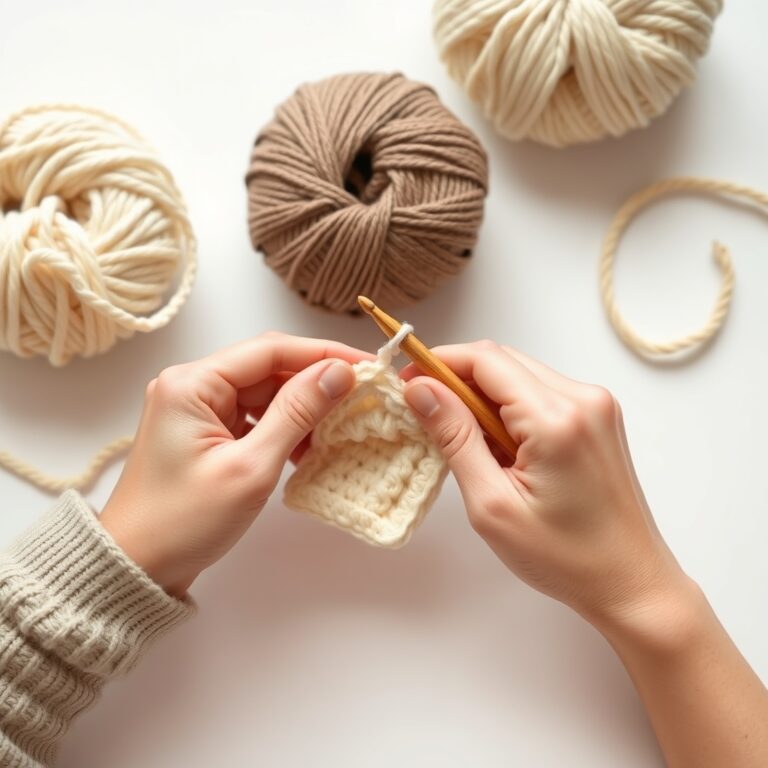
- Yarn — Two colors of your choice. The center star is worked entirely in one color (Color A), while the surrounding granny square frame uses a second color (Color B). DK or worsted weight yarn works best for beginners, but you can use any weight you prefer. For a beautiful drape, consider a high-quality cotton blend or a soft acrylic yarn.
- Crochet hook — A 3.00 mm (US C/2) hook for DK yarn, or a 5.00 mm (US H/8) hook if you are working with worsted weight. Choosing the right hook size is essential for achieving the correct gauge in any star granny square pattern.
- Darning needle — For weaving in those loose ends neatly once your square is complete.
- Scissors — A sharp pair for clean cuts.
- Stitch markers (optional) — Helpful for marking the first stitch of each round, especially if you are new to working in the round.
According to the Craft Yarn Council, selecting the correct hook size for your yarn weight is one of the most important steps in achieving consistent results across any crochet project.
Gauge and Finished Size
When crocheting this star granny square pattern with DK weight yarn and a 3.00 mm hook, each finished square measures approximately 3 inches by 3 inches (7.5 cm). This compact size is perfect for small projects like garlands, coasters, and holiday decorations. If you want larger squares for blanket panels, simply switch to worsted weight yarn paired with a 5.00 mm hook, which will yield squares closer to 5 inches across. Because this star granny square pattern is worked entirely in the round, your gauge should remain consistent as long as you maintain even tension throughout all six rounds. Blocking your finished squares with a light steam or spray method will help even out any minor irregularities and give you crisp, professional-looking results.
Color Suggestions
Choosing the right color palette can make or break your star granny square pattern. The key is to use high contrast between the center star color and the surrounding frame so that the star shape really pops against the background. Here are some popular combinations that crocheters love:
- Classic patriotic — A golden yellow star on a navy blue background is timeless and works beautifully for year-round projects.
- Holiday festive — A bright red star on a deep green square creates an instant Christmas vibe. These make gorgeous holiday stocking accents or tree ornaments.
- Soft nursery — A pastel pink star on a cream or white background is gentle and sweet, ideal for baby blankets and nursery decor.
- Boho neutral — A terracotta or rust star on an off-white square gives a warm, earthy feel that fits perfectly with modern farmhouse aesthetics.
Do not be afraid to mix and match different colorways within the same project. One of the best things about the star granny square pattern is that each square can use a different color scheme, creating a vibrant scrappy blanket that feels cohesive yet playful. For more inspiration on choosing yarn colors, take a look at our crochet tips section where we share plenty of advice for beginners.
Abbreviations
Familiarize yourself with these standard crochet abbreviations before starting your star granny square pattern. These are commonly used across most American crochet patterns and will help you follow along with confidence:
- ch — Chain stitch
- ch-sp — Chain space (the gap created by one or more chain stitches)
- dc — Double crochet
- dc3tog — Double crochet three stitches together (a decrease that combines three double crochet stitches into one)
- hdc — Half double crochet
- rep — Repeat the instructions that follow
- sc — Single crochet
- slst — Slip stitch (used for joining rounds together)
- st(s) — Stitch or stitches
- yo — Yarn over (wrapping the yarn over the crochet hook)
- tr — Treble crochet
Step-by-Step Star Granny Square Instructions
Now let us walk through each round of this star granny square pattern one step at a time. Follow along with the photos for each round, and do not worry if your first attempt is not perfect. Crochet is all about practice, and every square you make will look better than the last. If you are brand new to crochet, our beginner crochet guides can help you master the basic stitches before diving into this pattern.
Round 1 — Magic Ring Foundation
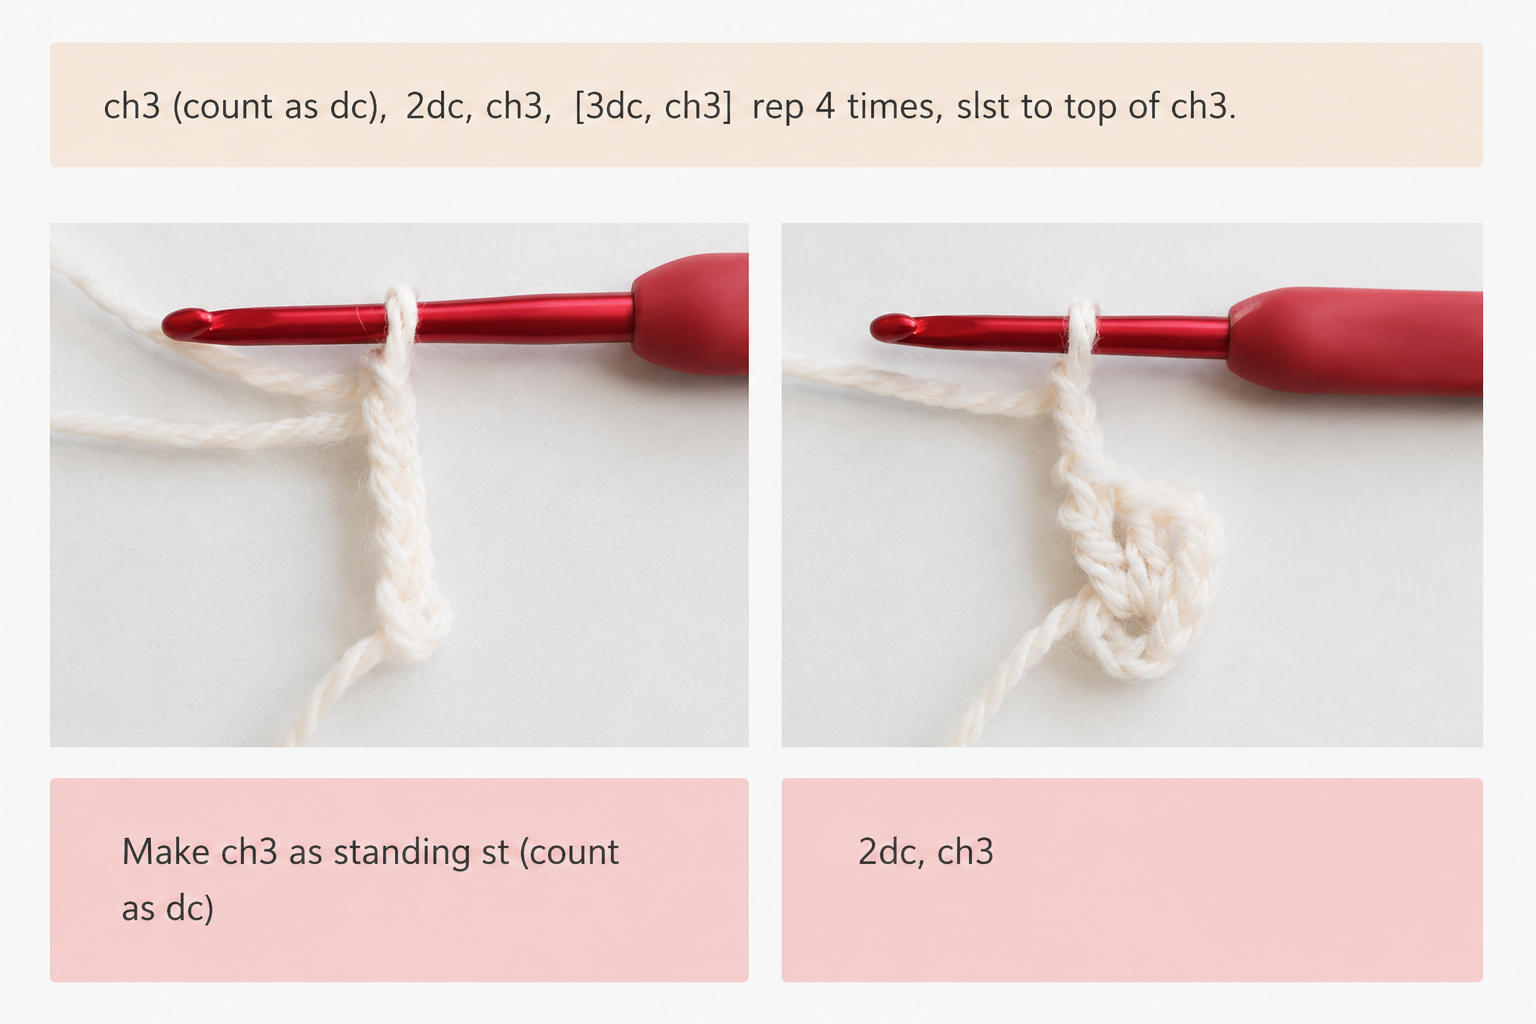
The very first step in this star granny square pattern is creating a solid foundation ring. We start with a magic ring (also called an adjustable loop), which gives you a perfectly closed center with no gaps.
Instructions: Make a magic ring, chain 6, then insert your hook into the first chain stitch and work a slip stitch to close the ring. Pull the tail end gently to tighten the center loop. Round 1 is now complete, and you should have a neat little circle with 6 chain stitches forming the ring.

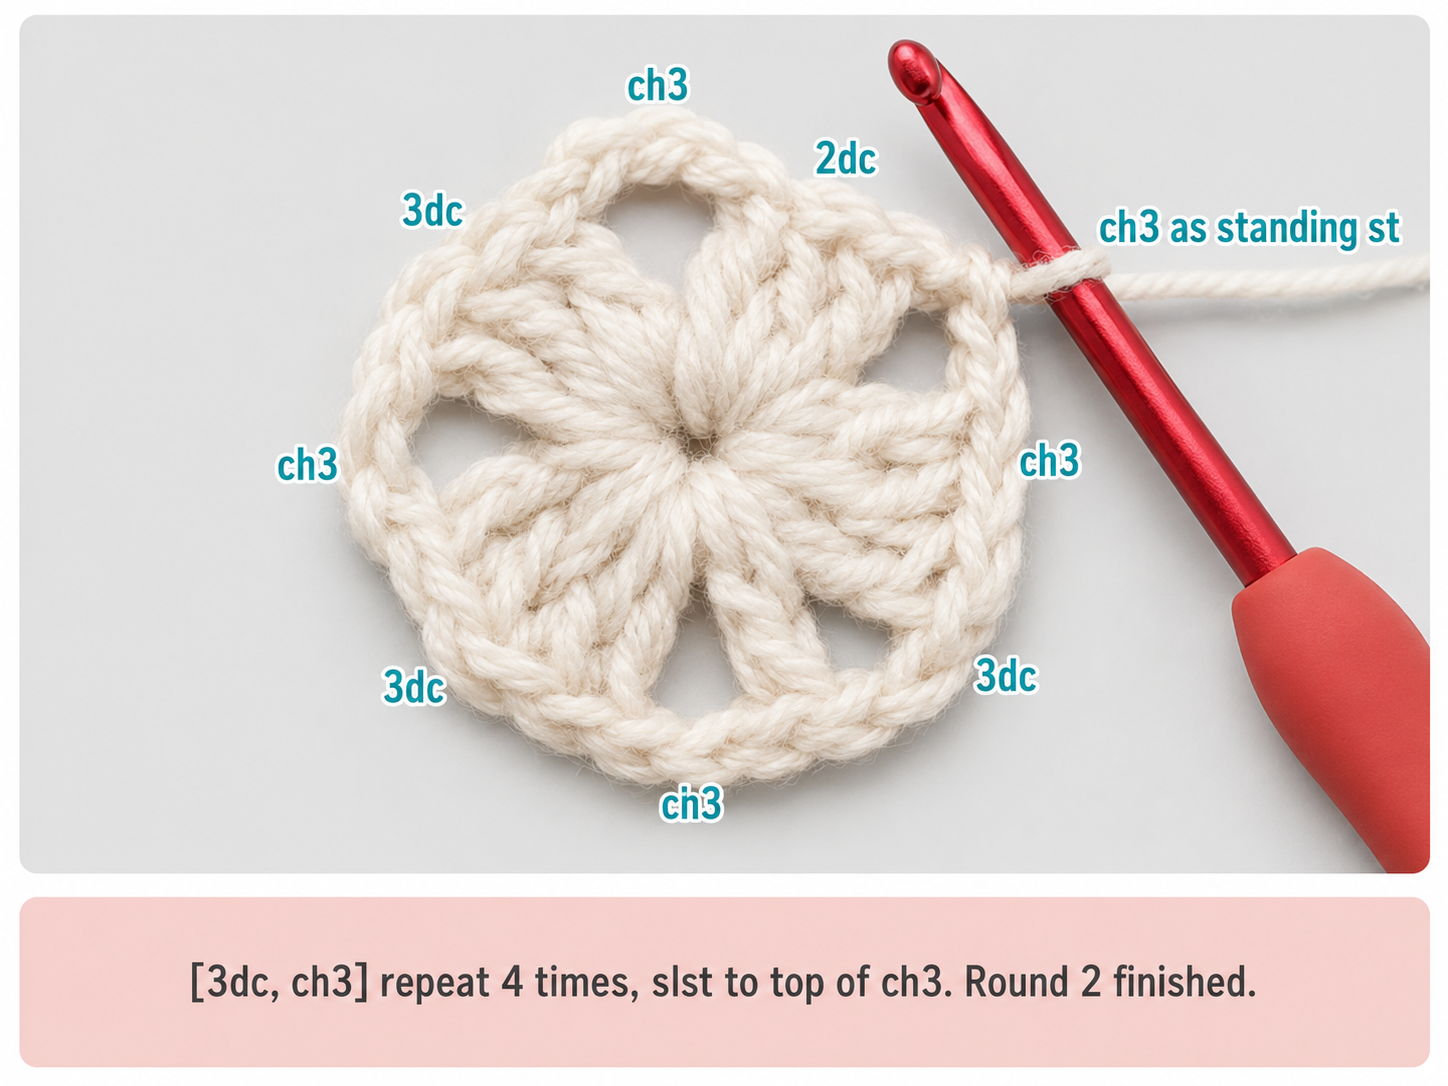
Round 2 — Pentagon Base
In this round of the star granny square pattern, we build a pentagon shape that serves as the underlying framework for our five-pointed star. This is the structural foundation that makes the star possible.
Instructions: Chain 3 (this counts as your first double crochet), then work 2 more double crochet stitches into the ring. Chain 3 to create a corner space, then work 3 double crochet stitches into the ring again. Repeat this sequence — [3 dc, chain 3] — four more times for a total of five groups. Join with a slip stitch to the top of the starting chain 3. You should now have a five-sided pentagon with five chain-3 corner spaces.
Round 3 — Forming the Star Points
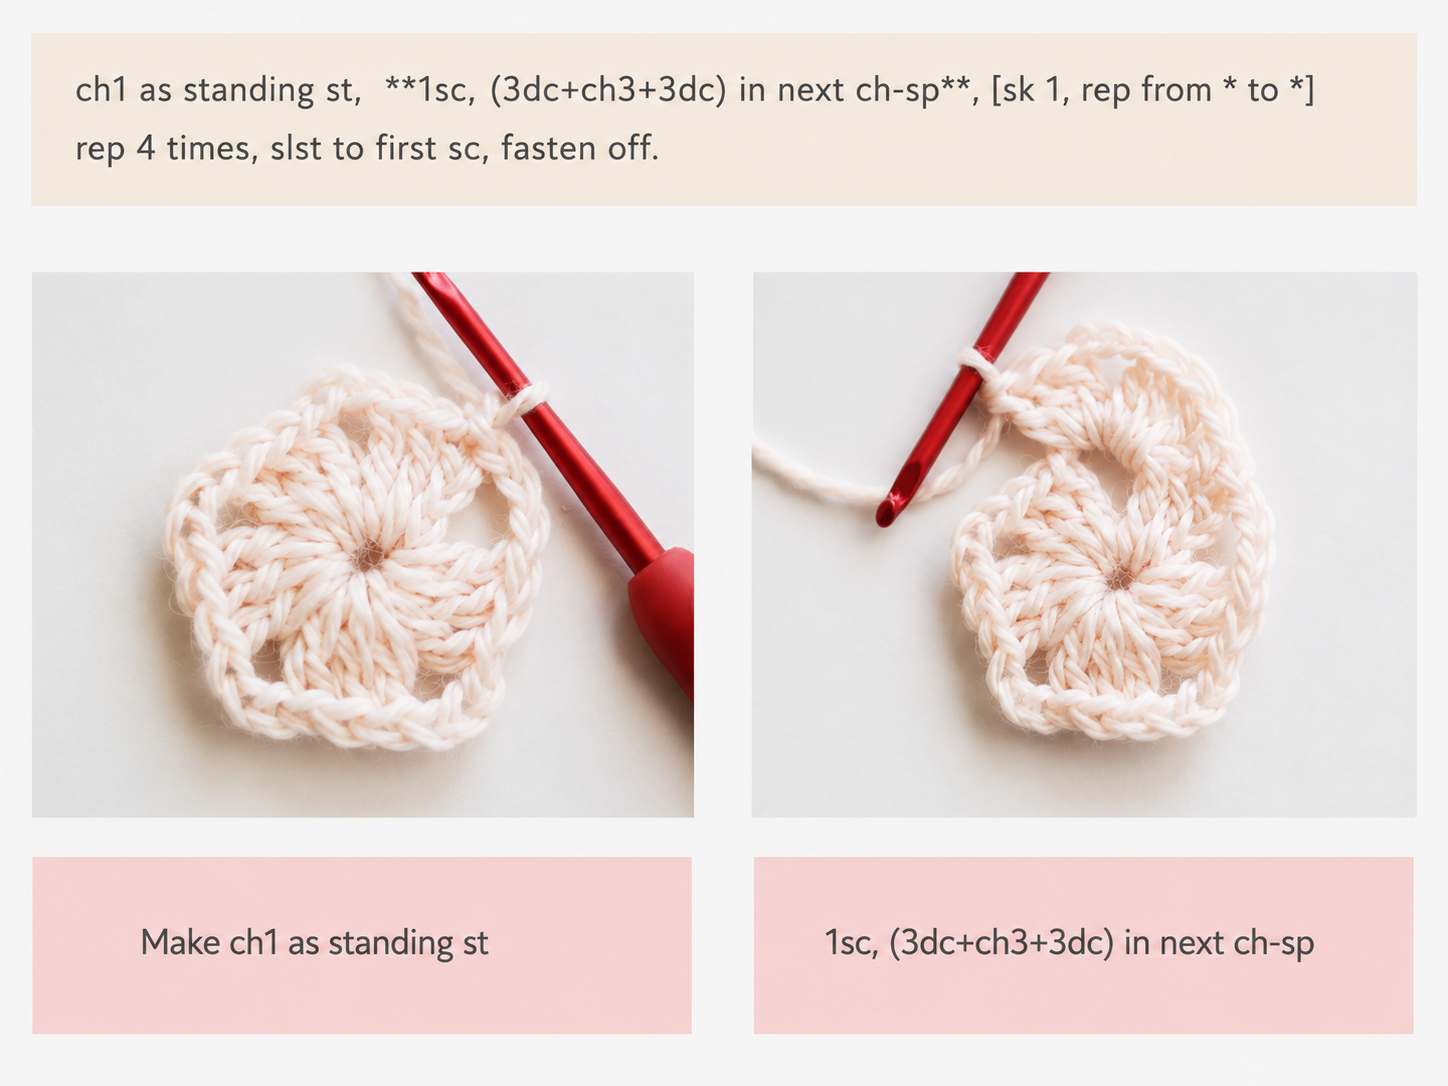
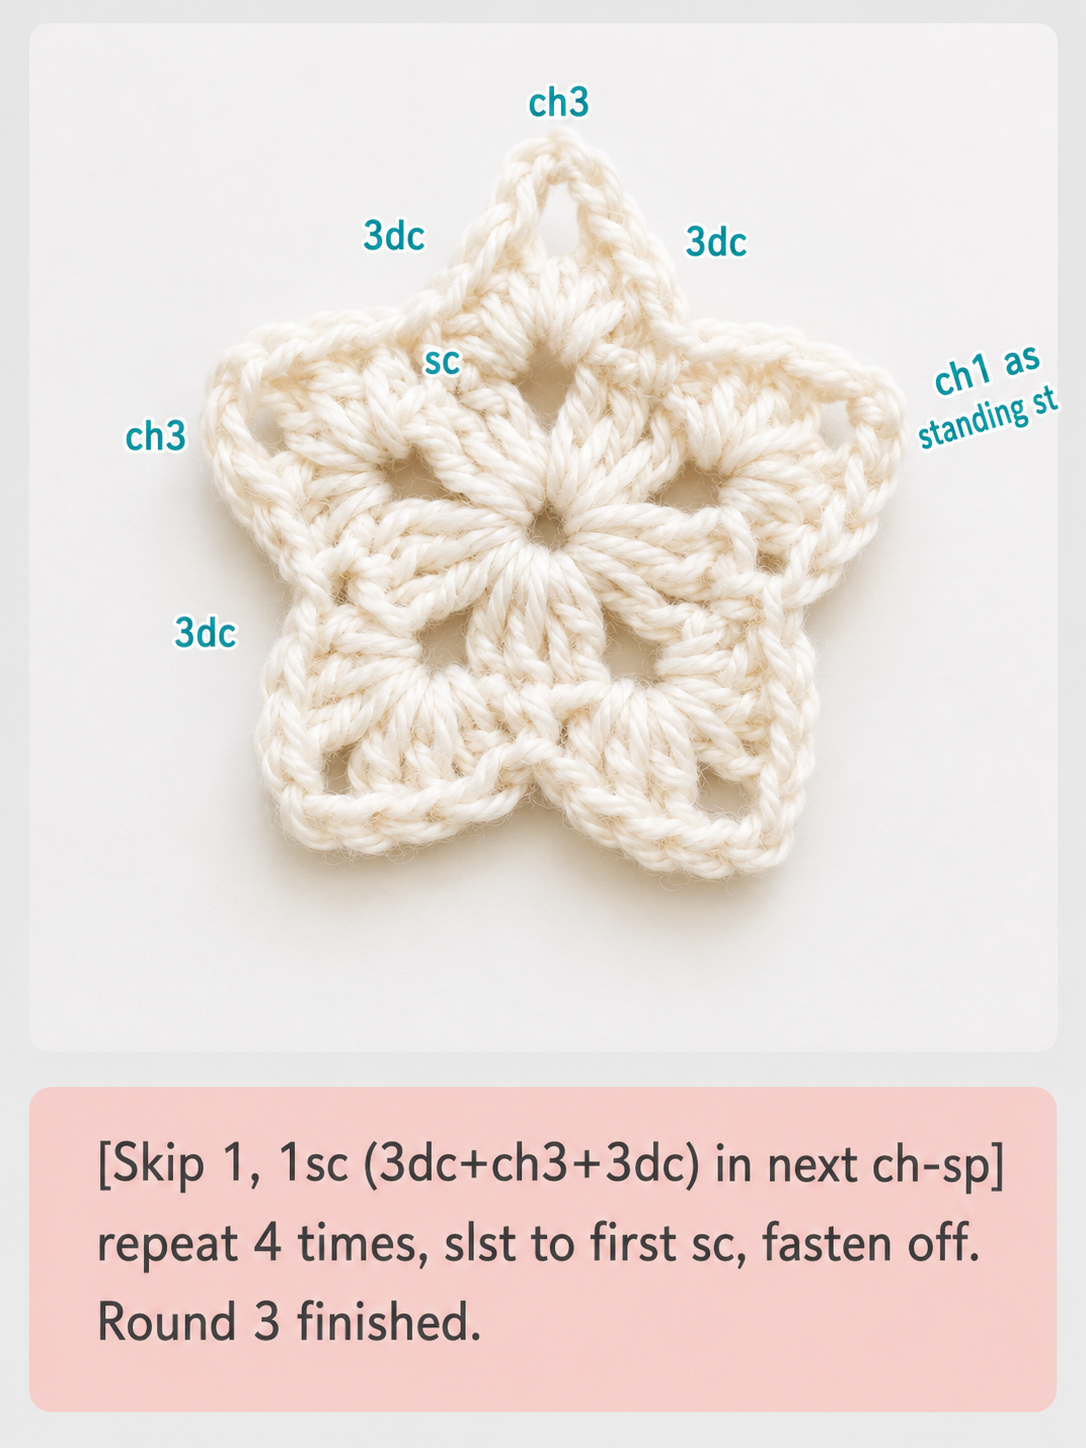
This is the round where the magic happens in any star granny square pattern. We transform the pentagon into a stunning five-pointed star by working shell stitches into each corner space. The shells create the pointed tips that give the star its distinctive silhouette.
Instructions: Chain 1 as a standing stitch. Work 1 single crochet into the next stitch. In the next chain-3 space, work a shell stitch: (3 double crochet, chain 3, 3 double crochet). Then skip 1 stitch, work 1 single crochet, and repeat the shell in the next chain space. Continue this sequence — [skip 1 stitch, 1 sc, shell in next ch-sp] — four more times around the pentagon. Join with a slip stitch to the first single crochet and fasten off Color A. Your star shape should now be clearly visible with five beautiful points radiating outward.
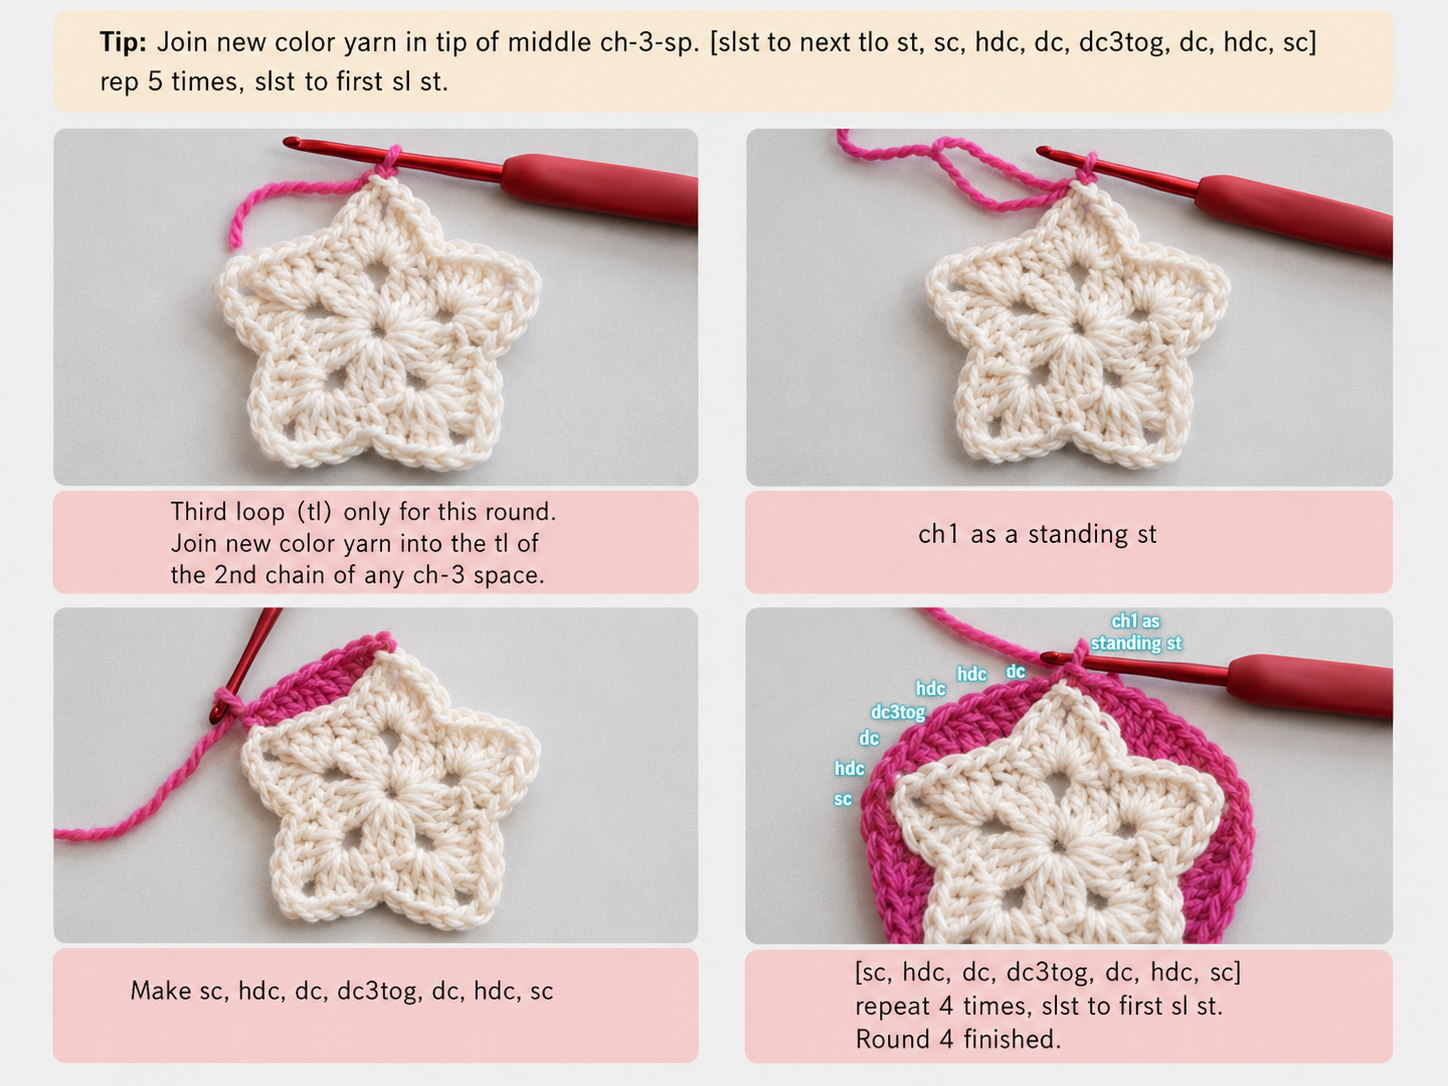
Round 4 — Transitioning to a Circle
Now we begin the process of turning our star applique into a proper square. The first step is converting the angular star shape into a smooth circular outline. This round introduces the dc3tog decrease stitch, which is essential for pulling those sharp star points into gentle curves. If you have never worked a dc3tog before, think of it as a standard double crochet decrease but with three stitches instead of two.
Instructions: Join Color B with a slip stitch in any stitch along the star edge. Chain 3 (counts as first dc). Work 1 double crochet in each of the next few stitches until you reach a star point. At each star point, work a dc3tog decrease across the three stitches at the tip to round it off, then continue with regular double crochet stitches along the next section. Repeat this process around all five star points, using dc3tog decreases to smooth each point into a flowing curve. Join with a slip stitch to the top of the starting chain 3. Your piece should now look like a smooth circle.
Round 5 — Shaping into a Square
In this round of the star granny square pattern, we introduce the classic granny square structure with chain-space corners that define the square shape. This is where your circular piece starts to take on the familiar granny square form.
Instructions: Chain 3 (counts as first dc), then work 2 double crochet stitches. Chain 3 for the first corner space, then work 3 double crochet stitches. Chain 1, work 3 double crochet, chain 3 for the next corner, and work 3 double crochet. Continue this sequence — [3 dc, chain 3, 3 dc, chain 1] — around the circle, placing chain-3 spaces at each corner and chain-1 spaces along the sides. Join with a slip stitch to the top of the starting chain 3. Your piece should now look distinctly square with four chain-3 corner spaces.
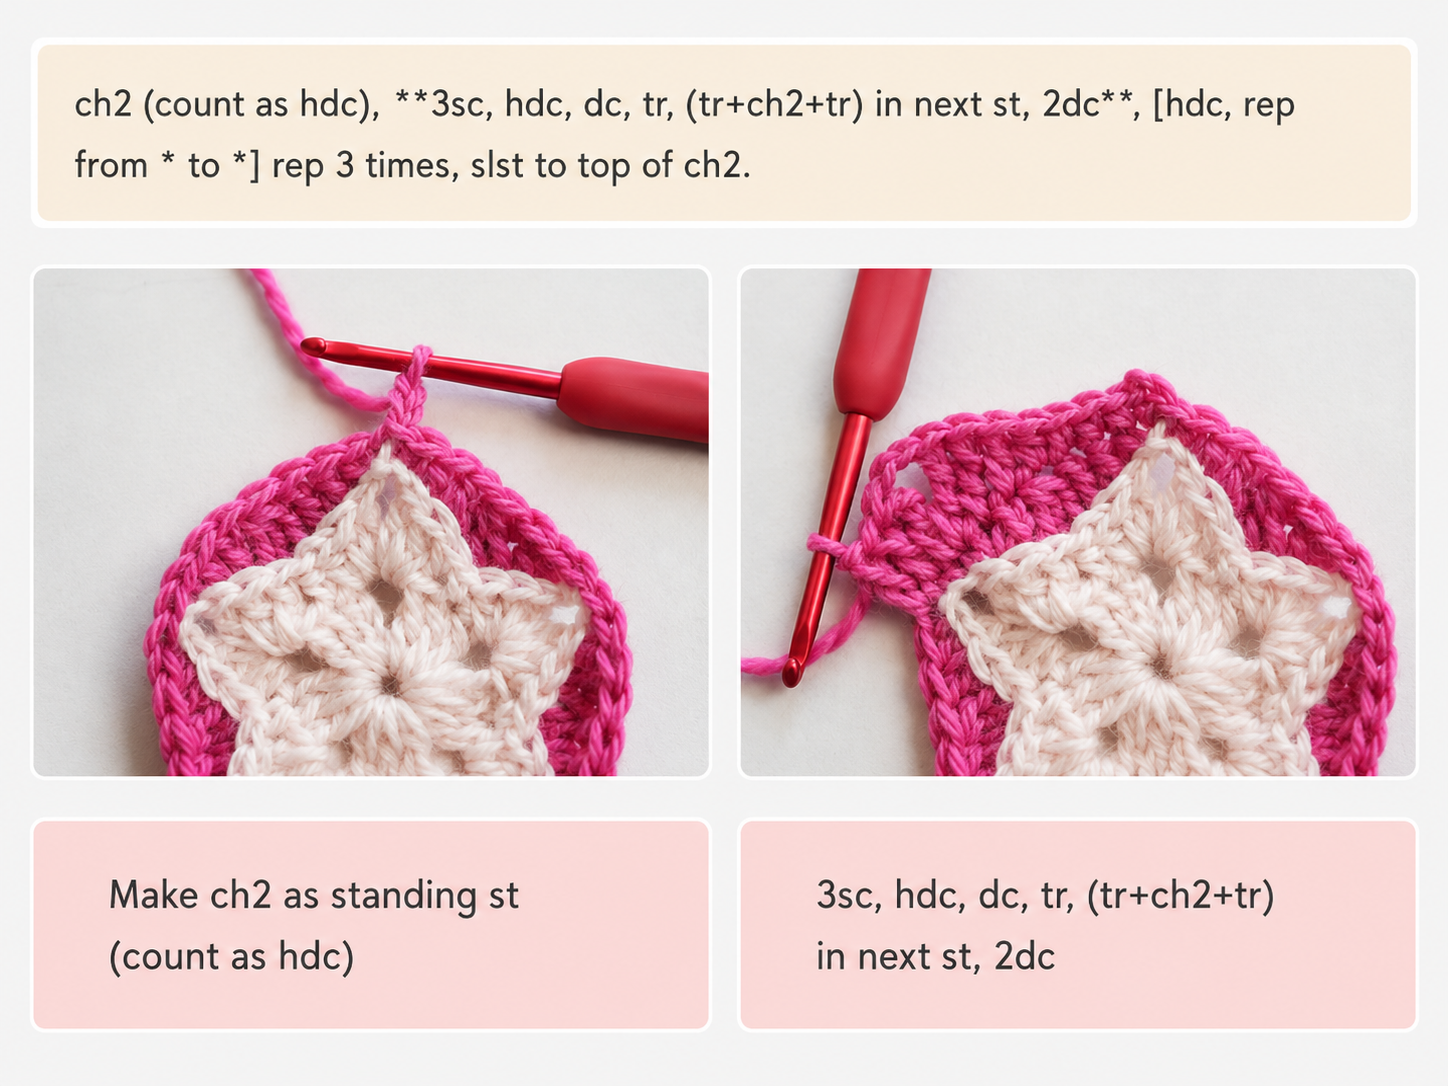
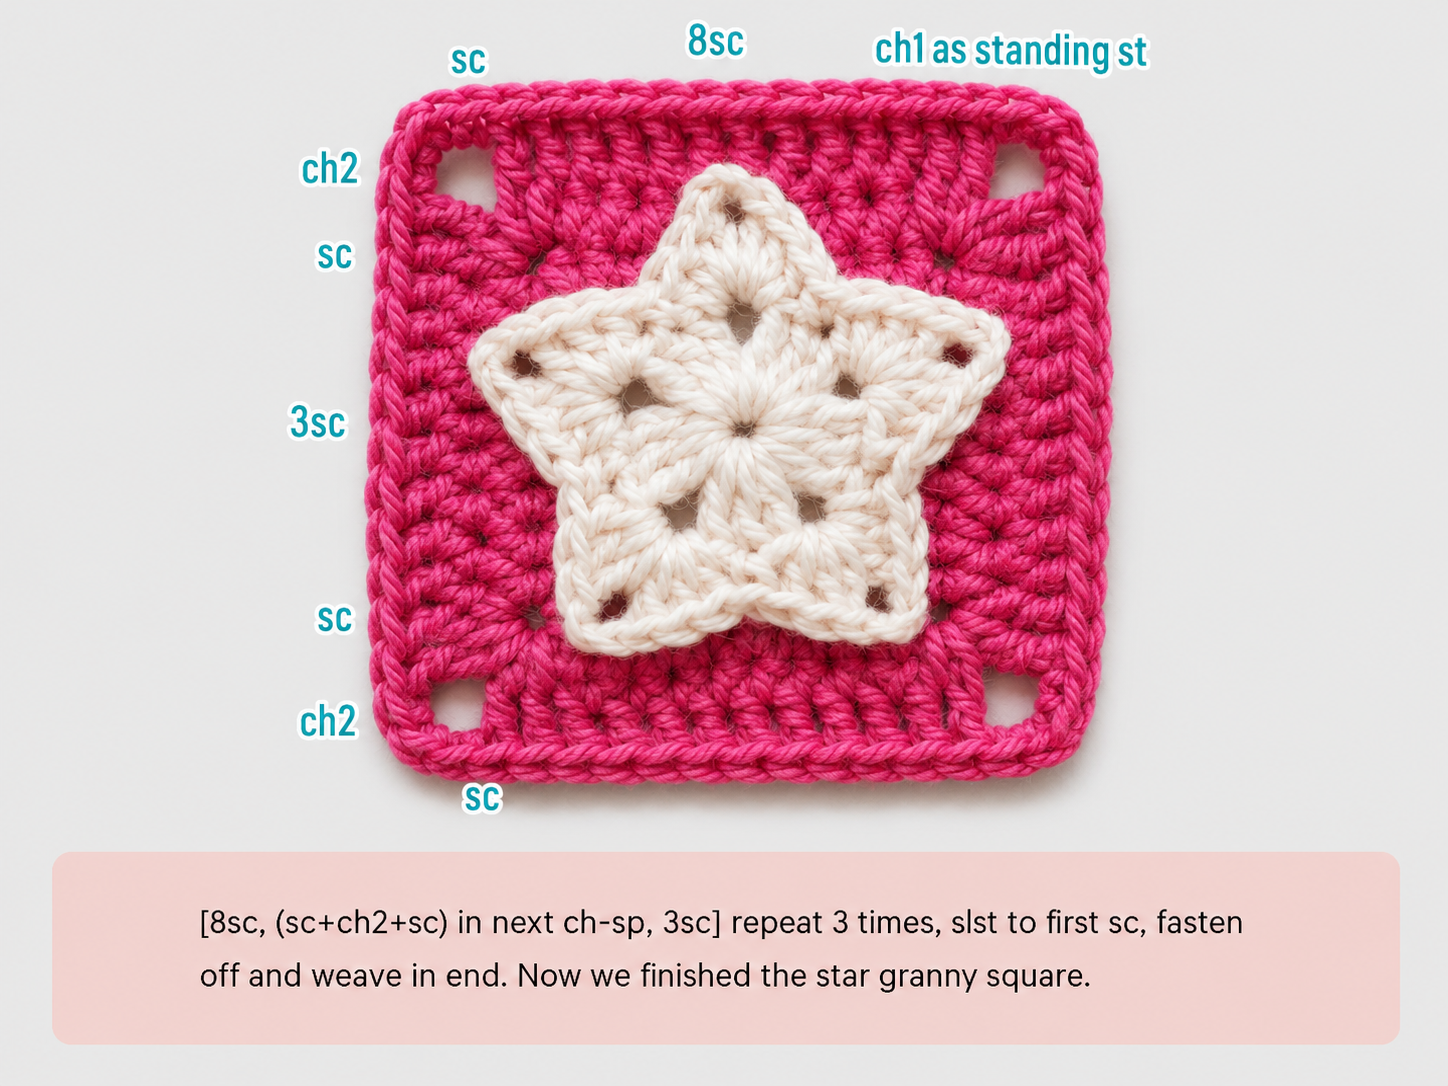
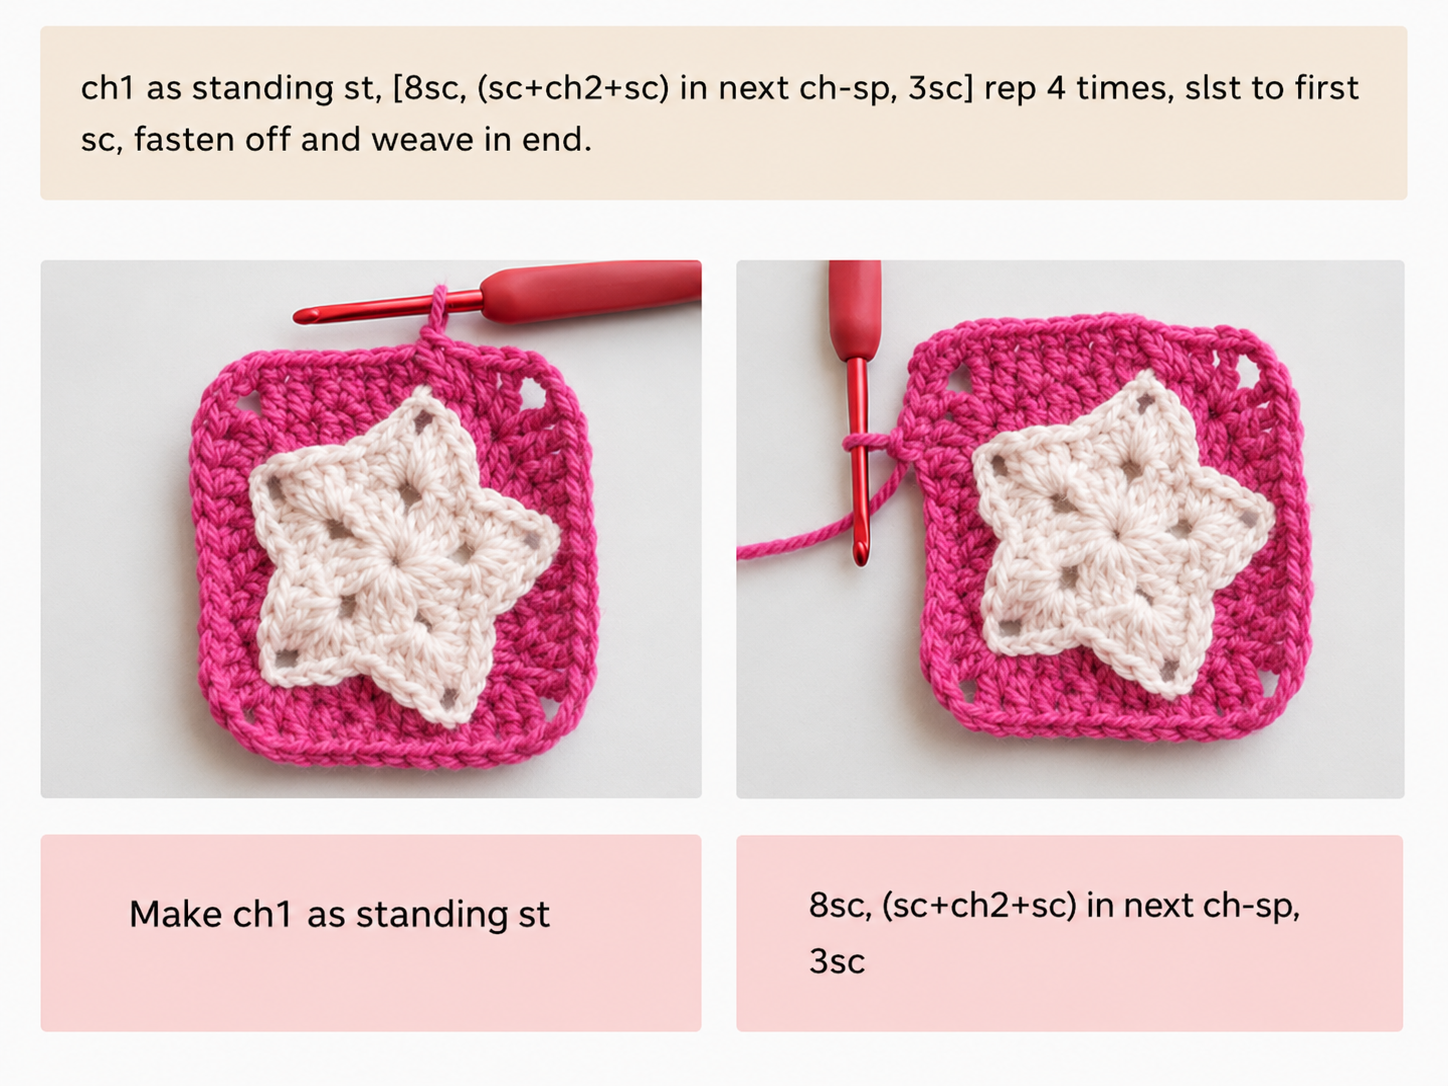
Round 6 — Final Square Border
The final round of this star granny square pattern adds definition and polish to your completed motif. We work a traditional granny square border that fills in the edges and creates a clean, finished appearance.
Instructions: Chain 3 (counts as first dc), work 2 double crochet in the same corner space. Chain 3, then work 3 double crochet in the same corner space to complete the corner. Work 3 double crochet in the next chain-1 space. Continue working 3 double crochet in each space along the sides, and work (3 dc, chain 3, 3 dc) in each corner chain-3 space. Join with a slip stitch to the top of the starting chain 3. Fasten off and weave in all loose ends with your darning needle.
Project Ideas for Your Star Granny Squares
Once you have mastered this star granny square pattern, the possibilities for what you can create are nearly endless. A single square makes a charming coaster or a decorative applique for a tote bag. Stitch several together in a row to create a celestial-themed bunting or garland that looks gorgeous draped across a mantel or挂在 a child’s bedroom wall. If you are feeling ambitious, make 20 or more squares and join them into a full-sized starry night afghan that will become a family heirloom.
Star motifs also look fantastic paired with other geometric granny square designs. Consider alternating your star granny square pattern squares with other free crochet patterns from our collection to create visual variety and added texture. A blanket that combines stars, hearts, and solid granny squares tells a beautiful story and keeps the eye moving across the design. If you enjoy making small, quick accessories, you might also love our crochet bracelet patterns that use similar techniques in miniature form.
Tips for Perfect Results
Here are a few extra tips that will help you get the most out of this star granny square pattern and ensure your finished squares look polished every time:
- Count your stitches at the end of every round. It is much easier to fix a mistake right away than to discover it three rounds later. Keeping a stitch counter handy or simply placing a stitch marker at the beginning of each round can save you a lot of frustration.
- Block your finished squares. Blocking is the secret weapon of any serious crocheter. After completing your square, pin it to a blocking mat or a towel-covered ironing board, spritz lightly with water, and let it dry completely. This step evens out your stitches, opens up your chain spaces, and gives your star granny square pattern a beautifully crisp, professional finish.
- Maintain consistent tension. Uneven tension is the number one cause of wavy edges and misshapen squares. If you notice your stitches getting tighter as you work, try relaxing your grip on the hook. Conversely, if your stitches are getting looser, gently tighten your hold.
- Weave in ends as you go. Instead of leaving all your tails until the very end, weave them in after completing each color change. This keeps your work tidy and prevents tangles that can distort your stitches.
- Use stitch markers for the first stitch of each round. This is especially helpful in the early rounds of the star granny square pattern where the stitch count changes frequently. A simple locking stitch marker placed in the first stitch of each round ensures you always know where your round begins and ends.
Frequently Asked Questions
Can I make this star granny square pattern larger?
Absolutely. You can continue adding rounds in the traditional granny square style — 3 dc in each side space, (3 dc, ch 3, 3 dc) in each corner — to grow your square to any size you need. Each additional round will add approximately one inch to the overall dimensions when using DK weight yarn with a 3.00 mm hook.
Is this pattern suitable for beginners?
Yes, this star granny square pattern is a great project for confident beginners who have already learned the basic stitches (chain, single crochet, double crochet, and slip stitch) and are comfortable working in the round. The only slightly advanced technique is the dc3tog decrease, which is clearly explained above with step-by-step guidance.
How many yards of yarn do I need per square?
For one finished 3-inch square using DK weight yarn, you will need approximately 15 yards of Color A for the center star and 25 yards of Color B for the surrounding frame. This makes the pattern wonderfully economical, especially if you are working from a scrap yarn stash.
Can I use more than two colors?
Of course. While the classic two-color version of this star granny square pattern is the most popular, you can absolutely introduce a third color for the final border round or alternate colors between rounds for a completely different look. Experimenting with color is one of the joys of crochet, so feel free to make this design your own.