

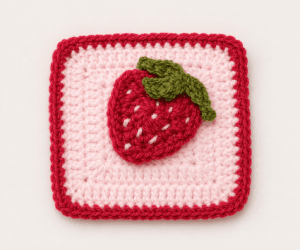
There is something cheerful about this strawberry flower granny square pattern, the red fruit sitting beside soft petals on a green and white base. This pattern combines three separate pieces, a strawberry applique, a six-petal flower, and a solid granny square background, into one motif. I like using these for blankets and cushion covers, but they work just as well as table runners or small wall hangings. None of the individual pieces are hard to make. A confident beginner can handle this, and the finished square looks a lot more impressive than the actual effort that went into it.
What You Will Need
You will need a 4.0 mm or 4.5 mm crochet hook, plus yarn in red for the strawberry, green for leaves and accents, white for the flower center, yellow for the petals, and whatever background color you like for the granny square base. Round that out with scissors, a darning needle for sewing the appliques on, and a tapestry needle for weaving in ends. Stitch markers help too, especially for keeping track of corners as the square grows. The Craft Yarn Council yarn weight chart is a useful reference for matching hook size to your chosen yarn.
Step 1: Crochet the Strawberry Applique
Start by making a magic circle (or chain four and join with a slip stitch to form a ring if you prefer). For the first round, chain three, this counts as your first double crochet, then work 11 more double crochets into the ring. Pull the tail to tighten the circle, and join with a slip stitch to the top of the beginning chain three. You should have 12 stitches total.
Round two is where the strawberry shape starts to emerge. Chain one, then work a half double crochet into the first stitch. Place four double crochets into the next stitch, this creates the first rounded bulge of the berry. Continue working a half double crochet and a single crochet into the following stitch, then one single crochet into each of the next two stitches. Now work a half double crochet and a double crochet into the next stitch to form the bottom point of the strawberry. Mirror the shaping on the other side: a double crochet and half double crochet in the next stitch, two single crochets in each of the next two stitches, four double crochets in the following stitch, and finish with a half double crochet in the last stitch. The result should look like a plump little strawberry with a pointed bottom and a rounded top.
Want a slightly bigger strawberry? Add a third round of single crochet all the way around, placing two single crochets at the top curves and the bottom point to keep the shape right. Fasten off and leave a long tail for sewing.
Step 2: Make the Leaves
A strawberry without leaves looks unfinished, so each one gets a small crown of green. For each leaf, chain six, skip the first chain, and work a single crochet in the second chain. Follow with a half double crochet in the next chain, a double crochet in the one after that, then a half double crochet and a single crochet in the final chain. You’ll end up with a teardrop-shaped leaf, gently pointed at the tip.
Make two or three leaves, however full you want the crown to look. Chain five if you want them smaller, or chain seven for larger leaves. Fasten off each one with a short tail, you’ll use those tails later to attach them to the top of the strawberry.
Step 3: Crochet the Flower Center
The flower starts as a small solid circle, the base the petals will anchor to. Make a magic circle and work 12 single crochets into the ring, then close with a slip stitch. That tight little circle gives you evenly spaced stitches for each petal. White or cream against colorful petals looks good if you want the center to stand out, but any contrasting color will do.
Step 4: Add the Flower Petals
Attach your petal color (yellow is the obvious choice, but not the only one) to any single crochet of the flower center base with a slip stitch. Chain three, which counts as your first double crochet, then work three more double crochets into that same stitch. Chain three again and finish the petal by slip stitching back into the same base stitch. That’s one raised, rounded petal done.
Slip stitch into the next base stitch to move over, then repeat the petal sequence: chain three, four double crochets in the same stitch, chain three, slip stitch to close. Keep going around, six petals total, with one base stitch skipped between each. Fasten off after the sixth petal and weave in the ends. You’re aiming for a full, slightly ruffled flower with all six petals evenly spaced.
Step 5: Crochet the Solid Granny Square
The background is a simple solid granny square, built in increasing rounds. Start with a magic circle or a chain-four ring. Chain three (this counts as your first double crochet), then work two more double crochets into the ring. Chain two, work three double crochets, chain two, work three double crochets, chain two, work three double crochets, chain two, then join with a slip stitch to the top of the beginning chain three. That gives you a small, four-cornered square with chain-two spaces at each corner.
For every round after that, work double crochets along each side and place a corner group, two double crochets, one treble crochet, two double crochets, into each chain-two corner space. A stitch marker in the treble crochet of each corner saves you from losing track of where the next one starts. Keep adding rounds until the square is big enough to hold your appliques comfortably, four rounds works for most projects. Finish with a single crochet border around the whole square for a clean edge.
Step 6: Assemble Everything
Lay the solid granny square flat and position the flower and strawberry on top. I usually put the flower in one quadrant and the strawberry in the corner next to it, with the leaves peeking out behind the top of the berry, but arrange them however looks right to you. Once you’re happy with the placement, use the long tails from each applique to sew them onto the square. Stitch close to the outer edges so the sewing stays nearly invisible. Weave in whatever ends are left, give it a gentle press if it needs one, and the square is done.
If motif-based granny squares are your thing, a few other nature-inspired patterns use similar techniques. The floral granny square pattern and the seed sunflower granny square both lean on the same applique and colorwork approach. For a themed blanket or throw, the heart solid granny square and leaf granny square pair well with this one.
Video Tutorial
The strawberry shaping and petal placement are easier to follow on video than in writing. Press play and crochet along at your own pace.