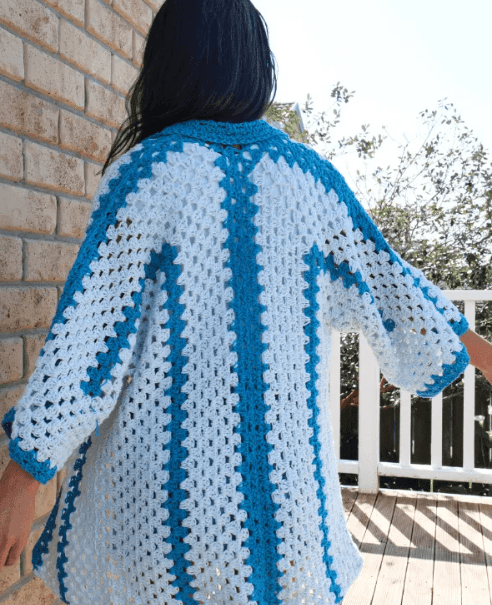
Finished crochet hexagon shirt for men with black base white zigzag trim and button front closure

Men’s Crochet Hexagon Shirt Pattern in 5 Steps: Free Tutorial

A crochet hexagon shirt looks more complicated than it actually is. The whole thing grows from one repeating hexagon motif, joined into two panels for the front and back. Worked in contrasting colors, like the black-and-white version shown here, the seams between hexagons start to read almost like a honeycomb once it’s all assembled. The build happens in five stages: the hexagon foundation, the body panel, the sleeve shaping, joining the two panels, and the collar and edging. None of the individual steps are difficult on their own, there are just a few of them to get through.

Materials and Measurements

Before you begin, you will need approximately 200 grams of 5-ply yarn in black and white (or any two colors you prefer), a 3.5 mm crochet hook, scissors, a tape measure, a yarn needle, and a handful of stitch markers. Take three key measurements: your chest circumference (which you will divide into four sections for shaping), the length from your shoulder down to where you want the shirt to end, and your arm circumference (divided by two for the sleeve width). Having these numbers ready before you start stitching your crochet hexagon shirt will save you a lot of guesswork later. For a guide to yarn weights and hook pairings, the Craft Yarn Council yarn weight chart is a handy reference.

Step 1: Start the Hexagon Motif

Every panel of this shirt begins with a hexagon shape. Make a magic ring, then chain three, this counts as your first double crochet. Work two more double crochets into the ring, chain one, then work three double crochets into the ring again. This forms your first cluster. Repeat the cluster sequence (three double crochets, chain one) until you have five clusters total inside the magic ring. Chain one and close the round by slip stitching into the third chain of your beginning chain three.

Hands crocheting a black hexagon piece for a mens crochet shirt

This first round sets the six-sided shape that the rest of the hexagon builds on. Keep your tension even across all five clusters so it lies flat. If the center cups or domes, your tension is too tight, loosen up a little. If it won’t lie flat and ruffles instead, go the other way and tighten up.

Step 2: Build the Body

Once you have one hexagon done, it is time to turn it into a full panel, the main body of the shirt. For a medium, that is about 13 inches from the underarm down, which works out to roughly 61 chains. Chain 61, then work double crochets across (the chain three counts as your first stitch). Build your clusters by skipping two stitches, placing three double crochets into the third stitch, then repeating that all the way to the end.

Black hexagon crochet piece with stitch markers for shirt construction

When you reach a corner, chain one and place another cluster in the same space, that is what turns it smoothly. Stitch markers earn their keep here. Once the panel grows bigger, it is surprisingly easy to lose track of where one side ends and the next begins. Keep working row after row until the panel reaches your desired body length.

Step 3: Shape the Sleeves

When the body panel reaches the point where the armhole should begin (between the 7th and 8th row for a medium), you need to change your approach. Instead of increasing evenly all around, stop increasing at the armhole section while continuing to increase at the other corners. This creates the opening where the sleeve will sit. Work on each side of the armhole individually, then connect them to form a clean opening. The sleeve itself is shaped by continuing the hexagon pattern but with the increases directed away from the armhole edge.

Step 4: Create and Join the Panels

Once your first panel and its sleeve section are done, repeat the whole process for a second, matching panel, these two become the front and back. For a medium with a 21-inch chest, you are aiming for about 10 extra inches on each panel to reach full chest width. With both panels finished, lay them flat and line up the shoulder edges and side seams.

Positioning a black crocheted hexagon panel with white border for shirt assembly

Join the panels at the shoulders and down the sides, but leave the armholes open. Slip stitches work fine here, or sew it with a darning needle and matching yarn if you would rather. This is also your moment to play with color, swap in stripes or a second tone now if that is the look you want. The version photographed here keeps white for the collar, cuffs, and hem against the black body.

Step 5: Add the Collar and Finishing Details

With the body assembled, the collar comes next. Attach white yarn at the neck edge and work clusters around the neckline, following its natural curve. Keep it snug, two to three rows is usually plenty for a clean, structured finish.

Stitching along the white bordered edge of a crochet hexagon shirt for collar finishing

Finish the raw edges, the hem, the front opening, the armholes, with a row of single crochet in white. That is what gives it a clean, polished border. Want a bit more length in back? Work three or four extra rows along the bottom hem. Sew buttons evenly along the front edge, weave in your ends, and give the finished shirt a gentle stretch to help the stitches settle into place.

Finished crochet hexagon shirt for men with black base white zigzag trim and button front closure

Crochet Hexagon Shirt: Frequently Asked Questions

Can I make this shirt in a different yarn weight?
Yes. This pattern uses a 5-ply (worsted-weight) yarn with a 3.5 mm hook, but you can size up to a 4.0-4.5 mm hook with the same weight for a more open, drapey fabric, or size down for a denser one.

How do I adjust this pattern for a different chest size?
Use your chest circumference divided into four sections as your target panel width, and add or remove hexagon clusters evenly along each row until the panel matches that measurement before you start shaping the armhole.

What is the difference between this hexagon motif and a granny square?
A granny square works in four-sided rounds with corner chain spaces, while this hexagon motif uses five corner clusters per round, giving it six sides instead of four and a slightly different drape when joined into panels.

Do I have to use two colors?
No. The black and white contrast shown here highlights the hexagon texture clearly, but a single color works just as well if you prefer a more subtle, uniform look.

Video Tutorial

Some parts of this, especially the panel joining, make a lot more sense once you see them in motion. Watch the full walkthrough below and crochet along at your own pace.

Want another wearable project after this one? The chunky oversized cardigan pattern is a good next challenge, or scale things right down with the crochet bracelet patterns. And if hexagons got you hooked on geometric motifs, the granny square pattern collection and pet bandana patterns are worth a look too.

Similar Posts

Leave a Reply

Your email address will not be published. Required fields are marked *