Heart Solid Granny Square: Free Pattern with Step-by-Step Tutorial
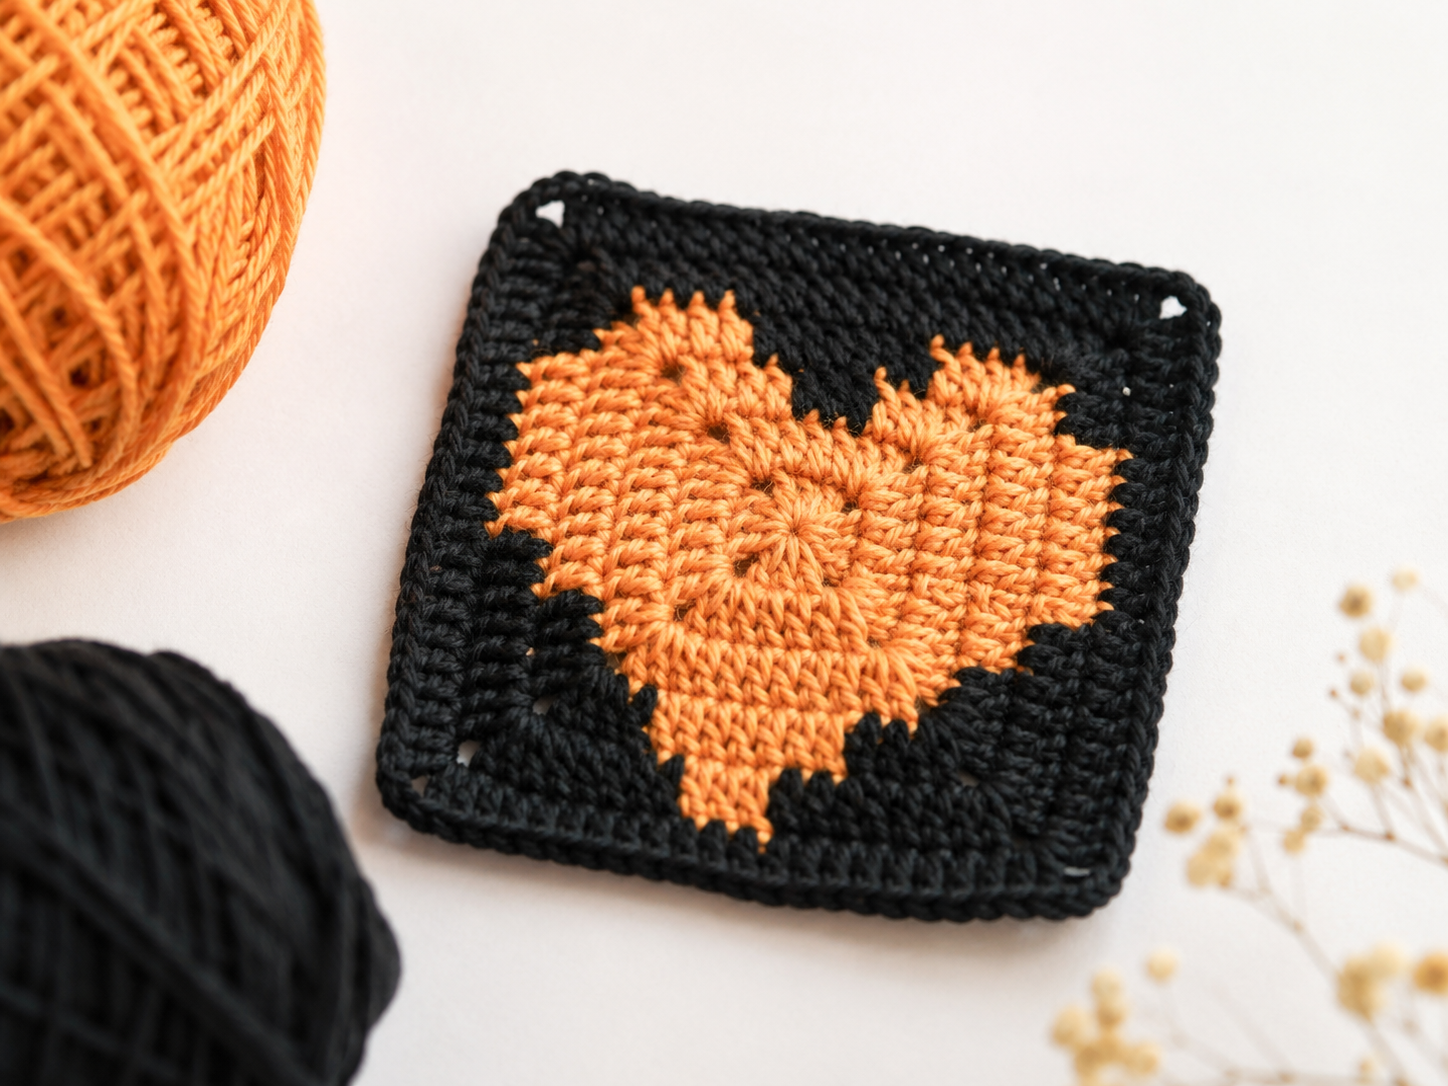
Heart Solid Granny Square Pattern
Looking for a heart granny square pattern with a little extra love stitched right into it? This heart solid granny square is exactly what you need. It combines the classic structure of a solid granny square with a bold heart motif at the center, making it one of those designs that grabs attention the moment someone sees it. Whether you are planning a Valentine’s Day blanket, a heartfelt baby afghan, or just want to add a romantic accent square to a larger project, this pattern delivers on every level.
The beauty of this heart granny square lies in its simplicity. You only need to know the double crochet stitch and how to change colors mid-round, both skills that most crocheters pick up early on. The design uses a solid background with the heart worked in a contrasting color, which means no gaps, no holes, just a smooth, clean square with a crisp heart shape sitting right in the middle. The tight, solid stitching gives the finished piece a satisfying weight and durability, perfect for blankets, pillows, and wearables that need to hold up over time.
In this heart granny square tutorial, we will walk through each round together. This pattern sits right alongside our other popular granny square patterns as a must-try design. I will show you exactly where to place each stitch, how to switch yarns at the right moment, and how to keep your tension even so the heart shape comes out looking sharp. Every round is photographed so you can double-check your work as you go. Grab your two favorite colors and let’s get started.
Materials You’ll Need
- Yarn: 2 colors — one for the heart, one for the background. Any medium-weight (worsted/DK) yarn works beautifully.
- Crochet hook: A 3.00mm hook (or whatever size gives you a tight, even gauge with your chosen yarn)
- Darning needle: For weaving in ends
- Scissors
- Stitch marker (optional): Helpful for marking the first stitch of each round
Color Combination Ideas
The original design uses a warm peachy-orange heart on a deep black background, and the contrast is absolutely stunning. The solid stitching technique is similar to what we use in our 3D flower granny square — both patterns benefit from tight, even tension. That dark background makes the heart leap right off the square. But you can go in so many directions with this heart granny square pattern. A bright red heart on a crisp white square gives you that classic Valentine’s look — perfect for February projects. Try a soft pink heart on charcoal gray for something elegant and modern that works for nursery decor year-round. A burgundy heart on cream would look right at home in a farmhouse-style blanket. And if you want something playful, how about a hot pink heart on a mint green background? The solid stitching means any color pairing you choose will look polished and defined.
Gauge and Finished Size
With a 3.00mm hook and standard worsted-weight yarn, your finished heart granny square should measure approximately 4.5 inches by 4.5 inches. Keep in mind that gauge varies between crocheters — if you tend to crochet tightly, your square might come out a bit smaller, and if your tension is looser, it might run a touch larger. The important thing is consistency. If you are making multiple heart granny squares for a blanket, they will all match as long as your tension stays the same throughout.
Abbreviations (US Crochet Terms)
- ch — chain stitch (if you need a refresher on basic stitches, check our beginner crochet guide)
- dc — double crochet
- ch-sp — chain space
- sl st — slip stitch (used to join rounds)
- st(s) — stitch(es)
- yo — yarn over
- incomplete dc — a double crochet stopped before the final yarn over (used for color changes)
Special Techniques
Before we start the rounds, let’s cover two techniques that make this pattern possible: color switching and the incomplete double crochet.
How to Switch Yarn Colors
When the pattern tells you to switch from Color A to Color B, you do not simply drop one yarn and pick up another. Instead, you finish the last stitch of Color A as an incomplete double crochet. This means you yarn over, insert your hook into the next stitch, pull up a loop, yarn over, and pull through two loops — but you stop there, leaving two loops on your hook. Now, pick up Color B and yarn over with it, pulling through those two remaining loops to complete the stitch. From that point on, you continue crocheting with Color B until the next switch. This technique creates a clean, almost invisible color change that keeps the heart boundary looking sharp and professional.
How to Make an Incomplete Double Crochet
Here is the full breakdown: yarn over, insert your hook into the stitch, yarn over and pull up a loop (now you have three loops on the hook), yarn over and pull through the first two loops (now you have two loops remaining). Stop here. This is your incomplete dc. Pick up your new color, yarn over, and pull through both loops. That single stitch now carries both colors seamlessly. Drop the old color and continue with the new one.
Step-by-Step Instructions
Round 1 — Magic Ring Foundation
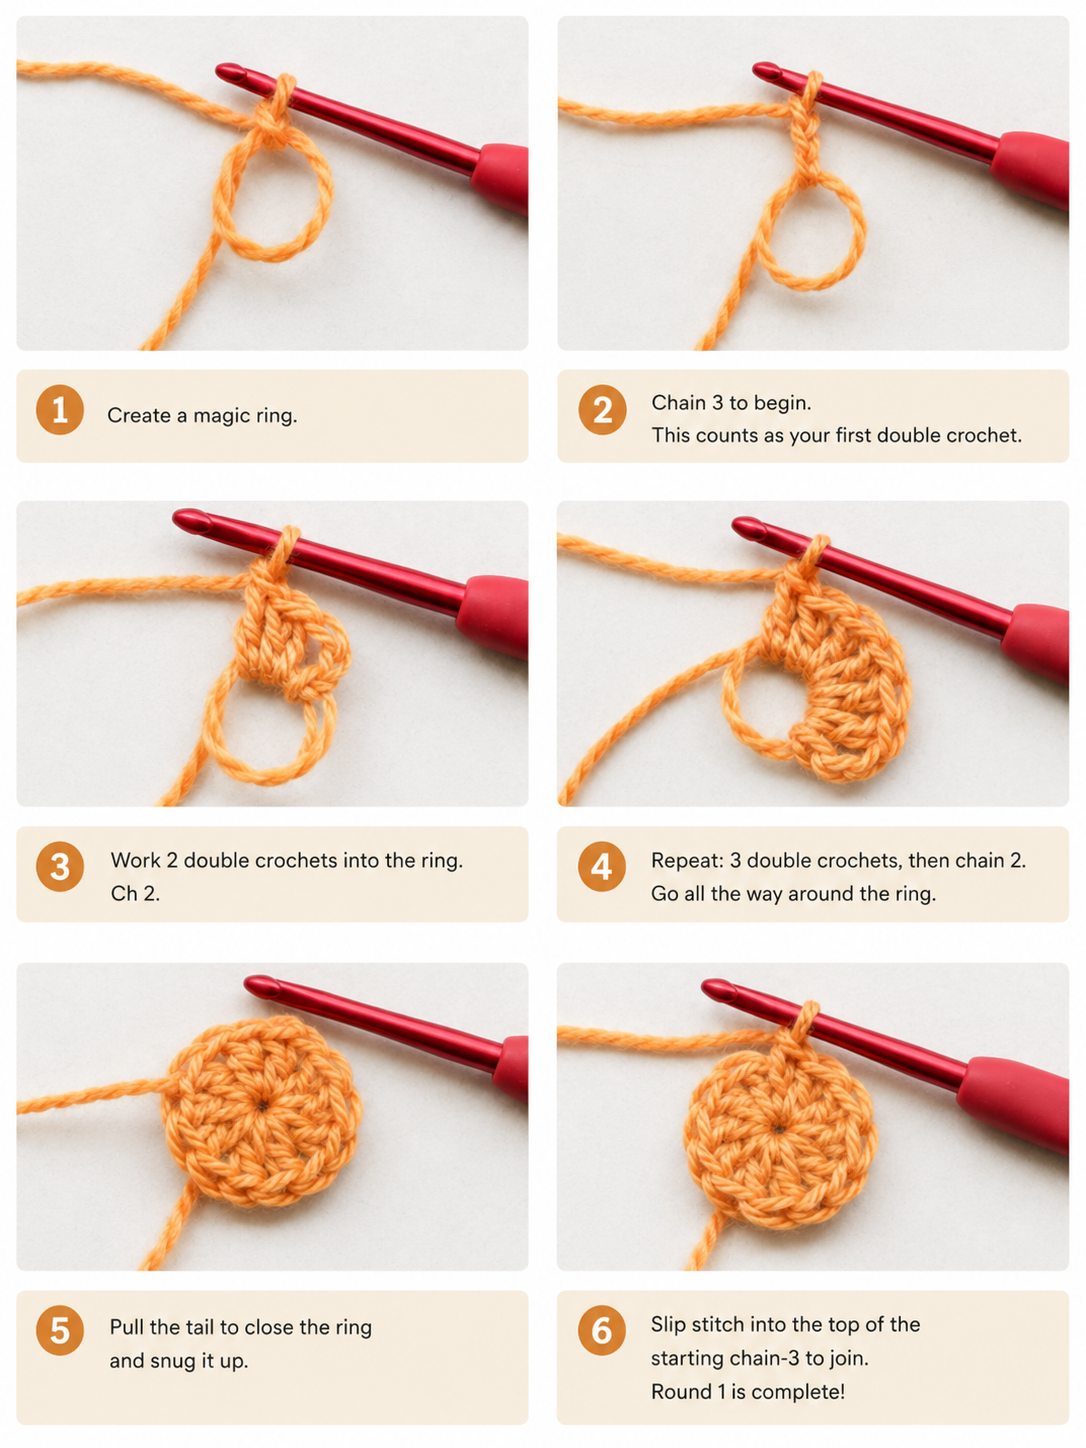
Start with a magic ring. Chain 3 (this counts as your first double crochet). Work 2 double crochet stitches into the ring, then chain 2. Now repeat the following sequence three times: 3 double crochet into the ring, chain 2. Pull the tail of the magic ring tightly to close the center. Slip stitch into the top of the beginning chain 3 to join the round.
At the end of Round 1, you should have four groups of 3 double crochet separated by four chain-2 corners. This is your basic heart granny square foundation — 12 double crochet stitches total with a neat, closed center.
Round 2 — Corner Increases
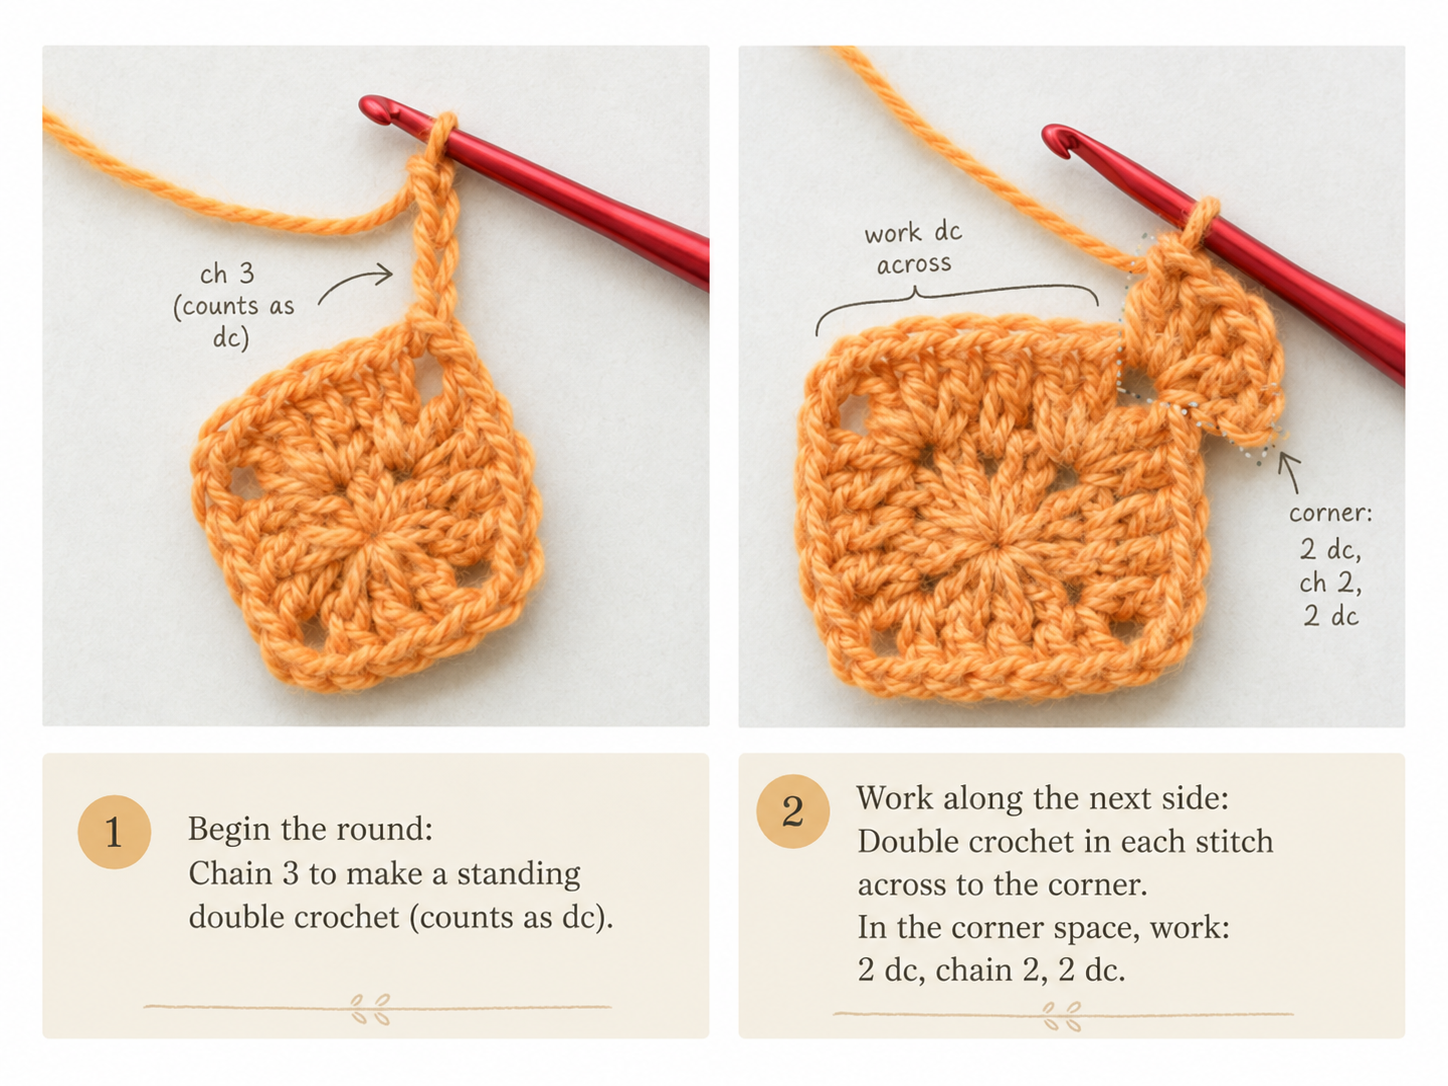
Chain 3 (counts as first dc). Work a double crochet into each of the next 2 stitches. In the first corner chain-2 space, work 2 double crochet, chain 2, then 2 more double crochet. This creates your first corner increase. Now repeat the following around: double crochet in the next 3 stitches, then in the next corner space, work 2 dc, ch 2, 2 dc. Do this for all four corners. Slip stitch to the top of the beginning chain 3 to close.
Round 2 gives you a solid, evenly shaped square. Each side now has 5 double crochet stitches and each corner has a chain-2 space. The square should lie flat with no curling. If it cups or ripples, adjust your tension slightly for the next round.
Round 3 — Starting the Heart
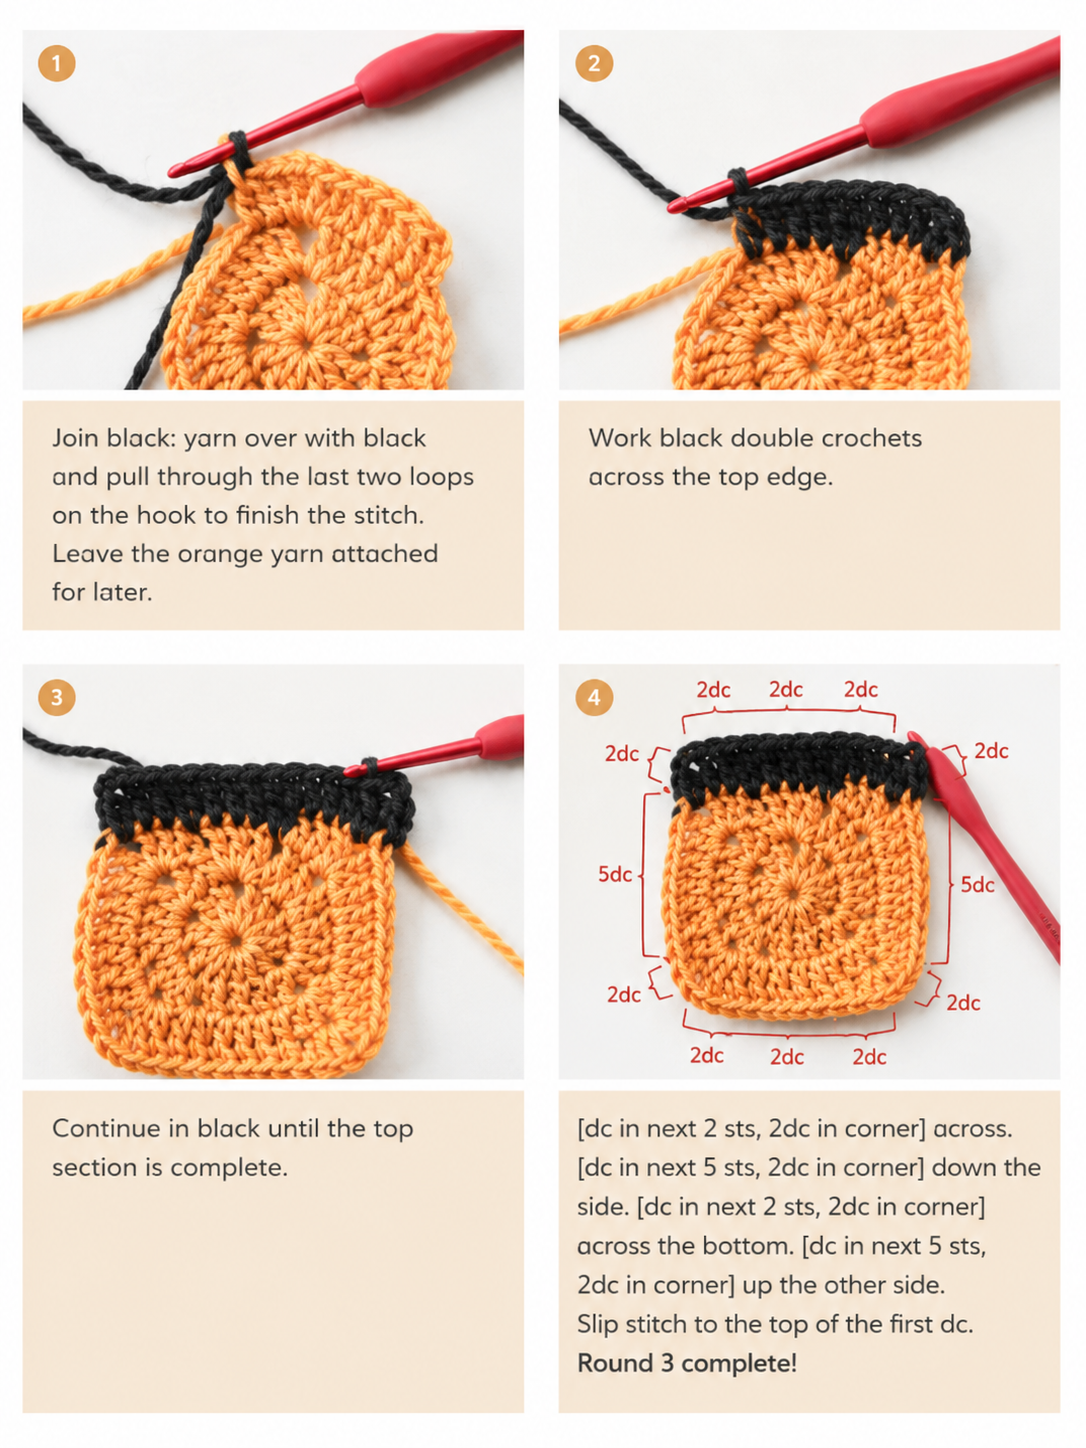
This is where the magic happens — Round 3 is where the heart shape begins to emerge through your first color changes. Chain 3 as your standing stitch. Work a double crochet in each of the next 4 stitches. In the corner space, work 2 dc, chain 2, 2 dc. Work one dc in the next stitch. Now work an incomplete dc in the following stitch and complete it with your background color (Color B). Work 2 dc with the background color, then work another incomplete dc and complete it with your heart color (Color A).
Continue around: dc in the next 2 stitches with Color A, 2 dc, chain 2, 2 dc in the corner space, dc in the next 5 stitches — repeat this sequence twice. Then work 2 dc, chain 2, 2 dc in the final corner space, dc in the next 2 stitches. Slip stitch to the top of the beginning chain 3.
After Round 3, you should see the very beginning of the heart shape taking form. The two small bumps of color peeking out from the top edges of the square are the start of the heart’s lobes. It might not look like much yet, but Rounds 4 and 5 will bring it into clear focus.
Round 4 — Expanding the Heart
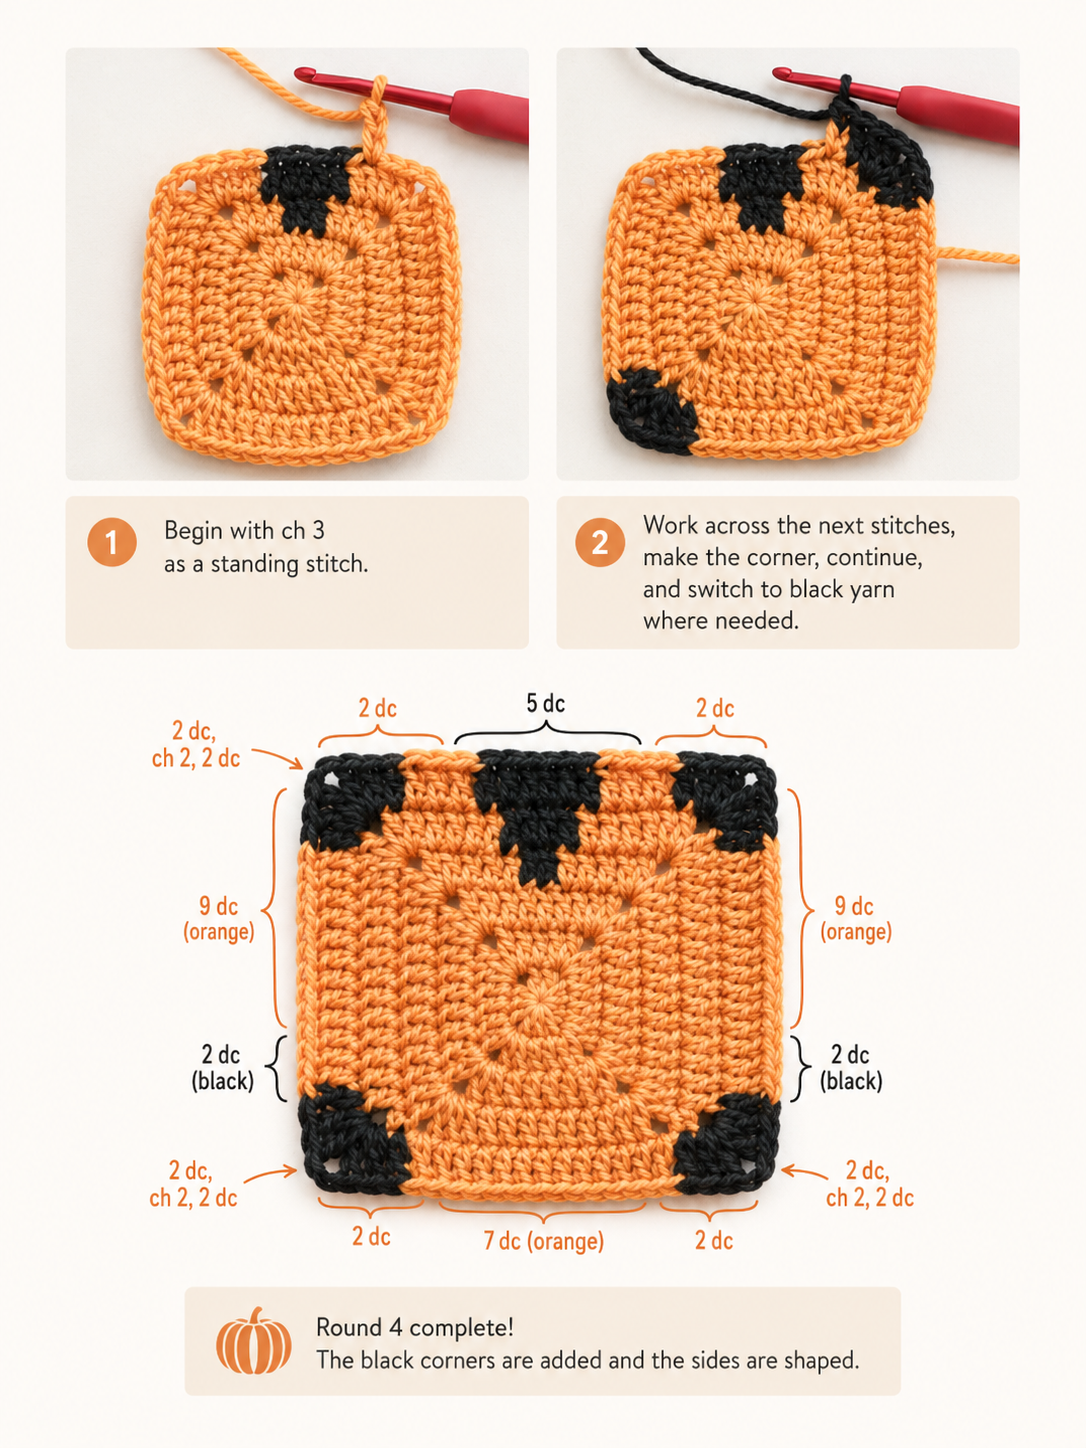
Chain 3 as your standing stitch with Color A (the heart color). Double crochet in the next 6 stitches. Work 2 dc, chain 2, 2 dc in the corner space. Work 2 dc with Color A, then switch to Color B. Work 7 dc with Color B, then switch back to Color A. Work 2 dc with Color A, then 2 dc, chain 2, 2 dc in the corner space with Color A. Work 9 dc in the following stitches with Color A, then switch to Color B. Work 2 dc with Color B, then 2 dc, chain 2, 2 dc in the corner space. Work 2 dc with Color B, switch to Color A, work 7 dc with Color A. Switch to Color B, work 2 dc, 2 dc, chain 2, 2 dc in the corner space. Switch to Color A, work 2 dc. Slip stitch to the top of the beginning chain 3.
This round has the most color switches in the entire pattern, and that is what gives the heart its shape. You are essentially tracing the outline of the heart by alternating between the heart color and the background color at precise points. Take your time with this round — each color switch matters for the final look. If your heart outline looks a little wobbly, that is completely normal at this stage. Round 5 will tighten everything up.
Round 5 — Defining the Heart
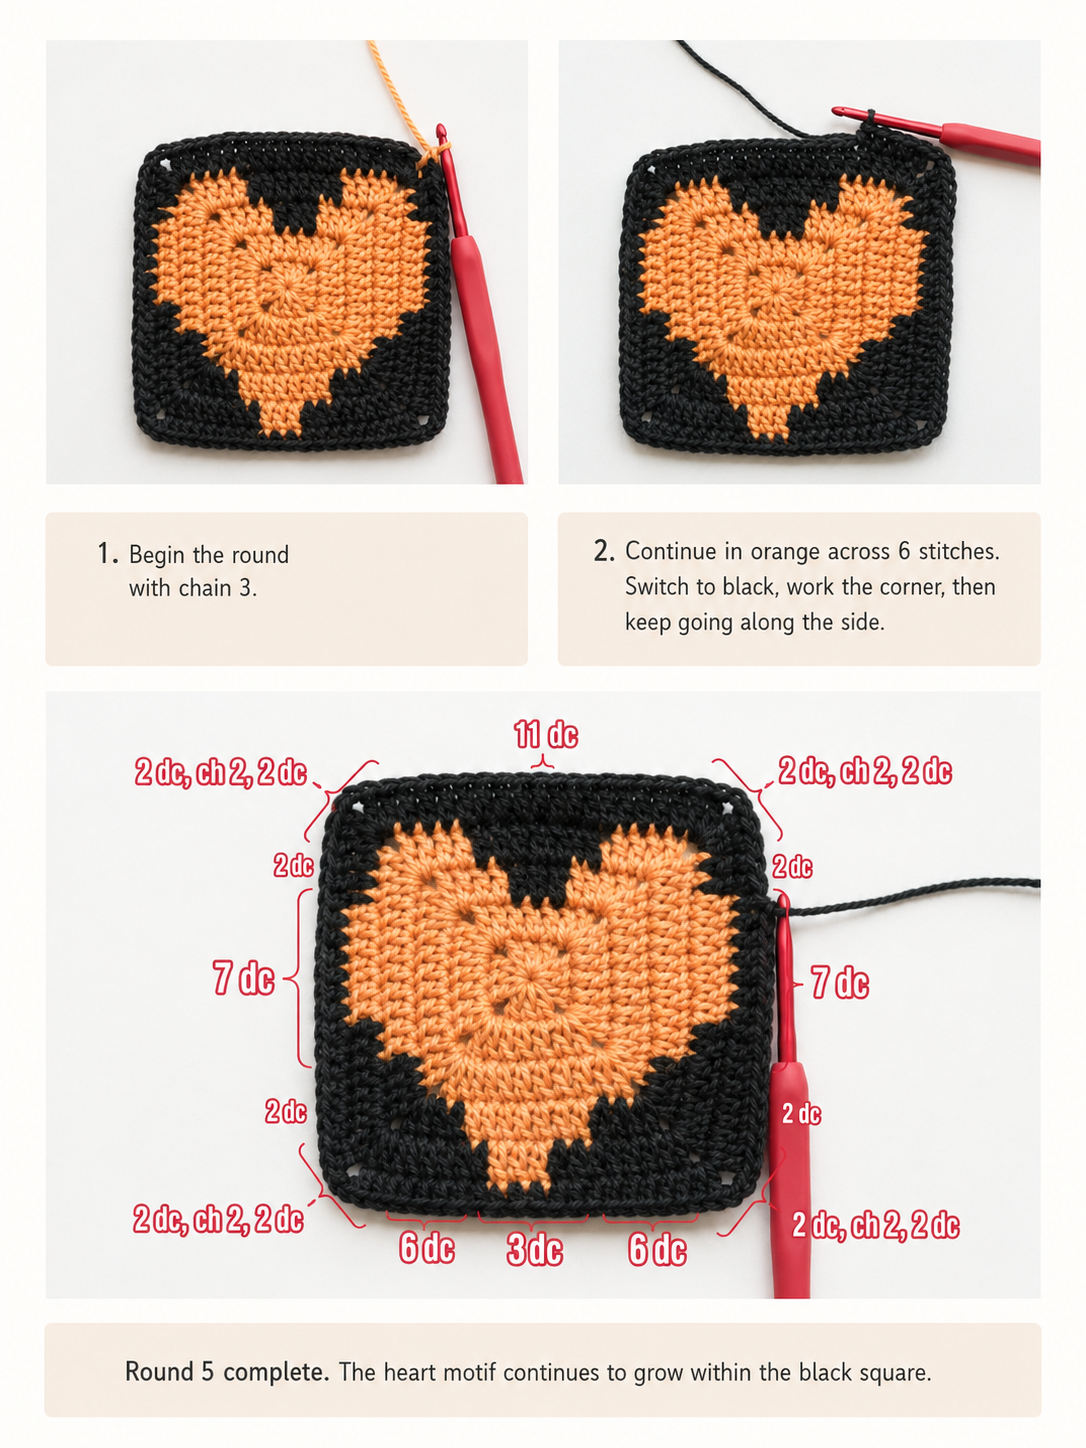
Chain 3 as your standing stitch. Work 6 dc, then switch to Color B. Work 2 dc with Color B, then 2 dc, chain 2, 2 dc in the corner space. Work 15 dc in the following stitches. Work 2 dc, chain 2, 2 dc in the corner space. Work 2 dc, then switch back to Color A. Work 7 dc with Color A, then switch to Color B. Work 6 dc with Color B, then 2 dc, chain 2, 2 dc in the corner space. Work 6 dc, then switch to Color A. Work 3 dc with Color A, switch to Color B. Work 6 dc with Color B, then 2 dc, chain 2, 2 dc in the corner space. Work 6 dc. Slip stitch to the top of the beginning chain 3.
By the end of Round 5, the heart should be clearly visible and well-defined. The lobes at the top should be symmetrical, the point at the bottom should be sharp, and the contrast between the two colors should make the shape unmistakable. This is the most satisfying round because you can finally see the heart in its full glory.
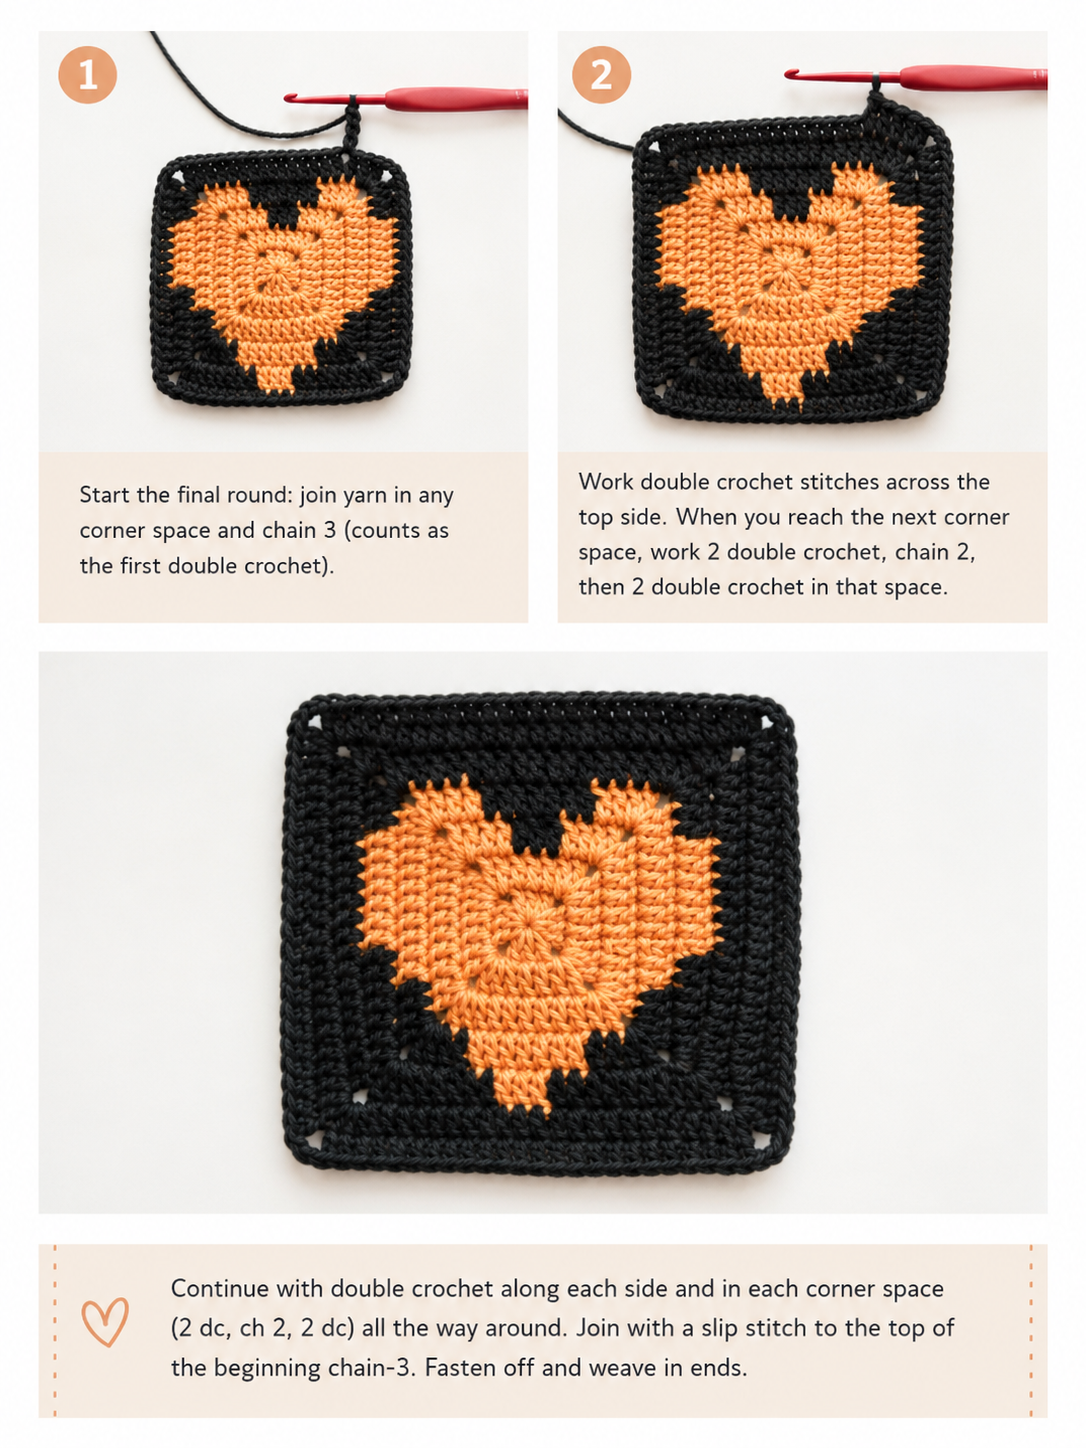
Round 6 — Final Border
Switch to your background color for the final round. Chain 3 (counts as 1 dc). Work 10 dc. In the corner space, work 2 dc, chain 2, 2 dc. Work 8 dc. Now repeat the following three times: 11 dc, 2 dc, chain 2, 2 dc in the corner space, 8 dc. Slip stitch to the top of the first chain 3 and fasten off.
Round 6 creates a clean, solid border around your heart granny square in a single color that frames the heart beautifully and gives you perfectly even edges for joining squares together. The final square should lay completely flat with no curling at the corners. Weave in all your loose ends with the darning needle, and your heart granny square is complete — a gorgeous little piece ready for any project.
What Can You Make With Heart Granny Squares?
These heart squares are incredibly versatile. Join nine of them in a 3×3 grid and you have a cozy throw pillow cover with a scattering of hearts. Make 20 or 30 and sew them together for a full-sized afghan that is perfect for Valentine’s Day or an anniversary gift. A single square makes a charming coaster or a framed piece of wall art — especially if you block it stiff and mount it in a shadow box. If you are feeling ambitious, try a garment: a cardigan panel made entirely of heart squares would be a showstopper at any craft fair. And for quick gift-giving, a 2×2 arrangement makes a sweet love-themed washcloth or dishcloth set.
Tips for Perfect Results
- Keep your tension consistent. Since this heart granny square is solid (no gaps), uneven tension shows up immediately. If your stitches are tighter on one side, the square will pull and the heart will look distorted.
- Block your finished square. A quick steam or wet blocking works wonders. If you are new to blocking, the Craft Yarn Council has excellent resources on standard crochet techniques and care. Pin the square to a flat surface, spray lightly with water, and let it dry completely. This evens out all the stitches and makes joining much easier.
- Use stitch markers. Placing a marker at the start of each round helps you keep track, especially in Rounds 4 and 5 where the color changes can get confusing.
- Do not pull too tight when switching colors. A gentle, even pull keeps the transition neat. If you yank the yarn, you will see a gap or distortion at the color change point.
- Choose colors with strong contrast. The heart shape reads best when the two yarns are clearly different. Dark on light, light on dark, or two vibrant colors that complement each other all work well.
Pattern Quick Reference
Materials: 2 colors of worsted-weight yarn, 3.00mm hook, darning needle, scissors
Gauge: Approximately 4.5 x 4.5 inches
Difficulty: Beginner to intermediate
Techniques: Magic ring, double crochet, color switching, incomplete double crochet
Frequently Asked Questions
How many rounds does the heart granny square take?
This solid heart motif works up in just a few rounds using filet-style increases and color blocks to form the heart shape against a solid background.
What yarn weight works best for the heart granny square?
A worsted-weight (#4) cotton or acrylic with a 4.5–5.5 mm hook gives the cleanest heart shape and the easiest stitch definition for beginners.
Can I use the heart granny square in a blanket?
Yes — repeat the motif in your favorite color combinations and join them like any other granny square for a heart-themed blanket, pillow, or wall hanging.
How do I keep the heart shape from looking lopsided?
Keep your tension even on both sides of the heart and count your stitches at each color change; a quick block after finishing also helps the motif lie flat and symmetrical.