Granny Square Vest Pattern Free: 7 Easy Designs (XS to 5XL)
As an Amazon Associate we earn from qualifying purchases: some supply links in this post are affiliate links, at no extra cost to you.
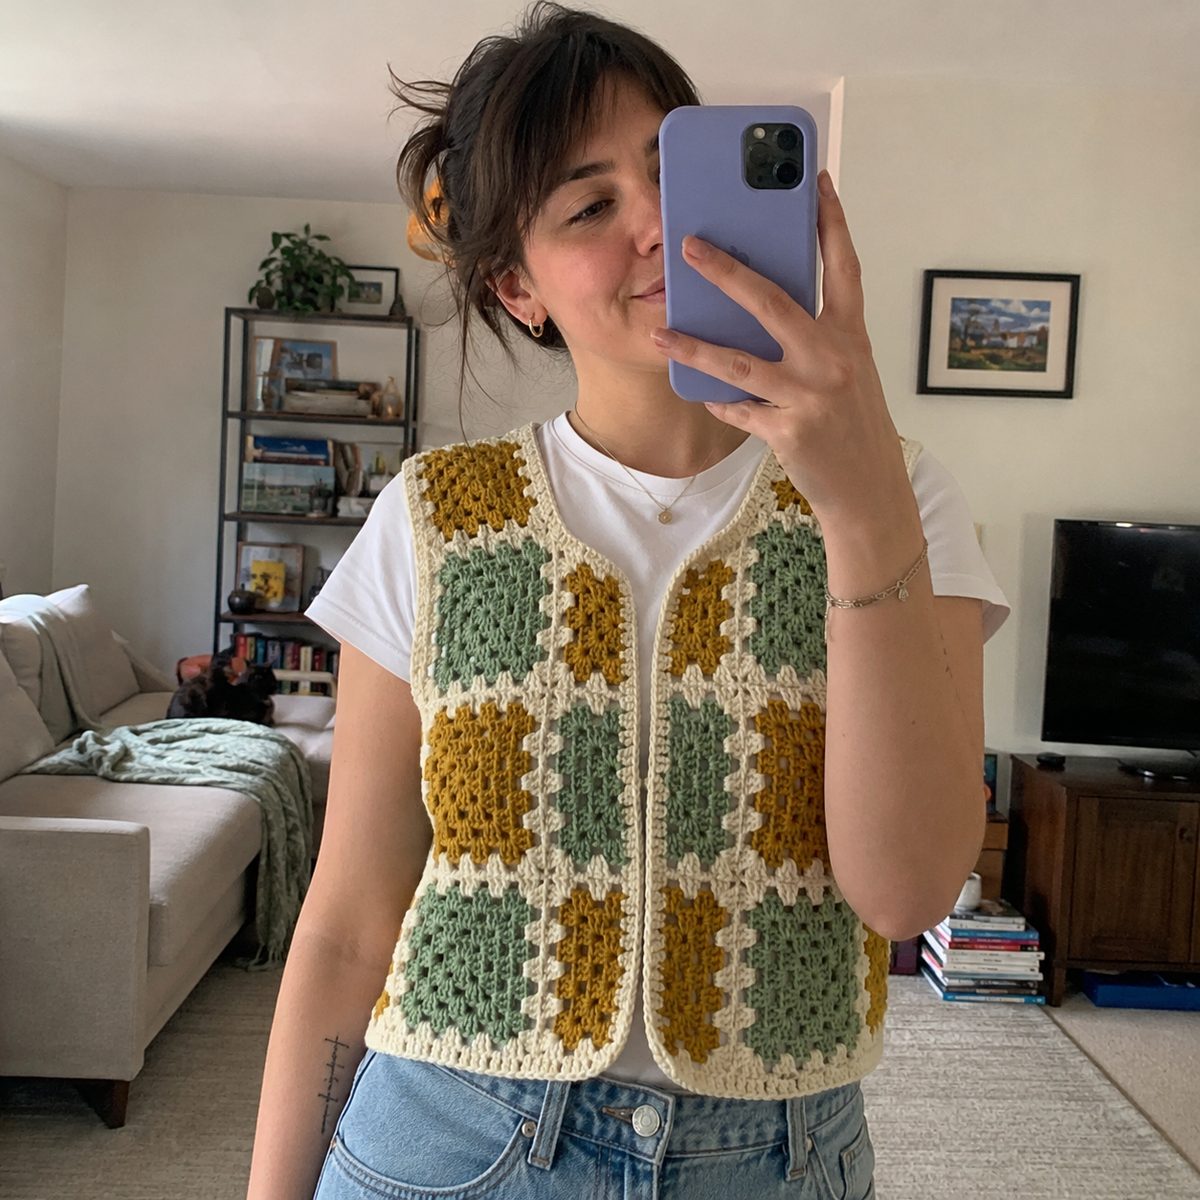
Looking for a granny square vest pattern free of charge with full size-inclusive measurements? You’ve found it. This comprehensive pattern includes detailed instructions for sizes XS through 5XL, with exact stitch counts, hook sizes in both millimeters and US sizes, yarn weight recommendations, and step-by-step assembly diagrams.
A granny square vest is one of the most rewarding crochet wearables you can make. With no sleeves there’s less shaping to worry about, and the modular squares let you customize colors and patterns endlessly. Confident beginner or experienced crocheter, this free guide walks you through every step.
Pattern Overview
This vest is constructed from individual granny squares joined together to form a front panel, a back panel, and optional side panels. The armholes are created by leaving strategic gaps between joined squares. The neckline is shaped during assembly and finished with a decorative edging.
Key Features
- Size inclusive: XS (81 cm / 32 in) through 5XL (152 cm / 60 in) bust
- Skill level: Intermediate (comfortable with double crochet and basic garment construction)
- Gauge: 4 rounds = 10 cm × 10 cm (4 in × 4 in) square using 4.5 mm hook and worsted yarn
- Finished square size: 10 cm × 10 cm (4 in × 4 in)
- No-seam option: Use join-as-you-go technique throughout
Gauge Swatch
Before beginning, make a gauge swatch: work a 4-round granny square using your chosen yarn and a 4.5 mm (US 7) hook. Measure the finished square. It should be exactly 10 cm × 10 cm (4 in × 4 in). If your square is smaller, try a larger hook (5.0 mm). If it’s larger, try a smaller hook (4.0 mm). For more on gauge, see our tension guide.
Pro Tip: Block your gauge swatch before measuring. Yarn relaxes and stretches after blocking, which can change your square size by 0.5-1 cm. For a wearable garment, this small difference compounds dramatically across dozens of squares. Always block and measure before starting your granny square vest pattern free project.
Sizing and Measurements
This granny square vest pattern free is designed with 2-3 inches (5-7.5 cm) of positive ease, meaning the finished garment measures 2-3 inches larger than your actual bust measurement for a relaxed, comfortable fit.
| Size | Bust (cm) | Bust (in) | Finished Vest (cm) | Finished Vest (in) | Squares per Row | Total Rows | Total Squares |
|---|---|---|---|---|---|---|---|
| XS | 76-81 | 30-32 | 84 | 33 | 8 | 11 | 88 |
| S | 81-89 | 32-35 | 92 | 36 | 9 | 11 | 99 |
| M | 89-97 | 35-38 | 100 | 39 | 10 | 12 | 120 |
| L | 97-107 | 38-42 | 110 | 43 | 11 | 12 | 132 |
| XL | 107-117 | 42-46 | 120 | 47 | 12 | 13 | 156 |
| 2XL | 117-127 | 46-50 | 130 | 51 | 13 | 13 | 169 |
| 3XL | 127-137 | 50-54 | 140 | 55 | 14 | 14 | 196 |
| 4XL | 137-147 | 54-58 | 150 | 59 | 15 | 14 | 210 |
| 5XL | 147-157 | 58-62 | 160 | 63 | 16 | 15 | 240 |
Length Adjustments
The measurements above produce a hip-length vest (approximately 55-60 cm / 22-24 in). To adjust:
Cropped vest: Subtract 1-2 rows (saves 8-16 squares per panel)
Tunic-length vest: Add 2-3 rows (adds 16-24 squares per panel)
Each additional row adds approximately 10 cm (4 in) to the length.
Armhole Measurements
| Size | Armhole Depth (cm) | Armhole Width (cm) | Armhole Depth (in) | Armhole Width (in) |
|---|---|---|---|---|
| XS-S | 18 | 15 | 7 | 6 |
| M-L | 20 | 17 | 8 | 6.5 |
| XL-2XL | 22 | 18 | 8.5 | 7 |
| 3XL-5XL | 24 | 20 | 9.5 | 8 |
Materials Needed?
Yarn
Choose a worsted weight (medium #4) yarn with good drape for garments. See our yarn guide and best yarn recommendations for options.
| Size | Yarn Needed (meters) | Yarn Needed (yards) | Approximate Skeins (100g/170m) |
|---|---|---|---|
| XS | 750 | 820 | 5 |
| S | 850 | 930 | 5 |
| M | 1,000 | 1,095 | 6 |
| L | 1,100 | 1,200 | 7 |
| XL | 1,300 | 1,420 | 8 |
| 2XL | 1,400 | 1,530 | 8 |
| 3XL | 1,600 | 1,750 | 10 |
| 4XL | 1,750 | 1,915 | 11 |
| 5XL | 2,000 | 2,190 | 12 |
Pro Tip: Buy all yarn from the same dye lot. Yarns from different dye lots can have noticeable color differences that become very visible in a multi-square garment. For the best wearable crochet results, purchase all yarn at once and check that every skein has the same lot number on the label.
Hooks and Notions
- Main hook: 4.5 mm (US 7), see our hook size guide for alternatives
- Joining hook: 4.5 mm (same as main) or 4.0 mm for tighter seams
- Edging hook: 4.0 mm (US G) for a tighter, cleaner edging
- Stitch markers (at least 20)
- Tapestry needle for weaving ends
- Measuring tape
- Blocking mats and T-pins
- Removable stitch markers or safety pins for layout planning
The Granny Square Motif
This granny square vest pattern free uses a 4-round granny square that finishes at 10 cm × 10 cm (4 in × 4 in). You can use any granny square crochet pattern you like, but here’s our recommended motif for the cleanest results.
The Solid 4-Round Square
We recommend using a solid granny square technique for garments. Solid squares (no chain-space holes) provide better wind resistance, a cleaner look, and more structural integrity for wearable pieces. They’re also less likely to stretch and distort over time.
Round 1: The Center
Using Color A and a magic ring, chain 3 (counts as first dc), work 11 dc into the ring. Pull the ring tail to close. Join with a slip stitch to the top of the chain-3. (12 dc total)
Round 2: Building Out
Chain 3, dc in the same stitch. *2 dc in the next stitch, dc in the next stitch.* Repeat from * to * around. Join. (18 dc total)
Round 3: Corner Formation
Chain 3, dc in the next stitch. *(2 dc, chain 1, 2 dc) in the next stitch (corner), dc in the next 4 stitches.* Repeat from * to * three more times. Join. (4 corners with ch-1 spaces)
Round 4: The Final Round
Chain 3, dc in each stitch to the corner. In each corner space, work (2 dc, chain 1, 2 dc). Continue around. Join. Fasten off. (28 dc + 4 ch-1 corners)
Measure: the square should be exactly 10 cm × 10 cm (4 in × 4 in). If it’s not, adjust your hook size and try again. For troubleshooting, see our granny square fixes or sizing guide.
Color Placement Strategy
For a cohesive garment, plan your color placement before starting. Here are three approaches:
Approach 1: Uniform Squares (Beginner Friendly)
Every square uses the same 2-3 colors in the same round sequence. This creates a uniform, structured look that’s easy to execute and looks very polished.
Approach 2: Planned Random (Intermediate)
Use 4-6 colors, varying the combination for each square but maintaining a consistent palette. Lay out squares as you complete them and rearrange until the color distribution looks balanced.
Approach 3: Gradient (Advanced)
Arrange colors in a gradient from light to dark or follow a specific color progression. This creates a stunning ombre effect across the garment.
Pro Tip: For a garment, consistency matters more than variety. Choose one joining method and stick with it throughout. Mixing joining methods creates visible differences in the seams that are more noticeable on a wearable than on a blanket. Our JAYG tutorial covers the best techniques for garments.
Joining Your Squares
For this granny square vest pattern free, we recommend the flat slip stitch join-as-you-go method for the cleanest garment result.
Step-by-Step Joining Process
Step 1: Create Your Layout
Using the sizing chart above, determine your panel dimensions. For a size M (10 squares per row, 12 rows):
Front panel: 10 squares wide × 6 rows = 60 squares
Back panel: 10 squares wide × 6 rows = 60 squares
Total: 120 squares (with gaps left for armholes)
Step 2: Block All Squares
Before joining, block every square to exactly 10 cm × 10 cm (4 in × 4 in). Pin each square to a blocking mat at the exact measurement and mist with water. Allow to dry completely (6-12 hours). This step is non-negotiable for garments.
Step 3: Join Row by Row
Using the join-as-you-go method, work the front panel row by row. Join horizontally first, then vertically if needed. Repeat for the back panel.
Armhole Shaping
Armholes are created by leaving gaps between the front and back panels at the sides. The gap size determines the armhole opening.
Standard Armhole Construction
For a size M vest (10 squares per row):
- Work the front panel: 10 squares × 6 rows (joined)
- Work the back panel: 10 squares × 6 rows (joined)
- Lay both panels flat with right sides facing up
- Join the shoulder seams: connect the top 2 squares on each side (left shoulder and right shoulder)
- This leaves a gap on each side for the armhole
Armhole Depth Calculation
For each size, leave the following number of rows unjoined at the sides:
| Size | Rows Joined at Shoulder | Rows Joined at Side (below armhole) | Armhole Gap (rows) |
|---|---|---|---|
| XS-S | 2 | 3 | 6 rows open |
| M-L | 2 | 4 | 6 rows open |
| XL-2XL | 2 | 4 | 7 rows open |
| 3XL-5XL | 3 | 4 | 7-8 rows open |
Pro Tip: Try the vest on before permanently joining the side seams. Pin the side seams with safety pins first, then check the armhole size. You can easily add or remove a row from the armhole gap before making the final join. This fitting step is essential for crochet garments that fit well.
Armhole Edging
Once the panels are joined with armhole gaps, work a clean edging around each armhole:
- Join yarn at the bottom of the armhole gap (right side of the work)
- Work 1 single crochet in each stitch along the front panel edge
- Work 3 sc in the corner at the shoulder join
- Work 1 sc in each stitch along the back panel edge
- Work 3 sc in the bottom corner
- Join with a slip stitch. Fasten off.
For a size M armhole, you’ll work approximately 40-44 sc stitches per armhole. This creates a smooth, comfortable opening that won’t stretch or gap.
Neckline Options
The neckline defines the style of your vest. Here are three options for your granny square vest pattern free:
Option 1: Round Neckline (Classic)
A simple round neckline with a 15-18 cm (6-7 in) drop from the shoulder. Work 1 round of sc around the neck opening, working 3 sc in each shoulder corner. Add a second round of half double crochet for a finished edge. For a size M, you’ll need approximately 60 sc stitches around the neckline.
Option 2: V-Neck (Flattering)
A V-neck is universally flattering and works especially well with granny square construction. The V is created by working one fewer square in the center of each row on the front panel. For a size M: instead of a solid 10-wide panel, work 5 squares, then decrease by 1 square per row for 3 rows, then 4 squares for the remaining rows. This naturally creates a V-shape at the center front. See our dress pattern guide for similar shaping techniques.
Option 3: Scoop Neck (Casual)
A wider, deeper neckline with a 20-22 cm (8-9 in) drop. Leave 3-4 squares unjoined at the center front to create the scoop. Edge with 2-3 rounds of sc for stability.
Neckline Edging Pattern
For all neckline options, this edging provides a polished finish:
Round 1: Sc evenly around the neckline (3 sc in each corner/point).
Round 2: *Ch 1, skip 1 sc, sc in next sc.* Repeat around. This creates a subtle picot-like texture.
Round 3: Slip stitch in each chain space around. Fasten off.
Assembly Instructions
Complete Step-by-Step Assembly
Step 1: Make All Squares
Using the sizing chart, determine your total square count. Make all squares, weaving in ends as you go. Do not skip this step, waving in ends is much easier on individual squares than on a completed garment.
Step 2: Block All Squares
Pin each square to exactly 10 cm × 10 cm (4 in × 4 in) on your blocking mat. Mist lightly with water and allow to dry completely. This typically takes 6-12 hours depending on humidity.
Step 3: Layout and Plan
Arrange your blocked squares according to your planned layout. Number each square with a stitch marker, noting its position (row number, column number, and panel, front or back). Photograph the layout.
Step 4: Join Front Panel
Using the JAYG method, join the front panel squares row by row. For a V-neck variation, adjust the square count per row as described above.
Step 5: Join Back Panel
Repeat the joining process for the back panel.
Step 6: Join Shoulders
Place front and back panels right sides together. Join the shoulder seams using the same joining method. Work through both layers for strength.
Step 7: Define Armholes
Pin the side seams to determine the armhole gap. Try on and adjust if needed. Once satisfied, join the side seams below the armhole gap.
Step 8: Edging
Work the armhole and neckline edging as described in the sections above.
Step 9: Final Blocking
Block the completed vest one final time. Pin it to your blocking mat at the exact finished measurements from the sizing chart. Mist and dry. This sets the shape and ensures the vest maintains its dimensions through wearing and washing.
Pro Tip: When trying on the vest for fitting, wear a thin shirt underneath. The vest should fit comfortably over your clothing without feeling tight or restrictive. If it feels snug, you may need to adjust your gauge (larger hook = bigger squares = larger vest) rather than adding more squares, which would change the proportions. If you need help with tension issues, our guide has practical solutions.
Edging and Finishing
The finishing touches make all the difference in a handmade garment. This granny square vest pattern free includes several edging options.
Bottom Hem Edging
Work 2-3 rounds of single crochet along the bottom edge. This prevents the hem from curling and provides a clean, weighted edge. For a decorative touch, add a row of reverse single crochet (crab stitch) as the final round.
Button Band (Optional)
For a button-front vest, work a button band along the front opening edges. Work 3-4 rows of sc (each row approximately 5 mm / 0.2 in wide). On one side, create buttonholes by working (sc, ch 2, skip 2 sc) at evenly spaced intervals. Space buttonholes 8-10 cm (3-4 in) apart.
Surface Embellishment
Add visual interest with surface crochet details. Work chains or slip stitches on the surface of the finished vest to create additional geometric patterns. This is especially effective on solid-color vests.
Color Palette Ideas
The right color palette takes your granny square vest pattern free from craft project to wardrobe staple. Here are four curated palettes for different aesthetics:
Palette 1: Earth Tones (Classic)
- Cream, terracotta, olive green, mustard, charcoal grey
- Works with everything in your wardrobe
Palette 2: Ocean Breeze (Summer)
- White, seafoam, dusty blue, sage, sandy beige
- Great for spring and summer layering
Palette 3: Jewel Tones (Statement)
- Amethyst, emerald, sapphire, ruby, gold
- Makes the vest a statement piece
Palette 4: Monochromatic (Modern)
- 3-5 shades of the same color (e.g., light blue to navy)
- Sophisticated and contemporary
Pro Tip: For your first vest, stick to 2-3 colors maximum. More colors mean more yarn changes, more ends to weave, and more complexity in the layout. As you gain confidence with garment construction, you can experiment with more elaborate color schemes. Start with the beginner-friendly approach and build up.
Customization Options
Add Pockets
Work 2 small granny squares (2 rounds each, approximately 5 cm / 2 in) and attach them to the front panel at hip height. Use whip stitch on the wrong side for an invisible attachment.
Hooded Vest
Extend the back panel by 2-3 rows above the shoulders and fold over to create a hood. Shape the hood by decreasing stitches at the top center. This transforms the vest into a cozy, casual layering piece well suited to cool weather.
Zippered Closure
Instead of buttons, install a separating zipper along the front edges. This gives a modern, structured look. Sew the zipper tape to the wrong side of the front edges using a sewing needle and matching thread.
Lined Vest
For extra warmth and structure, line the vest with a lightweight fabric. Cut fabric panels to match the vest dimensions, sew side seams, and hand-stitch the lining to the vest at the armholes, neckline, and hem. This is a great technique for learning more about advanced wearable crochet.
Frequently Asked Questions
Is this granny square vest pattern free for commercial use?
This pattern is free for personal use. You may sell finished items made from this granny square vest pattern free in small quantities, but please do not sell or distribute the pattern itself. Credit Knot to Yarn when sharing your finished projects on social media.
How long does it take to make a granny square vest?
For a size M with 120 squares, expect approximately 20-30 hours of crochet time: 12-18 hours for making the squares, 3-5 hours for joining, and 2-4 hours for edging and finishing. This assumes working at a moderate pace. For a faster experience, use a bulky yarn and larger hook to reduce the square count.
Can I use a different size granny square?
Yes, but you’ll need to recalculate the number of squares per row. The sizing chart in this pattern is based on 10 cm (4 in) squares. If you use 12.5 cm (5 in) squares, you’ll need fewer squares per row (approximately 7-8 for a size M instead of 10). Recalculate using: Total width ÷ square size = squares per row.
What’s the best yarn for a granny square vest?
Worsted weight yarn with good drape is ideal. Cotton-acrylic blends (like Paintbox Cotton DK or Berroco Vintage) offer the best combination of stitch definition, drape, and washability. For a warmer vest, use a wool or merino blend. Avoid 100% acrylic for garments, it tends to be heavy and doesn’t drape well. See our yarn guide for specific brand recommendations.
How do I care for my finished granny square vest?
Hand wash in cool water with a gentle detergent. Lay flat to dry on a towel, reshaping to the original dimensions. Do not hang wet, gravity will stretch the garment out of shape. Block once a year or after every few washes to maintain the shape. Store folded, not hung, to prevent stretching at the shoulders.
Explore more designs on Ravelry granny square vest patterns and Yarnspirations vest pattern collection.
Can I make this vest as a beginner?
This pattern is rated intermediate, but a confident beginner who knows the double crochet stitch, slip stitch, and can follow a crochet pattern can absolutely complete it. Take your time with the joining and try the garment on frequently during assembly. Check out our beginner crochet resources for foundational skills.
Ready to start? Gather your yarn, pick your palette, and begin crocheting squares. This granny square vest pattern free is your ticket to a handmade wardrobe staple that you’ll wear for years. For more garment patterns, explore our sweater pattern, cardigan, and crop top guides. Happy crocheting!
More Pattern Ideas