How to Crochet a Dinosaur Granny Square (Free Pattern)
How to Crochet a Dinosaur Granny Square (Free Pattern)
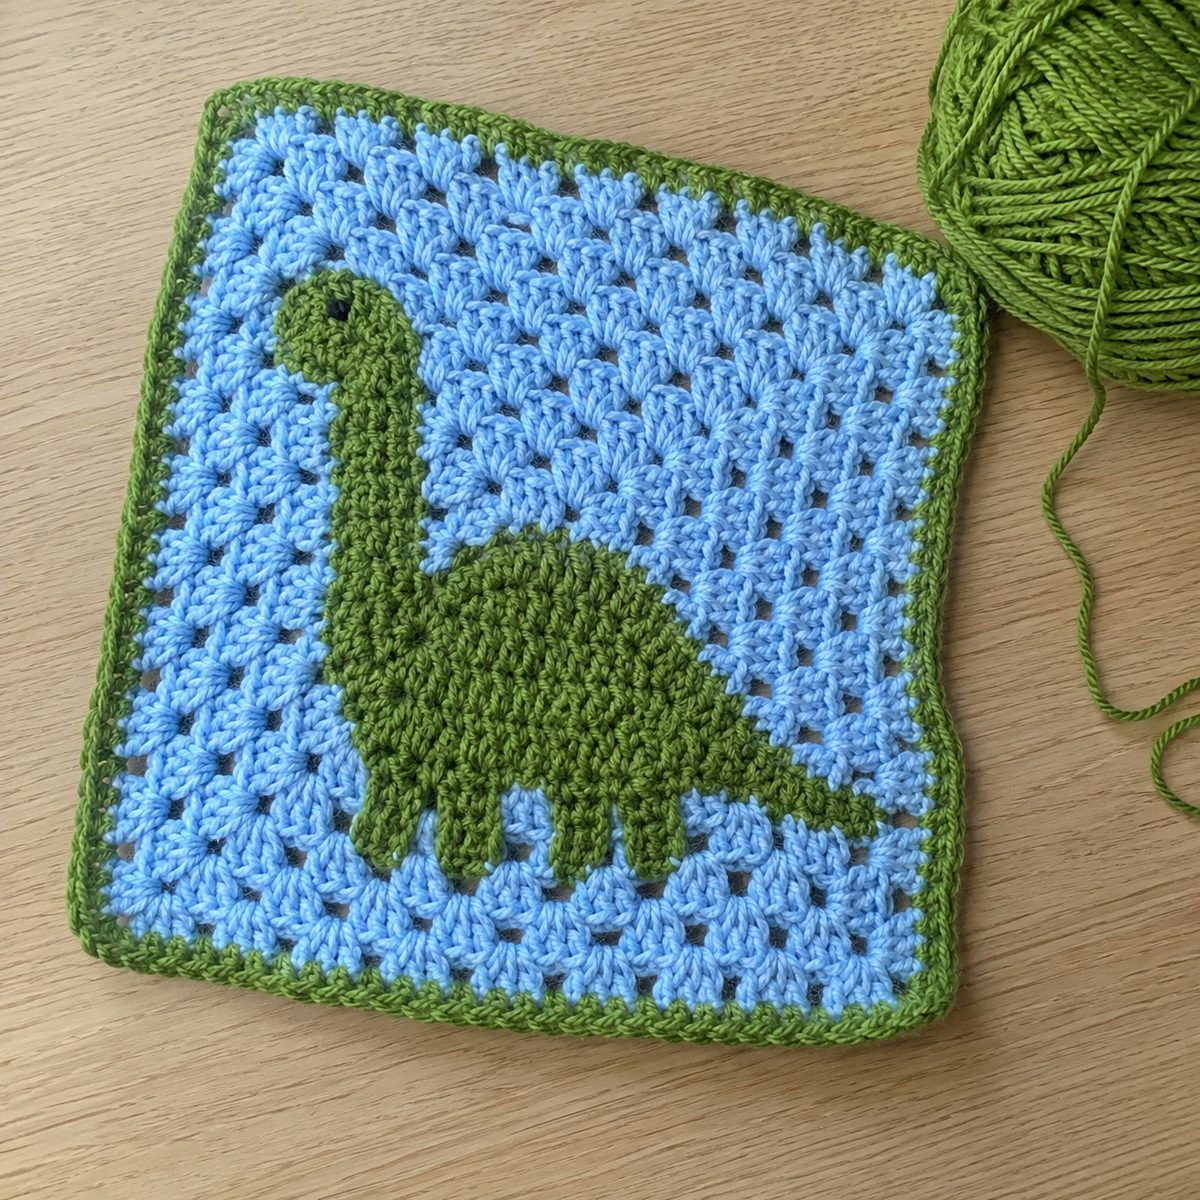
If you want a project that mixes a classic granny square with a playful dinosaur, you’re in the right place. This one makes you smile, and it’s surprisingly easy even if you’re fairly new to crochet. Finished it’s about 3.9 by 3.9 inches, a great building block for a themed baby blanket, nursery wall hanging, or a kid’s afghan. The fun part is watching a flat square turn into a recognizable little dinosaur using just three colors of DK yarn and a 3.00 mm hook.
As an Amazon Associate we earn from qualifying purchases: some supply links in this post are affiliate links, at no extra cost to you.
Dinosaur crochet has taken off the last few years, and it’s easy to see why, kids love dinosaurs, and working one into a cozy blanket or decor piece adds a handmade touch you won’t find in a store. Baby-shower gift, a dino-obsessed toddler’s room, or just a whimsical motif for your square collection, it fits almost any project.
The design is simple at heart. You crochet the dinosaur body as its own motif, make a solid base square, join the two, then add the little finishing touches, feet, an eye, and a sweet mouth. It’s all basic stitches plus one special technique, the 3-double-crochet popcorn stitch, which gives the feet their bumpy texture. Never done a popcorn? We walk through it step by step.
Materials You’ll Need
Before we get into the pattern, let’s gather everything you’ll need. One of the best things about this project is that it requires very few supplies, so chances are you already have most of these items in your crochet kit.
- DK or Sport Weight Yarn (3 colors): You’ll need three different colors to bring your dinosaur to life. Choose one color for the dinosaur’s body (a bright green or teal works beautifully), one for the base square (a soft cream, white, or pastel shade is ideal), and one accent color for facial details like the eye and mouth (black or a dark contrasting color). If you’re planning to make a full blanket with multiple dinosaur squares, consider buying yarn in coordinating color families so all your squares harmonize together.
- 3.00mm (Size C/2 or 11) Crochet Hook: This relatively small hook paired with DK-weight yarn creates a tight, firm fabric that holds its shape well and produces clean, defined stitches. The small hook size is what gives the finished square its crisp details and professional appearance.
- Darning Needle (Tapestry Needle): A blunt-tipped needle with a large eye for weaving in ends and sewing pieces together. You’ll use this extensively when attaching the dinosaur motif to the base square.
- Scissors: A good pair of sharp scissors for cutting yarn cleanly.
- Stitch Markers (optional): Helpful for keeping track of stitch counts, especially in the earlier rows where precision matters most.
Abbreviations (US Crochet Terms)
This pattern uses standard American crochet terminology. If you’re used to UK terms, note that the American single crochet corresponds to the UK double crochet, and the American double crochet corresponds to the UK treble crochet.
| Abbreviation | Meaning |
|---|---|
| ch | Chain |
| ch-sp | Chain space (the gap created by chains from a previous row) |
| dc | Double crochet |
| sc | Single crochet |
| tr | Triple (treble) crochet |
| hdc | Half double crochet |
| inc | Increase (work 2 stitches into the same stitch) |
| rep | Repeat |
| st(s) | Stitch(es) |
| sl st | Slip stitch |
| sk | Skip |
| BLO | Back loop only |
| TLO | Third loop only (found behind hdc stitches) |
| pic | Picot stitch |
| sc2tog | Single crochet two together (decrease) |
| dec | Decrease |
Special Stitches Explained
Before starting the pattern, take a moment to familiarize yourself with these three special techniques. They’re not complicated, but understanding them beforehand will make the whole process smoother and more enjoyable.
3-Double-Crochet Popcorn Stitch (3-dc-popcorn)
The popcorn stitch is what gives the dinosaur’s little feet their charming, rounded texture. Here’s how to work it:
- Work 3 double crochet stitches into the same stitch or space.
- Remove your hook from the last double crochet (carefully, so you don’t drop the loop).
- Insert your hook from front to back into the top of the first double crochet of the group.
- Grab the dropped loop and pull it through the first double crochet.
- Chain 1 to secure the popcorn stitch in place.
This creates a puffy, raised cluster of stitches that pops forward from the fabric, hence the name! When you work several of these in a row, they create a delightfully bumpy texture that works well for dinosaur toes.
Chain-1 Picot Stitch
A picot is a tiny decorative loop that adds lovely detail to edges and points. To make a ch-1 picot:
- Chain 3 stitches.
- Insert your hook into the third chain from the hook.
- Slip stitch to close, creating a small loop.
Though this pattern doesn’t rely heavily on picots, it’s a handy technique to know and can be used to add decorative touches to spikes, tails, or other embellishments if you want to customize your dinosaur.
sc2tog (Single Crochet Two Together: Decrease)
This is a simple decrease that reduces two stitches down to one. It’s used to shape the dinosaur’s body, creating curves and angles:
- Insert your hook into the next stitch and draw up a loop (2 loops on hook).
- Insert your hook into the following stitch and draw up another loop (3 loops on hook).
- Yarn over and pull through all 3 loops on the hook.
You’ve now decreased by one stitch. This stitch is essential for shaping the dinosaur’s neck, back, and tail contours.
Dinosaur Granny Square Pattern: Step by Step
Now let’s get into the actual pattern! We’ll build the dinosaur granny square in several stages: first the dinosaur body, then the base square, joining the two together, adding the feet, and finally the facial details. Take your time with each step and don’t hesitate to rip back and redo a row if your stitch count doesn’t match, precision in the early rows pays off in the final result.
Part 1: Crocheting the Dinosaur Body
The dinosaur body is worked flat in rows, starting from the head/neck area and working down toward the tail. Use your main dinosaur color (Color A) for the body. Pay close attention to the increases and decreases, they’re what give your dinosaur its distinctive shape.
Row 1: Foundation
Chain an appropriate number of stitches to begin the body panel. Work a series of single crochets across the chain, placing increases at regular intervals to begin forming the wider body shape. The first row establishes the width of the dinosaur’s head and upper neck. Count your stitches carefully at the end of this row, having the correct number from the very start ensures the rest of the shaping works out properly.
Row 2: Building the Head
Continue in single crochet, working increases at the specified intervals to widen the piece. You’ll notice the shape starting to emerge, the increases create a gentle outward curve that will eventually form the rounded top of the dinosaur’s head. Chain 1 and turn at the end of the row as usual.
Row 3: Expanding the Body
Work another row of single crochet with strategic increases. At this point, the piece should be noticeably wider than Row 1, and you can start to visualize where the dinosaur’s head will be positioned within the final square. The increases in this row extend the body further, creating the space needed for the dinosaur’s back.
Row 4: Widening
This row continues to build out the body width. Work single crochets across with increases placed to maintain even shaping. The fabric should now look like an elongated oval or teardrop shape, wider in the middle and tapering at both ends. Keep your tension consistent throughout, uneven tension can cause the piece to curl or distort, which will make it harder to attach to the base square later.
Row 5: Completing the Body Panel
In this final row of the body panel, you’ll work a combination of single crochets and decreases to begin tapering the piece back down toward the tail end. The body panel should now have a clear dinosaur-like silhouette with a broader head/neck area and a narrowing tail. Fasten off, leaving a long tail for sewing. Give the piece a gentle stretch and shape it with your fingers to ensure it lies flat before moving on.
Pro tip: If your dinosaur body looks a bit wobbly or uneven, don’t panic. Blocking the piece (lightly misting with water and pinning it flat) can work wonders for straightening out any irregularities.
Part 2: Crocheting the Base Square
The base square serves as the backdrop for your dinosaur. It’s a simple, solid granny square worked in your background color (Color B). You want this square to be firm and evenly shaped so that the dinosaur sits flat against it without any puckering or stretching.
Start with a magic ring (or chain-4 and join to form a ring). Work your first round of double crochets into the ring with chain-2 spaces at each corner. Continue building the square outward, working rounds of double crochets with chain-2 corner spaces until the square measures approximately 3.9 by 3.9 inches, the same size as your dinosaur body. Typically, this takes about 4 to 5 rounds depending on your gauge.
Fasten off and weave in the ends. Check that all four corners form clean 90-degree angles and that the edges are straight. If any side seems longer or shorter than the others, adjusting your tension in future squares will help ensure consistency across a multi-square project.
Part 3: Attaching the Dinosaur to the Base
Now comes the satisfying part, positioning and sewing your dinosaur onto the base square. This is where the design really comes together and your flat pieces transform into a recognizable character.
Place the dinosaur body centrally on the base square. Take a moment to adjust the positioning until you’re happy with how it looks, the dinosaur should be centered both horizontally and vertically with roughly equal margins on all sides. Once you’re satisfied with the placement, pin the dinosaur in position using stitch markers or sewing pins to prevent it from shifting while you work.
Thread your darning needle with the long tail left from the dinosaur body. Using a whip stitch or mattress stitch (whichever you find more comfortable), sew around the perimeter of the dinosaur body, attaching it firmly to the base square. Work your stitches close together for a neat, secure attachment. Take care to sew through both layers, just the surface stitches of the base square and the outer stitches of the dinosaur body.
Once you’ve sewn all the way around, knot the yarn securely on the wrong side and weave in the end. Give the piece a final check to make sure the dinosaur lies completely flat against the base with no bubbling or bunching.
Part 4: Crocheting the Feet (3-dc Popcorn Stitches)
The dinosaur’s feet are one of the cutest features of this design, and they’re created using the 3-double-crochet popcorn stitch technique we covered earlier. These little bumpy protrusions give the dinosaur a three-dimensional quality that makes the whole square feel lively and animated.
Using your main dinosaur color (Color A), position your hook at the bottom edge of the dinosaur’s body, right where the feet should go. Work a series of 3-dc popcorn stitches evenly spaced along the bottom edge. Each popcorn stitch forms one “toe” or foot bump. You’ll typically want to work three to four popcorn stitches in a row to create a convincing set of dinosaur feet.
For each popcorn stitch: work 3 double crochets into the stitch, drop the loop, insert your hook into the first dc of the group, pull the loop through, and chain 1 to secure. Move to the next stitch and repeat until all feet are complete. Fasten off and weave in the end.
The popcorn stitches should stand out proud from the edge of the body, creating a delightfully tactile element that kids (and adults!) won’t be able to resist touching.
Part 5: Adding Facial Details
Those final little details are what really bring your dinosaur to life. Using your accent color (Color C, typically black or a dark color), add the following features:
Eye: Thread your darning needle with a length of accent yarn. Sew a small circle or French knot at the position of the eye. A French knot works beautifully for this, wrap the yarn around the needle 2 to 3 times, insert the needle back into the fabric close to where it emerged, and pull tight to form a neat, rounded dot. Position the eye roughly in the upper portion of the dinosaur’s head area.
Mouth: Using the same accent yarn, embroider a small, simple curved line below the eye to create a friendly little smile. A small backstitch or a simple curved satin stitch works well here. Keep the mouth small and sweet, just a few stitches are enough to suggest a happy expression without overwhelming the design.
If you’d like to get creative, you could also add a tiny nostril or two, or even a small decorative spot on the dinosaur’s body using a fourth color. However, the basic design with just an eye and a smile is already absolutely charming.
Video Tutorial
If you’re a visual learner or just want to see the whole process in action, check out this video tutorial that walks through every step of the dinosaur granny square pattern:
Watching someone else work through the pattern can be incredibly helpful, especially for techniques like the popcorn stitch and the seaming process. Feel free to pause, rewind, and follow along at your own pace.
Customization Ideas
One of the joys of granny square crochet is how easily you can customize each square to make it your own. Here are some ideas for putting your personal spin on this dinosaur pattern:
- Color Variations: Instead of the traditional green dinosaur, try a pink dinosaur for a gender-neutral baby blanket, a blue stegosaurus, or a rainbow-striped creature using multiple colors for the body.
- Size Adjustments: Use a larger hook and chunkier yarn for a bigger square (great for throw pillows), or go even smaller with thread and a steel hook for delicate holiday ornaments.
- Embellishments: Add small crochet spikes along the dinosaur’s back, a crocheted flower or bow near the head, or tiny crochet bones in the dinosaur’s hand.
- Different Dinosaurs: Once you’ve mastered this basic body shape, try modifying the proportions to create different dinosaur species, a long-necked brontosaurus, a three-horned triceratops, or a fierce T-rex with tiny arms.
Frequently Asked Questions
What yarn weight should I use for the dinosaur granny square?
It’s written for DK or sport weight yarn (weight 3). DK gives a nice balance of stitch definition and drape, and with a 3.00 mm hook it makes a firm, sturdy fabric that holds its shape. Substitute a different weight and your gauge, and finished size, will change: worsted with a 4.00 mm hook gives a bigger square (around 5 inches), fingering with a 2.50 mm hook a smaller, more delicate one (around 3 inches).
How do I make the popcorn stitch for the dinosaur’s feet?
The 3-dc popcorn is easier than it looks. Work 3 double crochets into the same stitch, slip your hook out of the last loop, insert it front to back into the top of the first dc you made, grab the dropped loop, and pull it through. Chain 1 to lock it. It should puff outward into a rounded bump. If it looks flat, work it a touch looser and make sure you pull the loop through snugly, but not so tight it distorts the neighboring stitches.
Can I adjust the size of this dinosaur granny square?
Yes. The easiest way to resize is to change hook and yarn weight, a 4.00 or 5.00 mm hook with worsted gives a bigger square, a 2.00 mm hook with fingering a miniature one. You can also add or remove rounds on the base square, but if you change its size you’ll need to adjust the dinosaur body to match, and a much larger dino may need extra body rows too.
How do I join multiple dinosaur granny squares into a blanket?
There are a few ways to join granny squares, and the right one depends on the look you want. The popular ones: (1) slip stitch join: hold two squares right sides together and slip stitch through both loops of each pair for an invisible seam; (2) single crochet join: the same idea but with sc for a visible, decorative ridge; (3) flat zigzag join: a lacy, decorative connection. For a kid’s blanket the slip stitch join is usually best: smooth and sturdy with no gaps for little fingers.
Printable Pattern Card
Here’s a quick-reference summary you can screenshot, print, or save for easy access while you crochet:
🧶 Dinosaur Granny Square: Quick Reference
Finished Size: ~3.9″ x 3.9″ (10 x 10 cm)
Yarn: DK/Sport weight, 3 colors (body, background, accent)
Hook: 3.00mm (US Size C/2)
Gauge: Approximately 22 sc = 4″ / 10 cm
Key Techniques: 3-dc popcorn stitch, sc2tog decrease, whip stitch seaming
Sections:
- Crochet dinosaur body (5 rows with inc/dec shaping)
- Crochet solid base square (4-5 rounds of dc)
- Whip stitch dinosaur to base
- Work popcorn stitch feet along bottom edge
- Embroider eye and mouth with accent yarn
Pattern uses US crochet terminology throughout.
Wrapping Up
Nicely done, your dinosaur square is finished! It’s a good reminder of how a few simple stitches and some shaping can turn yarn into something special. One square as an appliqué on a baby onesie or a dozen joined into a dino blanket, the result is bound to delight whoever sees it.
And don’t sweat the first attempt. Each square comes out a little better than the last, and that’s the nice thing about granny squares, they’re small, forgiving projects that give you lots of practice without committing to something huge.
We’d love to see your finished dinosaur granny squares! Feel free to share your creations on social media and tag us. Happy crocheting!
Recommended Resources
For more crochet inspiration, visit free patterns on Ravelry and check the Craft Yarn Council standards.
Explore more on KnotToYarn: Free Patterns, Granny Squares, Beginner Crochet.