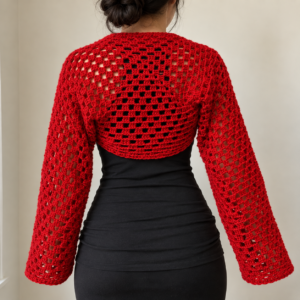
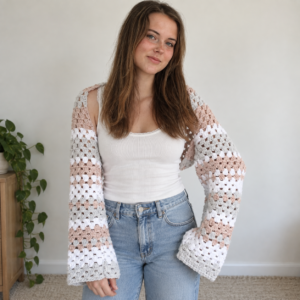
Granny Square Bolero: 7 Stunning Crochet Patterns

Quick Answer
A granny square bolero is a cropped, open-front crochet garment made by joining granny square motifs into panels, then seaming them to form armholes. Unlike a full cardigan, a bolero covers just the shoulders and upper arms, a perfect lightweight layer for spring and summer. The build is simple: crochet your squares, join them into two rectangular panels, and seam the edges to make sleeves.
Tip: Always block your granny squares before joining: this ensures every square is the same size and creates a professional, even finish on your finished bolero.
At a Glance
- Skill level: beginner to intermediate
- Time needed: 8 to 20 hours depending on pattern complexity
- Best yarn: worsted weight (size 4) cotton or acrylic blend
- Hook size: 5.0 mm (H-8) to 6.0 mm (J-10)
Common Mistakes to Quick Fixes
- Squares not matching in size: Block all squares before joining and check your gauge regularly
- Armholes too tight: Leave at least 8 inches of unseamed edge per sleeve opening
- Bolero curling at edges: Add a border round in single crochet to stabilize the edges
Mini Glossary
DC (double crochet), SC (single crochet), CH (chain), SL ST (slip stitch), SM (stitch marker), TCH (turning chain), FPDC (front post double crochet), BPDC (back post double crochet), sp (space), st/sts (stitch/stitches), rep (repeat), RS (right side), WS (wrong side)
What Is a Granny Square Bolero?
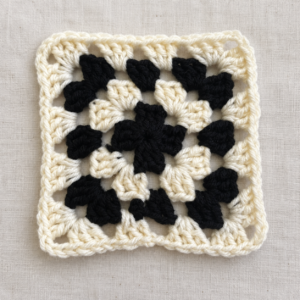
A granny square bolero is a cropped, open-front garment that sits snugly over the shoulders and upper arms, giving just enough warmth without the bulk of a full cardigan. Unlike a cardigan that buttons down the front and reaches the hip, a bolero ends at the waist or just below the bust for a flattering silhouette over tank tops, dresses, and sleeveless blouses. Its defining feature is that it’s built entirely from granny square motifs, the same double-crochet clusters separated by chain spaces most crocheters learn early on.
What makes the bolero such a popular first garment is its modular construction. Rather than wrangling a large piece with complex shaping, you crochet individual squares and join them into rectangular panels, then seam those to form the armholes and body. You can size it up or down by adding or removing squares, and customize the palette per motif. Need a refresher on the basic square? See our granny square tutorial before you start.
The bolero differs from a standard crochet shrug in a few important ways. While the terms are sometimes used interchangeably, a shrug is typically worked as a single long rectangle that wraps around the back and shoulders with sleeves formed by seaming the short ends. A bolero, by contrast, is usually made from individually joined motifs that create a more textured, patchwork-style fabric. Both garments serve the same purpose, lightweight shoulder coverage, but the bolero has a more traditional, handmade aesthetic that highlights the charm of each individual square.
For crocheters who have already explored making a granny square cardigan or a granny square sweater, the bolero is a natural next step. It requires less yarn and less time than a full sweater, making it an excellent weekend project. The motif also serves as an ideal first garment project for beginners who have mastered flat granny squares through projects like a granny square coaster or a granny square afghan and are ready to level up to wearable crochet. In the sections below, we will walk you through seven distinct granny square bolero patterns, each offering a unique take on this classic garment style.
7 Stunning Granny Square Bolero Patterns to Try
Below you will find seven different approaches to making a bolero, ranging from classic motif-based construction to clever one-panel shortcuts. Each pattern description includes details on the construction method, suggested yarn, and the type of crocheter it suits best. From vintage-inspired patchwork looks to sleek modern designs, there is a granny square bolero pattern here for you.
1. The Classic Two-Panel Bolero
The classic two-panel bolero is the most traditional construction method and the one most people picture when they hear the term. You begin by crocheting a set of identical granny square motifs, typically 12 to 20 squares depending on your desired finished size and the gauge of your yarn. Each square is crocheted in the round using the standard cluster-and-chain method, working as many rounds as needed to reach the target size. A standard 4-inch square is common for worsted weight yarn, which means a medium-sized bolero would require approximately 16 to 20 squares.
Once all of your squares are complete, the next step is to block them thoroughly. Blocking is essential for any bolero because it ensures every single square measures exactly the same dimensions. After blocking, you arrange the squares into two rectangular panels, a back panel and a front panel, and join them together. The two panels are then seamed along the top edges to form the shoulders, and the side edges are partially seamed to create the armhole openings. A simple single crochet border around the entire bolero gives it a polished, finished look.
This construction method is satisfying because you can clearly see the grid of granny squares in the finished garment, creating a bold, graphic design. It is also highly customizable: use a different color for each round of every square, or keep all squares the same color for a more subdued, tonal effect. The two-panel bolero pairs beautifully with the techniques covered in our guide on how to join granny squares, which walks you through whip stitch, slip stitch, and join-as-you-go methods.
2. The Triangle Motif Bolero
The triangle-motif bolero takes the traditional concept in a fresh direction by incorporating half-granny squares along the bottom edge. Instead of a straight, rectangular hem, this version features a gentle V-shaped or scalloped edge created by half-square motifs that add visual interest and a flattering drape. The construction works similarly to the classic two-panel method: you crochet full granny squares for the main body of the motif, then add half-granny triangles along the bottom row of each panel to create the shaped edge.
A half-granny square is made by working only one half of the standard granny square round, starting with a foundation chain rather than a magic ring. You work the same cluster-and-chain pattern across the chain, building up one side of the square and then working back along the straight edge. These half-squares are then positioned along the lower edge of each panel, creating a zigzag or chevron effect that looks especially striking in two or three contrasting colors. The triangle-motif bolero is a wonderful choice for crocheters who want something a little more distinctive than a standard grid layout.
It is also a fantastic way to use up small amounts of leftover yarn from other projects. If you have scraps from making a granny square tote bag or a velvet pillow, the triangle edge is a perfect place to incorporate those odds and ends. For beginners who want to practice before tackling the half-square motif, our crochet abbreviations for beginners guide is a helpful reference.
3. The Granny Stripe Shrug (Full Pattern)
The granny stripe shrug is the fastest, most streamlined approach to a bolero, and it is the perfect pattern for anyone who wants a polished finished garment without the tedium of joining dozens of individual motifs. Instead of crocheting separate squares and seaming them, you work one long, continuous rectangle using the granny stripe stitch pattern, which is essentially the granny square concept translated into straight rows. The result is a design that has all all the visual charm of traditional granny clusters but works up in a fraction of the time.
Materials Needed:
- Approximately 800 to 1000 yards of worsted weight (size 4) yarn. A yarn like Lion Brand Pound of Love or any smooth worsted acrylic or cotton blend works beautifully. You will need three coordinating colors, Color A (main body), Color B (contrast stripe), and Color C (accent stripe).
- One crochet hook in size J (6.0 mm).
- Stitch markers for tracking rows.
- Tapestry needle for weaving in ends and seaming.
Gauge: In the granny stripe stitch pattern, 4 inches equals 11 stitches across and 7 rows tall. Take the time to make a gauge swatch before beginning your motif, this is the single most important step for ensuring a proper fit.
Foundation Row: With Color A, chain 50. Single crochet in the 2nd chain from the hook and in each chain across. You should have 49 single crochet stitches. This foundation row provides a stable, even base for the granny stripe pattern that follows.
Row 1 (Right Side, Color B): Chain 3 (this counts as your first double crochet). Work 2 more double crochet in the very first single crochet to create a 3-dc cluster. Skip the next 2 single crochet stitches. Now work 3 double crochet in the next single crochet stitch. Continue this pattern, skip 2, work 3 dc in the next stitch, all the way across the row. At the last stitch, work 2 double crochet (instead of 3) to maintain your stitch count. You should end the row with 49 total stitches. Turn your work.
Row 2 (Wrong Side, Color C): Chain 3. Work 2 more double crochet into the first chain-space from the row below, forming a cluster in that space. Now work 3 double crochet in each chain-space across the entire row. When you reach the end, work 1 double crochet into the top of the beginning chain-3 from the previous row. You should have 50 stitches total. Turn your work.
Row 3 (Right Side, Color A): Chain 3. Work 1 more double crochet into the same stitch at the beginning of the row (2 dc total). Now work 3 double crochet in each chain-space across. At the end of the row, work 2 double crochet into the top of the beginning chain-3 from Row 2. You should have 49 stitches. Turn your work.
Continuing the Pattern: Repeat Rows 2 and 3, alternating your three colors every 2 rows, until your rectangle measures approximately 60 inches long. This will give you roughly 106 rows of granny stripe fabric. The color rotation creates bold, cheerful horizontal stripes that are the hallmark of this granny square bolero style. Keep track of your rows with a stitch marker or a row counter, as the repetitive nature of the granny stripe pattern makes it easy to lose your place.
Finishing Row: After completing your final granny stripe row, work one complete row of single crochet across the entire piece in Color A. This finishing row stabilizes the edges and creates a neat, flat border that makes seaming much easier.
Blocking: Block your finished rectangle. Lay it flat on a blocking mat, pin it to the correct dimensions, and spray or steam it until dry. Blocking is non-negotiable for this pattern because it evens out your stitch tension and keeps the rectangle properly square rather than wavy or distorted. Our detailed guide on how to block crochet covers the full process if you are new to this essential finishing step.
Assembly, Creating the Bolero Shape: This is where the rectangle transforms into a piece. Wrap the blocked rectangle around your shoulders so that the center of the rectangle sits across your upper back. The two ends will fall forward over your chest. Using stitch markers, mark a point 34 rows in from each short edge, these markers indicate where the armhole seams begin and end. The unmarked section in the center is your back panel, and the two marked sections on each side will become your sleeves.
Fold the rectangle so that the two marked sections on each end align with each other, wrong sides facing out. Using a slip stitch and Color A, seam the long edges of each marked section together to create a tube, this tube is your sleeve. Repeat on the other side. Once both sleeves are seamed, turn the entire bolero right side out. The result is a beautifully constructed shrug with a seamless back panel, two comfortable sleeves, and an open front that drapes naturally over your shoulders. This construction method is so elegant in its simplicity that many crocheters return to it again and again as their go-to shrug pattern.
4. The Granny Square Cover-Up Bolero
The cover-up-style bolero is designed for crocheters who want more coverage than a standard bolero provides without committing to a full cardigan. This version extends slightly lower on the torso, reaching the midriff rather than stopping at the bust, and uses a denser joining method that creates a more solid, less airy fabric. The result is a bolero that functions almost like a light jacket, good for cool summer evenings, air-conditioned offices, or breezy beach cover-ups.
The construction uses smaller granny squares, typically 3 inches instead of the standard 4 inches, arranged in a tighter grid. More squares per panel means more seaming, but the denser fabric provides significantly more warmth and structure. This granny square bolero style often incorporates a solid-colored border worked in single crochet and double crochet around each square before joining, which closes up the gaps between clusters and creates a more cohesive, fabric-like appearance. The cover-up bolero is an excellent bridge project between a standard bolero and a full granny square cardigan, offering more practice with garment construction while still being manageable in scope. Consider adding a few rounds of a decorative border pattern along the front edges and hem for a polished finish.
5. The Color-Blocked Gradient Bolero
The color-blocked gradient bolero is a modern, eye-catching take on the traditional garment that uses an ombré color progression to create a stunning visual effect. Instead of using the same colors in every granny square, this pattern organizes colors in a deliberate gradient, for example, transitioning from pale cream at the shoulders through soft gold at the center to deep rust at the hem. The gradient can flow horizontally across the rows of squares, creating a sunset-like wash of color, or it can radiate outward from the center back, drawing the eye to the focal point of the garment.
To achieve the gradient effect in your bolero, plan your color palette before you begin crocheting. Choose five to seven shades in the same color family, ranging from the lightest to the darkest. Assign each color to a specific position in your panel layout, and crochet each square in its designated color combination. The key to a successful gradient bolero is smooth transitions, you want adjacent squares to share at least one common color so the shift from light to dark feels seamless rather than abrupt. This pattern is particularly striking in tonal blues, warm earth tones, or a rainbow spectrum for a bold, playful look. It also works beautifully as a gift for someone who appreciates modern, colorful crochet fashion.
6. The Solid Granny Square Bolero
The solid-square bolero is crafted using a variation of the traditional granny square in which the chain spaces are filled with additional stitches, creating a dense, fabric-like texture with no gaps between the stitch clusters. This technique produces a motif that looks more like a knitted garment than a traditional lacy crochet piece, which appeals to crocheters who prefer a smoother, more structured fabric. The solid granny square is worked in the same round-and-round method as the standard version, but instead of chaining between clusters, you work continuous double crochet stitches, placing 3 double crochet in each corner space and 1 double crochet in each stitch along the sides.
Because the solid squares have no open chain spaces, the resulting bolero provides more warmth and better wind resistance than an airy, traditional version. This makes it an excellent choice for transitional weather, spring mornings, autumn afternoons, or any time you need a light layer with genuine insulating properties. The solid construction also means the garment has less stretch, so accurate gauge swatching is especially important.
A single color in a high-quality cotton or merino blend gives the bolero a more elegant look, one that works as well over a little black dress as it does with jeans and a tee. The solid granny square technique also translates beautifully to larger garments, if you enjoy this method, a granny square sweater or the hexagon cardigan would be excellent follow-up projects that use the same dense, solid-motif construction.
7. The Mini Square Mesh Bolero
The mini-square-mesh bolero takes the granny square concept in a lighter, airier direction by using very small motifs, just 1.5 to 2 inches across, joined in a way that creates an open, mesh-like fabric. This style works well for warm-weather layering because the openwork construction allows air to circulate while still providing a visual layer over your outfit. The mini squares are typically worked in only two or three rounds each, making them incredibly fast to crochet. However, because each square is so small, you will need a significantly larger number of motifs, often 40 to 60 for a single bolero, which makes this a great project for crocheters who enjoy portable, pick-up-and-put-down work.
The mesh effect is enhanced by joining the mini squares with chain loops rather than tight seaming. This joining method leaves small gaps between each square, amplifying the airy, lace-like quality of the finished bolero. A DK weight (size 3) or sport weight (size 2) yarn in cotton or bamboo fiber works best for this style because the lighter weight allows the mesh structure to drape softly rather than standing stiffly.
This bolero is a stunning layering piece for summer weddings, garden parties, or beach vacations, and it pairs especially well with summer top patterns that show off the layered crochet texture. If you are new to crocheting garments, starting with small, simple projects like granny square coasters will build the consistency and confidence you need for this more motif-heavy design.
Sizing Your Granny Square Bolero
Getting the right fit is essential for any wearable crochet project, and a bolero is no exception. Because the bolero is a cropped garment that does not need to close in the front, the fit is more forgiving than a fitted cardigan, but you still want the armholes to be comfortable and the back panel to sit smoothly across your shoulders without pulling or sagging. The table below provides standard measurements for a bolero across seven sizes, from XS to 2XL.
| Size | Back Panel Width | Back Panel Length | Armhole Opening | Total Panels Needed |
|---|---|---|---|---|
| XS (0-2) | 14 inches | 12 inches | 8 inches | 12 squares (3×4) |
| S (4-6) | 16 inches | 13 inches | 8.5 inches | 14 squares |
| M (8-10) | 18 inches | 14 inches | 9 inches | 16 squares (4×4) |
| L (12-14) | 20 inches | 15 inches | 9.5 inches | 20 squares (4×5) |
| XL (16-18) | 22 inches | 16 inches | 10 inches | 24 squares |
| 2XL (20-22) | 24 inches | 17 inches | 10.5 inches | 28 squares |
| 3XL (24-26) | 26 inches | 18 inches | 11 inches | 32 squares |
These measurements assume you are using worsted weight yarn with 4-inch granny squares. If your squares measure a different size, you will need to adjust the number of squares accordingly. Measure your gauge square carefully, if your 4-inch square is actually 4.25 inches, that difference compounds across a panel and can change your finished bolero size by an inch or more. Always make a gauge swatch before beginning. If you need help selecting the right hook size for your yarn and gauge, our hook size chart is a useful reference tool.
When sizing a bolero for plus sizes, the most important adjustment is increasing the panel width to ensure comfortable coverage across the back and shoulders. The armhole opening should also be proportionally larger, at least 10 to 12 inches in circumference, to avoid tightness around the upper arms. The granny stripe shrug method is particularly easy to size up or down because you simply adjust the foundation chain length to reach your target back width, and then work the rectangle to the total length needed for your size. Try on the panel periodically as you work to check the fit before committing to the seaming step.
Best Yarn and Hook Choices for Your Granny Square Bolero
Selecting the right yarn for your bolero has a significant impact on both the process and the finished garment. The ideal yarn for a bolero balances stitch definition, drape, durability, and comfort against the skin. Here are the top recommendations organized by yarn weight category.
Worsted Weight (Size 4), The Best All-Around Choice: Worsted weight yarn is the gold standard for most granny square bolero patterns, and for good reason. It is thick enough to work up quickly, thin enough to create comfortable garments, and widely available in an enormous range of colors. Cotton worsted yarns like Lion Brand 24/7 Cotton or Berroco Modern Cotton provide excellent stitch definition that makes every granny cluster pop. Cotton-acrylic blends like Caron Simply Soft or Paintbox Yarns Cotton Blend offer a softer hand with slightly more drape. For reference on standard yarn weight categories, the Craft Yarn Council yarn weight system provides the official industry standards that pattern designers use when specifying yarn requirements.
DK Weight (Size 3), For a Lighter, Softer Bolero: If you prefer a bolero with more drape and a lighter feel, DK weight yarn is an excellent alternative. DK yarns produce a fabric that is softer and more fluid than worsted weight, making them ideal for the mini mesh bolero or any design where you want the garment to drape elegantly rather than hold a structured shape. Use a 4.0 mm or 4.5 mm hook with DK weight yarn. Bamboo and silk-blend DK yarns create particularly luxurious bolero garments that feel wonderful against bare skin.
Sport Weight (Size 2), For Delicate, Lacy Designs: Sport weight yarn is best reserved for the mini-square-mesh bolero or for crocheters who want an ultra-lightweight layering piece. The finer yarn creates smaller, more delicate granny squares with a beautiful laciness, but it also means more squares and more joining time. Use a 3.5 mm to 4.0 mm hook with sport weight yarn for the best results.
Hook Selection: For most granny square bolero projects using worsted weight yarn, a 5.0 mm (H-8) or 6.0 mm (J-10) hook is ideal. The granny stitch pattern naturally creates a loose, open fabric, so you generally want to use the hook size recommended on your yarn label or one size smaller if your stitches tend to run loose. An ergonomic hook with a comfortable grip is especially important for a bolero because you will be making many repetitive stitches over multiple sessions. For more inspiration and pattern browsing, you can explore community-designed Ravelry bolero and shrug crochet patterns to see how other crocheters approach yarn and hook selection for similar garments.
Step-by-Step Construction Overview
Regardless of which specific granny square bolero pattern you choose, the general construction process follows the same logical sequence. Understanding this sequence before you start will help you plan your project and avoid common mistakes. Here is the complete step-by-step workflow for assembling a bolero from individual granny square motifs.
Step 1, Make Your Granny Squares: Crochet all of the granny squares needed for your chosen size. Refer to the sizing chart above to determine the total number of squares. Work each square to the same number of rounds, and use the same yarn and hook throughout to ensure consistency. If you are using multiple colors, plan your color placement before you begin so the finished bolero has a cohesive, intentional look rather than a random patchwork.
Step 2, Block Every Square: Blocking is the most critical step in creating a professional-looking bolero. Lay each square flat on a blocking mat, pin it to the exact finished dimensions specified in your pattern, and apply moisture through steam or spraying. Allow the squares to dry completely before removing the pins. Blocked squares are all the same size and shape, which makes the joining process dramatically easier and produces a much neater final result. Our full tutorial on how to block crochet walks you through every blocking method in detail.
Step 3, Arrange and Join Into Panels: Lay out your blocked squares on a flat surface and arrange them into the panel configuration specified by your pattern. Typically this means one back panel and two smaller front panels, or two large rectangular panels that will be folded and seamed. Once you are satisfied with the layout, join the squares together using your preferred method. The how to join granny squares guide covers the three most popular techniques: whip stitch for invisible seams, slip stitch for a decorative ridge, and join-as-you-go for efficiency.
Step 4, Create the Armholes: Fold or position the panels so that the armhole openings are clearly defined. The armholes are formed by leaving a specific section of the panel edges unseamed, typically 8 to 11 inches depending on your size. Pin the edges together along the seam lines, and try the motif on before stitching to confirm the armhole placement is comfortable. Adjust as needed.
Step 5, Seam and Finish: Work the side seams using slip stitch or whip stitch, then add a border round around the entire bolero to stabilize the edges and create a clean, finished appearance. A simple single crochet border is classic and reliable, but you can also explore decorative border patterns for a more elaborate finish. Finally, weave in all loose ends securely so nothing unravels during wear or washing.
Styling Your Finished Granny Square Bolero
One of the best things about a bolero is its incredible versatility as a wardrobe piece. Because the garment is open-front and cropped, it layers beautifully over a wide range of outfits without adding bulk or overwhelming your silhouette. Here are some tried-and-true styling ideas for wearing your finished bolero.
Over a Sleeveless Summer Dress: A bolero is the perfect companion for a sundress, maxi dress, or any sleeveless summer dress. The cropped length keeps your waistline visible, maintaining the flattering shape of your dress, while the crochet coverage on your shoulders and upper arms provides just enough warmth for air-conditioned restaurants, evening breezes, or sun-sensitive skin. Choose a bolero in a neutral cream or tan for maximum versatility, or go bold with a colorful gradient design that complements the print of your dress.
With a Camisole and Jeans: For a casual everyday look, layer your bolero over a simple tank top or camisole paired with your favorite jeans. This combination works especially well with the classic two-panel or solid granny square granny square bolero styles, which have a more structured, tailored appearance. Add a pair of statement earrings and ankle boots, and you have an effortlessly stylish outfit that puts your handmade garment front and center.
As a Beach or Pool Cover-Up: The cover-up-style bolero and the mini-mesh version both make excellent beach cover-ups. Throw one over your swimsuit for a quick trip to the beach bar, a walk along the shore, or lounging under an umbrella. Cotton yarn is the best choice for a beach bolero because it dries quickly and withstands saltwater and chlorine better than animal fibers. The breathable, open construction keeps you cool in the heat while still providing enough coverage to feel comfortable walking around a public beach or pool area. Pair your handmade bolero with one of our summer top patterns for a fully coordinated crochet wardrobe.
For Layering in Transitional Seasons: During spring and fall, a pattern is an ideal transitional layering piece. Wear it over a long-sleeve tee, a lightweight turtleneck, or a granny square sweater base layer for extra warmth on the shoulders and upper back, the areas where you feel a chill first. The solid granny square bolero is particularly effective for transitional weather because its denser fabric provides genuine insulation.
Tips for a Professional Finish on Your Granny Square Bolero
The difference between a homemade-looking bolero and a professionally finished one comes down to a few key techniques in the final stages of your project. These tips will improve the quality of your finished garment and help it look just as polished as something you would find in a boutique.
Block Every Component Twice: For the best results, block your granny squares before joining, and then block the entire assembled bolero again after seaming. The first blocking ensures all squares are the same size for easy joining. The second blocking smooths out any unevenness created during the seaming process, relaxes the stitched seams so they lie flat, and sets the final shape of the garment. This double-blocking approach is the single most impactful thing you can do to improve the appearance of your bolero.
Weave In Ends Securely: A bolero made from multiple colors will generate a significant number of yarn tails that need to be woven in. Take the time to weave each end through at least two inches of stitching in multiple directions, this prevents the ends from working loose during wear and washing. Our guide on how to weave in crochet ends covers the most secure techniques. For a multi-color bolero, consider carrying your yarn up the side of your work (for the granny stripe method) to reduce the total number of ends you need to weave in.
Choose the Right Border: The border you add to your bolero does more than just look pretty, it serves an important structural function by stabilizing the edges and preventing curling. A simple round of single crochet is the most reliable choice for stability. If you want something more decorative, explore our collection of border patterns for options like the shell stitch border, the crab stitch edging, or the picot trim. Just remember that very elaborate borders can overwhelm a small garment like a bolero, so choose something that complements rather than competes with the granny square motifs.
Pay Attention to Seam Placement: The placement and quality of your seams directly affect the comfort and appearance of your granny square bolero. Seams should lie flat against the body, not twist or bunch. When seaming the sleeves, work with the wrong side facing out so the seam ridge ends up on the inside of the garment. Use stitch markers to clearly delineate where the seam begins and ends, and check the fit by trying on the granny square bolero before finalizing each seam. If the armholes feel tight, rip back and extend the unseamed section by a few rows rather than forcing your arms through a tight opening.
Use Quality Yarn for Garments: The yarn you choose for a granny square bolero will determine how the garment looks, feels, and wears over time. While budget-friendly acrylic yarns are fine for practice squares and home decor items like a granny square afghan, a wearable garment benefits from a softer, higher-quality fiber. Cotton, bamboo, merino wool, and high-end acrylic blends all produce beautiful, comfortable granny square bolero garments that feel good against the skin and hold up well to repeated wear and washing.
Frequently Asked Questions
How long does it take to crochet a granny square bolero?
Most granny square bolero patterns take between 8 and 20 hours to complete, depending on the complexity of the motif and the finished size. A simple two-panel bolero made with basic granny squares can be finished in a weekend (8 to 10 hours). More intricate patterns with color changes, joining-as-you-go techniques, or post-stitch details may take 15 to 20 hours. The granny stripe shrug method, which works up as a single long rectangle, is one of the fastest approaches because you eliminate the seaming time between individual squares. Plan your project timeline around your daily crochet schedule, and remember that blocking and finishing add another one to two hours to the total.
Can a beginner make a granny square bolero?
A granny square bolero is an excellent first garment project for beginners who have already mastered the basic granny square. If you can chain, double crochet, slip stitch, and work in the round, you have all the skills needed. The rectangle construction method (crocheting one long panel and seaming the edges for sleeves) is especially beginner-friendly because it avoids complex shaping. Start with a simple, single-color pattern using worsted weight yarn, and work your way up to multi-color designs. The key beginner tips are: block every square before joining, use stitch markers to track your first stitch, and make a gauge swatch before starting the full project.
What is the best yarn for a granny square bolero?
Worsted weight (size 4) cotton or cotton-acrylic blend yarn is the best choice for most granny square bolero patterns. Cotton gives a crisp, structured fabric that holds the bolero’s shape well and provides excellent stitch definition for showing off the granny square pattern. Acrylic blends are softer and slightly more forgiving, with better drape for a relaxed fit. Avoid very heavy yarns like bulky or super bulky, which make the bolero stiff and uncomfortable to wear. For a lightweight summer bolero, DK weight (size 3) cotton works beautifully. Choose a yarn with good stitch definition in colors that complement your wardrobe, and purchase at least one extra skein beyond the pattern recommendation for swatching and mistakes.
How do I size a granny square bolero for plus sizes?
To size a granny square bolero for plus sizes, increase the number of granny squares in each panel and add extra rows for length. For a standard bolero, you typically need two panels measuring approximately 18 inches wide by 30 inches long. For plus sizes, increase the panel width to 22 to 26 inches and the length to 34 to 38 inches. Make a gauge swatch first, then calculate the exact number of squares and rows needed for your measurements. The armhole openings should be at least 10 to 12 inches in circumference for comfort. When seaming, try the bolero on periodically to check the fit, and adjust seam placement as needed before finalizing.
How do I join granny squares for a bolero?
There are several reliable methods for joining granny squares in a bolero. The whip stitch creates a nearly invisible seam when worked on the wrong side with a yarn needle. The slip stitch join adds a decorative raised ridge along the seam. The join-as-you-go technique lets you connect squares as you finish each one, eliminating the tedious seaming step at the end. For a bolero that needs to look polished, the whip stitch is usually the best choice. Whichever method you choose, always block your squares first so they are the same size, and pin them together before seaming to ensure proper alignment. Mismatched squares create a wavy, uneven edge that is difficult to correct after seaming.