9 Easy Steps: Tulip Granny Square Crochet Pattern
Ready to start your next project? This guide has clear steps, helpful tips, and a few tricks I wish I had known when I first started crocheting.
\nTulip Granny Square at a Glance
- Topic: tulip granny square
- Skill level: intermediate
- Main goal: help the reader crochet a 3D tulip motif on a classic granny square background
- Related topics: flower granny squares, crochet applique motifs, 3D crochet flowers, spring crochet patterns
Quick Answer
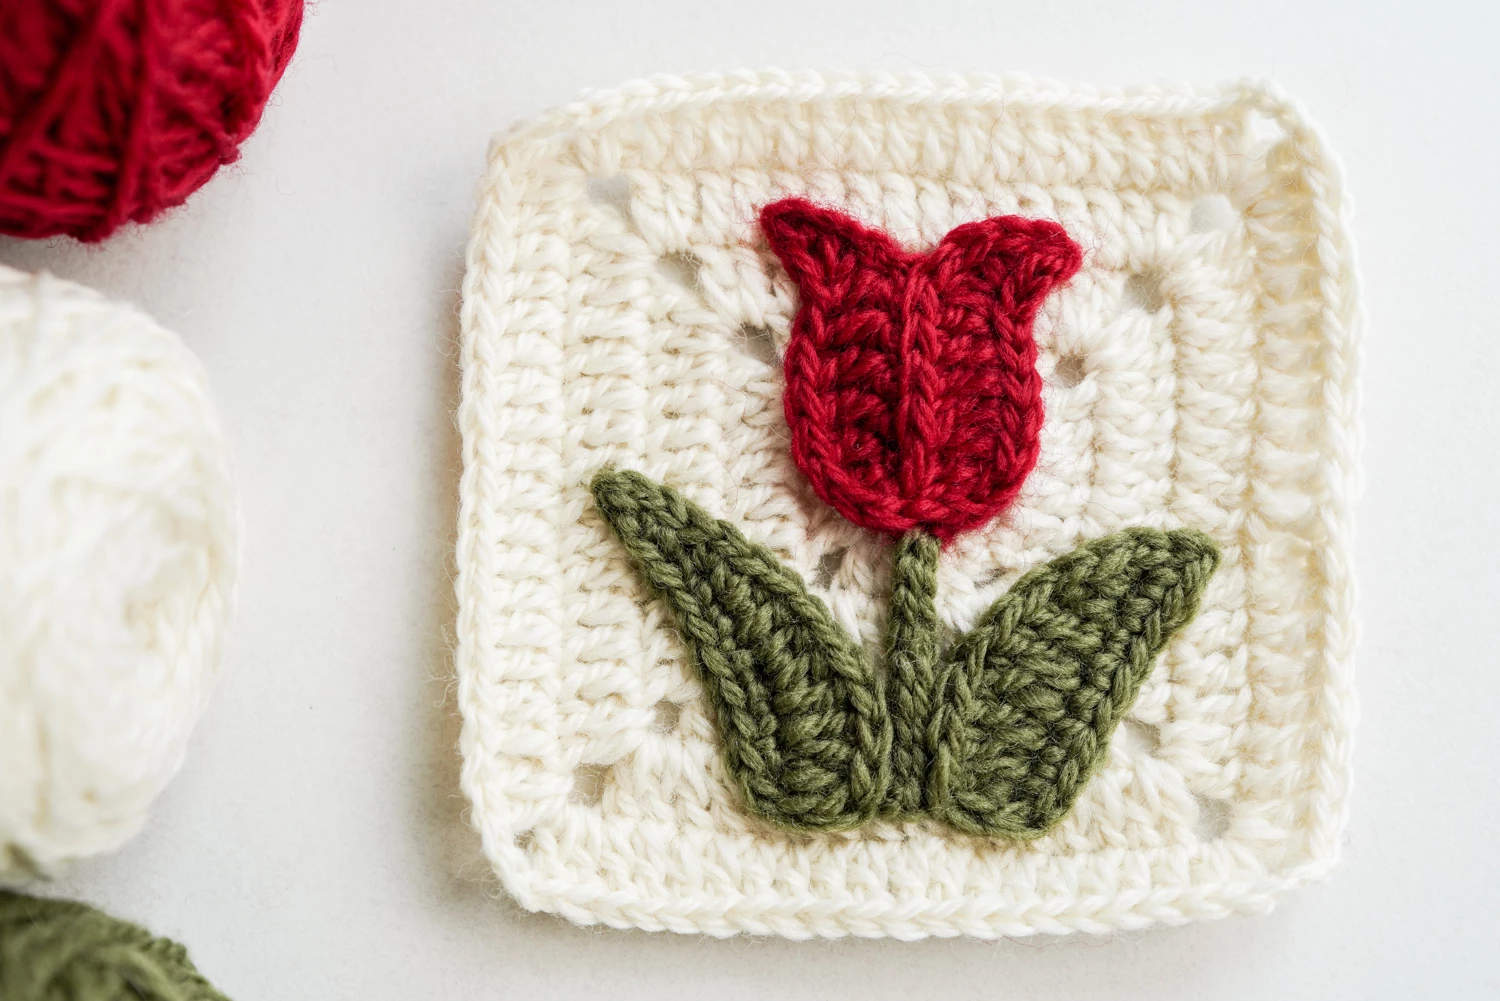
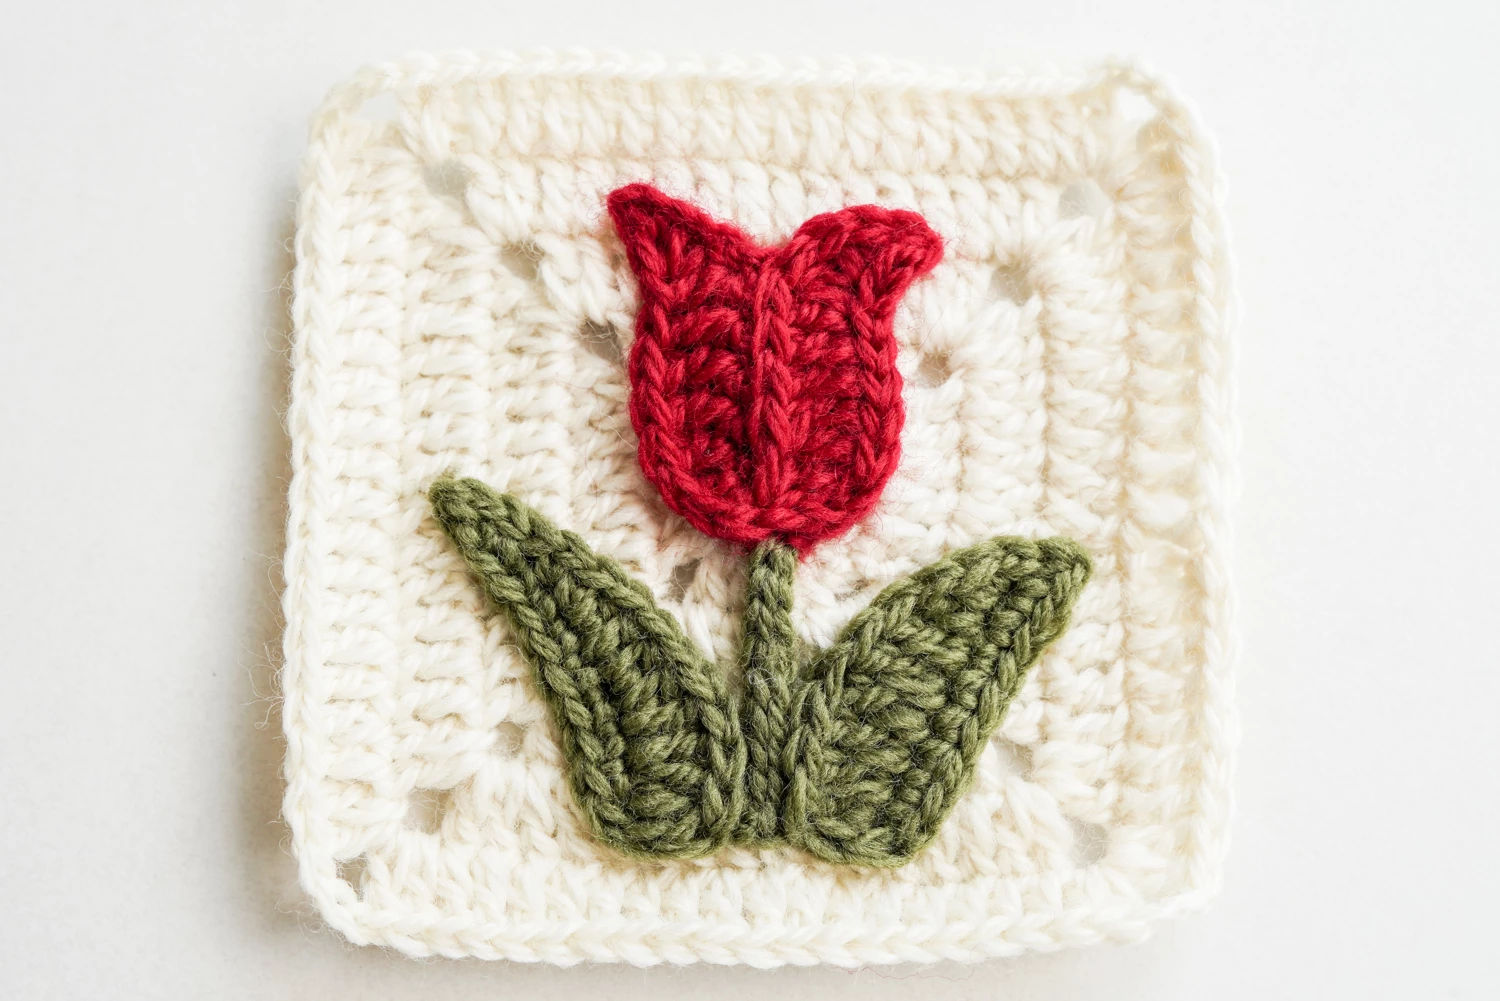
A tulip granny square combines a dimensional crocheted tulip flower with stem and leaves onto a traditional granny square background. This tulip granny square pattern uses three colors, intermediate stitch techniques like the third loop and picot stitches, and produces a 4.5-inch square that is perfect for spring-themed blankets, pillows, and tote bags. You will work the tulip motif and the granny square base separately, then assemble them at the end for a polished finish.
\nTip: Block your finished tulip granny square before assembling projects — this helps the granny background lay perfectly flat and makes the 3D tulip petals pop even more.
At a Glance
- Skill level: intermediate
- Time needed: 45-60 minutes per square
- Best yarn: worsted weight (4) cotton or acrylic blend
- Hook size: 5.0 mm (H-8)
Common Mistakes → Quick Fixes
- Flower petals curling: avoid working too tightly — relax your tension on the third-loop-only round
- Granny square edges not square: count your stitches in each corner space carefully — each corner must have the same number of dc clusters
- Leaves look flat instead of pointed: make sure the picot stitch at the leaf tip is tight and positioned at the very tip before fastening off
Mini Glossary
BLO (back loop only), FLO (front loop only), dc (double crochet), hdc (half double crochet), sc (single crochet), ch-sp (chain space), sl st (slip stitch), picot (picot stitch), inc (increase — 2 stitches in 1), dec (decrease — 2 stitches together)
 KnotToYarn
Subscribe to KnotToYarn!
Get the best free crochet patterns, tutorials & tips delivered straight to your inbox. Join our growing community!
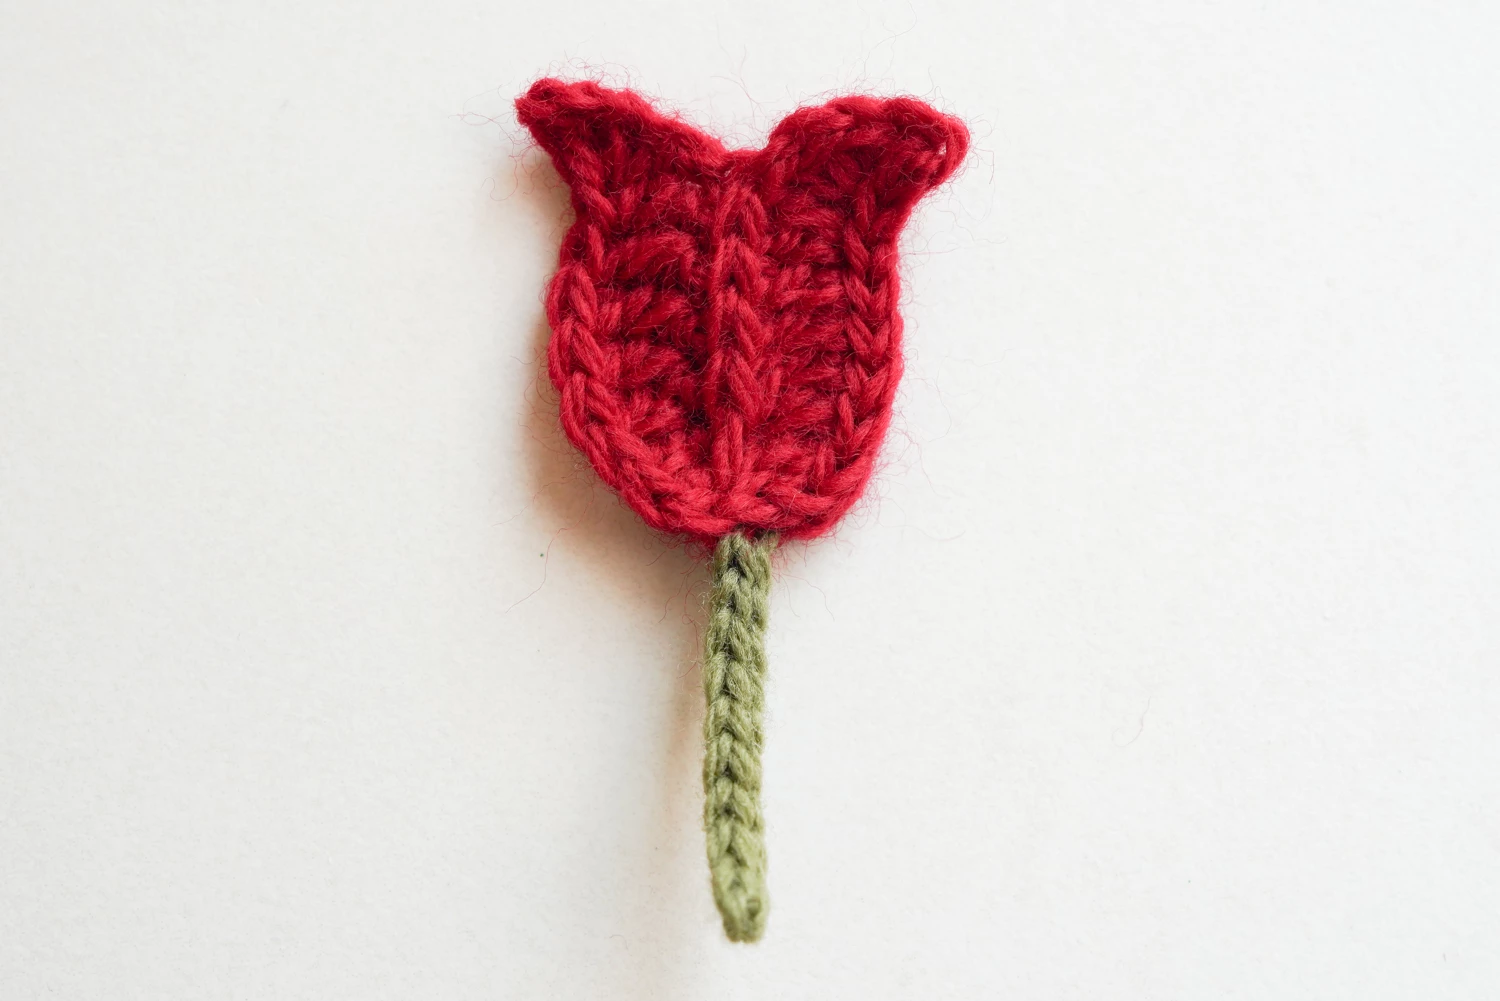
If you are looking for a crochet project that celebrates the beauty of spring, this tulip granny square pattern is exactly what you need. The design features a bold, dimensional tulip bloom sitting on a curved stem with two textured leaves, all set against a soft cream granny square background. Whether you are building a spring-themed blanket, decorating a pillow cover, or creating a set of reusable market bags, the tulip granny square adds a touch of garden elegance to anything you make.
This tulip granny square pattern is written for intermediate crocheters who are comfortable with basic stitches and ready to try techniques like working in the third loop, front loop only, and back loop only. The finished square measures approximately 4.33 inches, making it a versatile 4.5-inch block that works beautifully in any granny square project. We will walk through every single round together so you never feel lost.
Materials for Your Tulip Granny Square
Before you begin crocheting your tulip granny square, gather the following supplies. This pattern uses three colors of yarn: one for the tulip bloom, one for the stem and leaves, and one for the granny square background. Worsted weight (category 4) yarn works beautifully for this design because it gives the flower good structure while keeping the background soft and drapable.
- Yarn: 3 colors of worsted weight (4) yarn — approximately 15 yards of each color for one square
- Crochet hook: 5.0 mm (H-8) or the size that gives you the correct gauge
- Darning needle: for weaving in ends and assembling the tulip motif to the background
- Scissors: for cutting yarn between color changes
The tulip granny square looks best when you choose colors that mirror a real tulip garden. Classic red or deep pink for the bloom, sage or olive green for the stem and leaves, and cream or soft white for the background create a timeless, vintage feel. You can browse our guide on the best yarn for beginner crochet if you need help choosing materials that match your budget and style.
Tulip Granny Square Color Ideas
One of the best things about the tulip granny square is how easily you can customize the colors. The original design uses a deep red bloom against cream, which calls to mind a classic Dutch tulip field. But you can adapt this pattern to suit any season, occasion, or personal preference with just a few simple color swaps.
- Spring garden: soft pink bloom, bright green stem and leaves, cream background
- Sunset warmth: golden yellow bloom, burnt orange stem and leaves, dusty rose background
- Cool tones: lavender bloom, dusty blue stem and leaves, soft gray background
- Cottage charm: coral bloom, olive green stem and leaves, natural ecru background
Each tulip granny square takes only about 15 yards per color, so this is a fantastic stash-busting project. If you are new to selecting colors that work well together, our beginner crochet patterns guide includes a section on color theory basics that will help you pick combinations you will love.
Gauge and Sizing
The finished tulip granny square should measure approximately 4.33 inches (11 cm) on each side when worked with worsted weight yarn and a 5.0 mm hook. Gauge is not critical for decorative granny squares, but if you want your squares to match in a multi-square project, it is worth making a small swatch first. Crochet a quick test square background through round 3 and measure it — if it is too large, try a smaller hook; if too small, go up a hook size.
Keep in mind that the tulip granny square includes a 3D flower applique that adds some height on top of the background. When planning blanket layouts, account for the slight dimensional bump when joining squares. For more help with sizing and tension, check out our article on how to fix crochet tension.
Abbreviations (US Terms)
This tulip granny square pattern uses standard US crochet abbreviations. If any of these are unfamiliar, our crochet abbreviations guide explains every term in detail with diagrams.
- ch — chain stitch
- dc — double crochet
- sc — single crochet
- hdc — half double crochet
- sl st — slip stitch
- ch-sp — chain space
- BLO — back loop only
- FLO — front loop only
- inc — increase (2 stitches in 1 stitch)
- dec — decrease (2 stitches worked together)
- pic — picot stitch
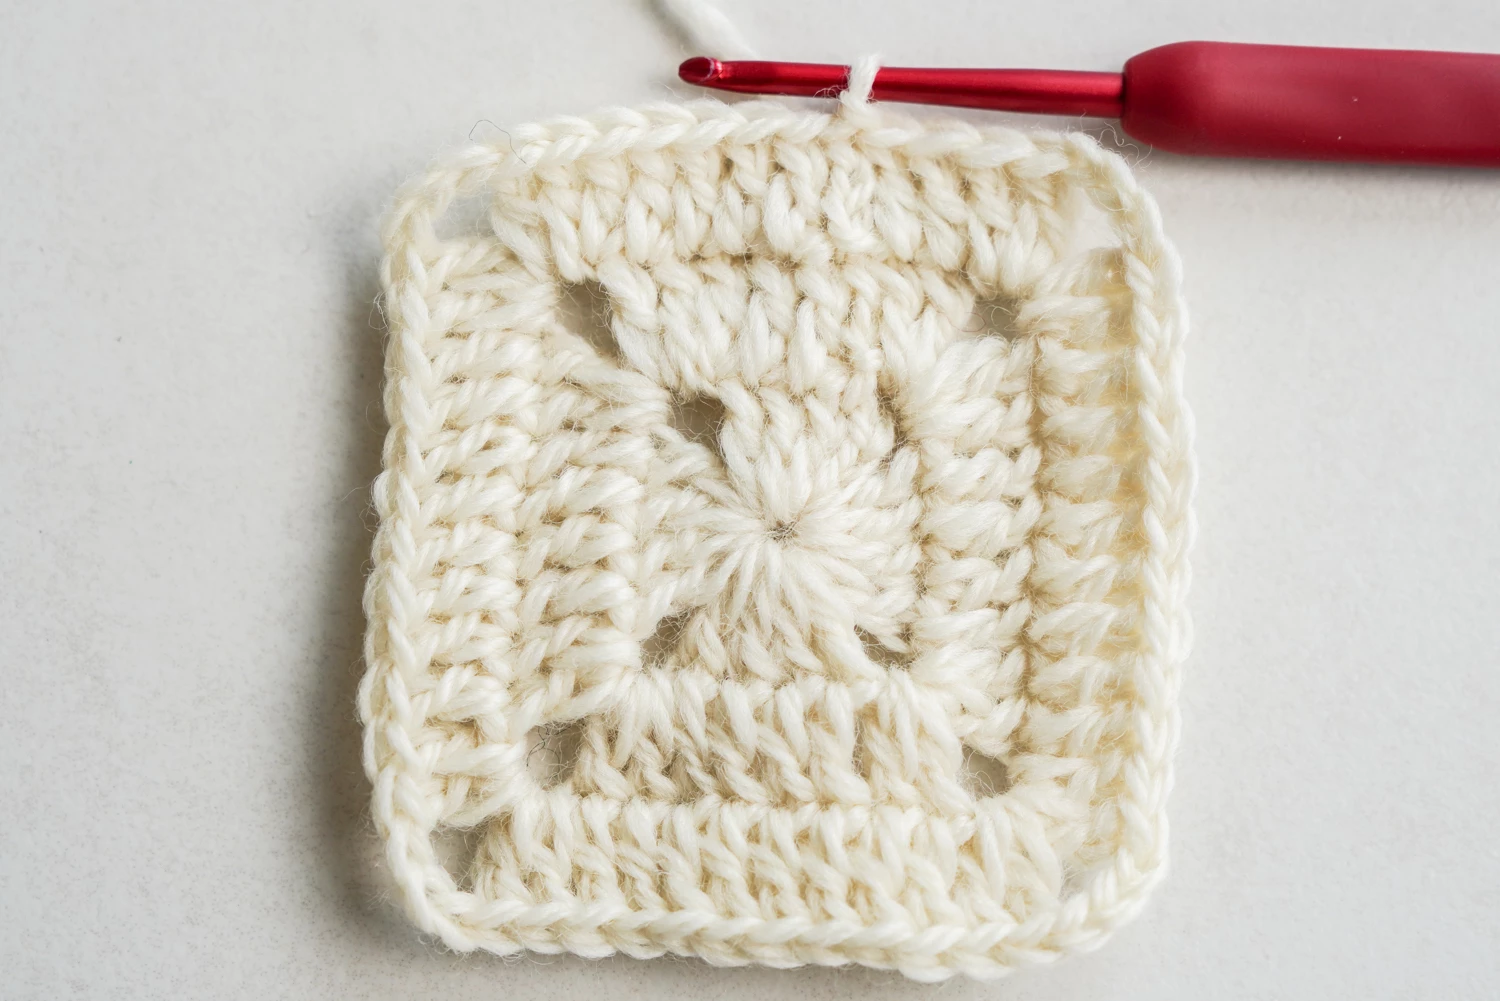
How to Crochet a Tulip Granny Square Step by Step
Now let us walk through each part of the tulip granny square together. We will start with the tulip flower bloom, then add the stem and leaves, crochet the granny square background separately, and finally assemble everything. Take your time with each round, and remember that you can always click on the images to zoom in if the stitch details are hard to see.
Part 1: The Tulip Flower Bloom
The flower bloom is the star of this tulip granny square. It is worked flat as a curved petal shape using chain stitches and a combination of increases and decreases. You will work in the back loop only for round 1, flip to the wrong side for round 2, and then use the third loop for the shaping in round 3. The result is a gently curved, teardrop-shaped petal that looks just like a real tulip.
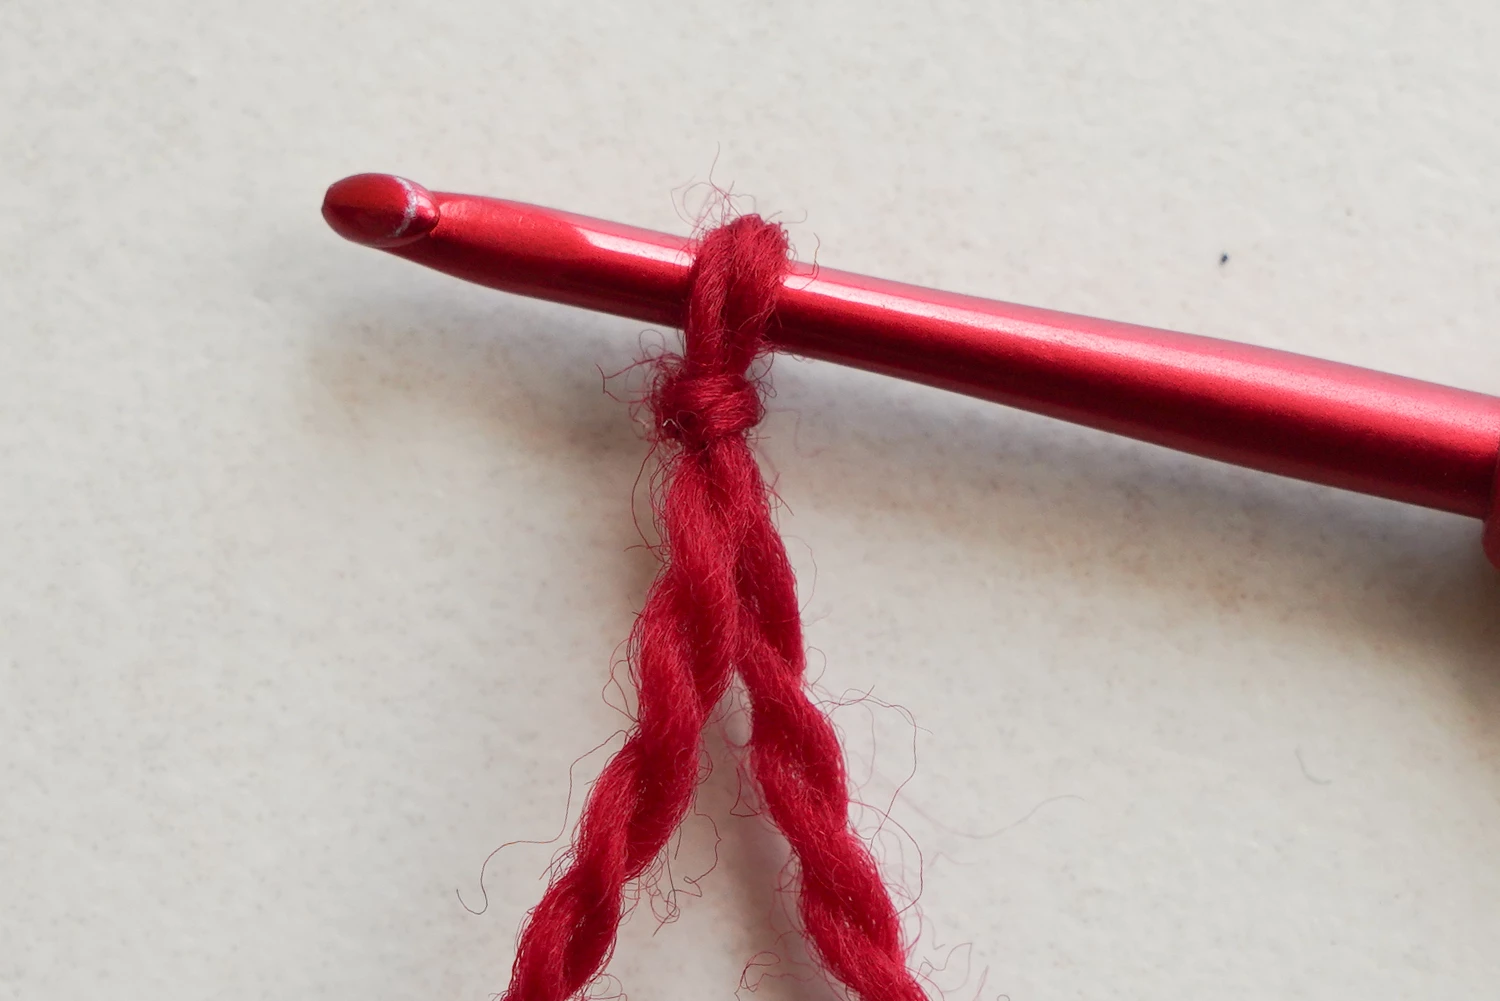
Round 1
Chain 10. Working in the back loop only, starting from the 9th chain from your hook to the first chain: slip stitch, half double crochet increase, double crochet increase, double crochet, double crochet, double crochet decrease, half double crochet decrease.
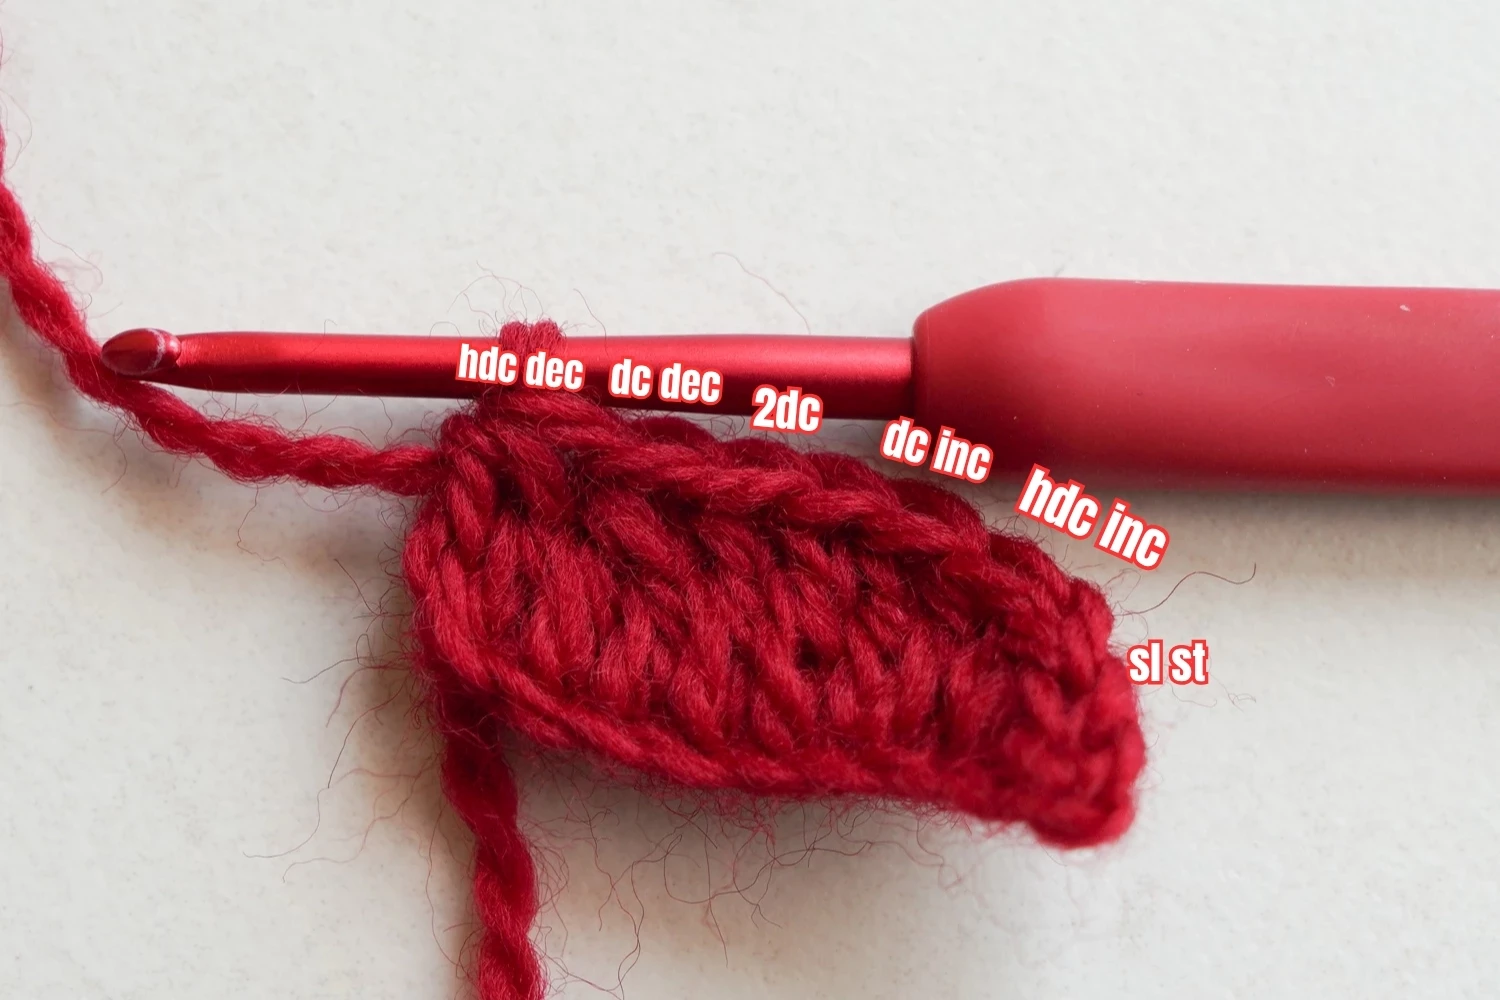
The image above illustrates this pattern step in detail.

Round 2
Flip your workpiece to the wrong side. Working in the front loop only, chain 1 (counts as single crochet), then single crochet in the next 5 stitches.
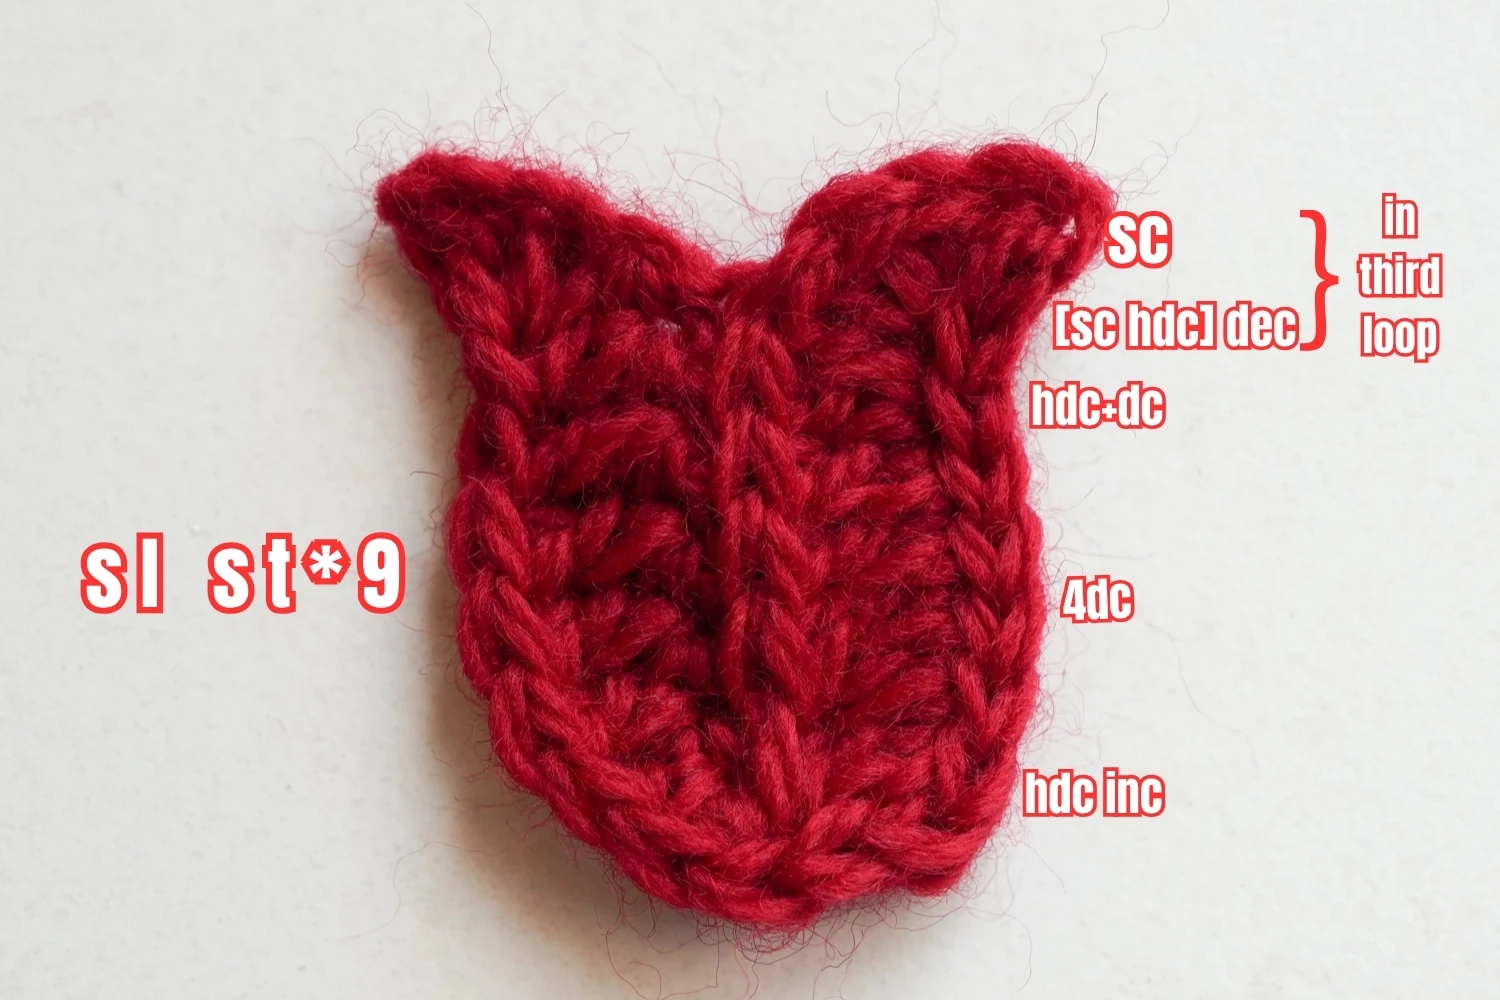
Round 3
Flip the workpiece back to the right side. Chain 4. Starting from the 3rd chain to the 1st chain, working in the third loop only: single crochet, (single crochet and half double crochet) decrease; half double crochet plus double crochet in the next stitch, double crochet in the next 4 stitches, half double crochet increase, then slip stitch in the next 9 stitches along the other half of the petal. Fasten off.
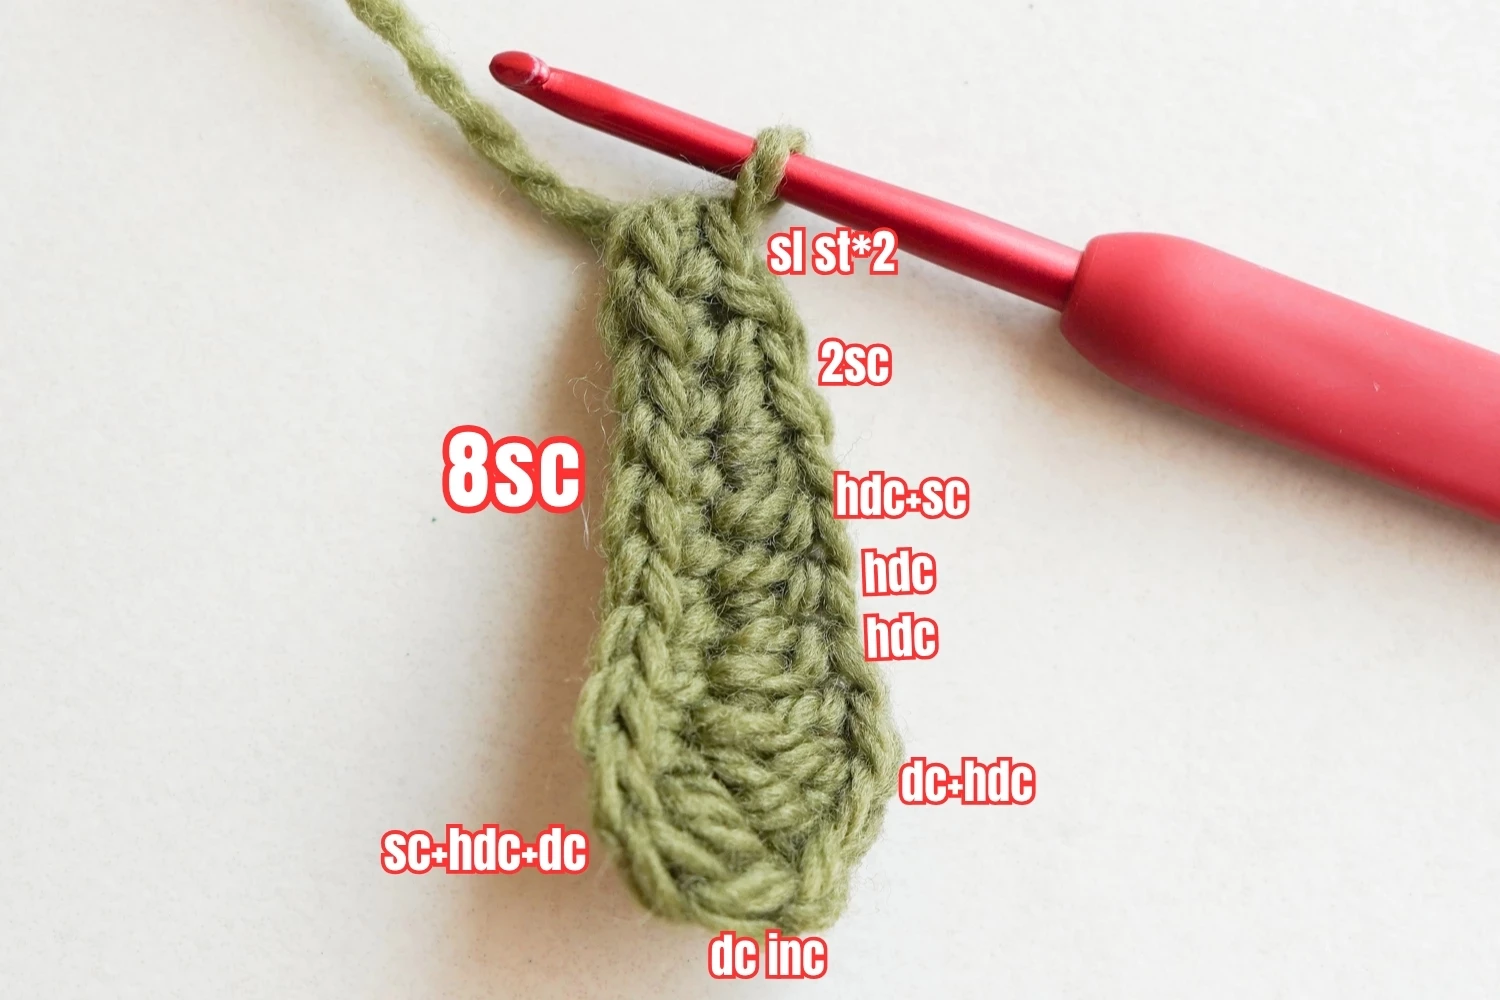
Part 2: The Stem
Next, you will add a simple stem below the flower bloom of your tulip granny square. The stem is made by chaining and working slip stitches in the third loop, which creates a thin, slightly raised cord that looks just like a real tulip stem. This technique is quick and gives a clean, defined line between the flower and the leaves.
Join a new yarn at the base of the flower. Chain 10, then working in the third loops only, slip stitch in the third loop of each chain from the 9th chain to the 1st chain. Fasten off.
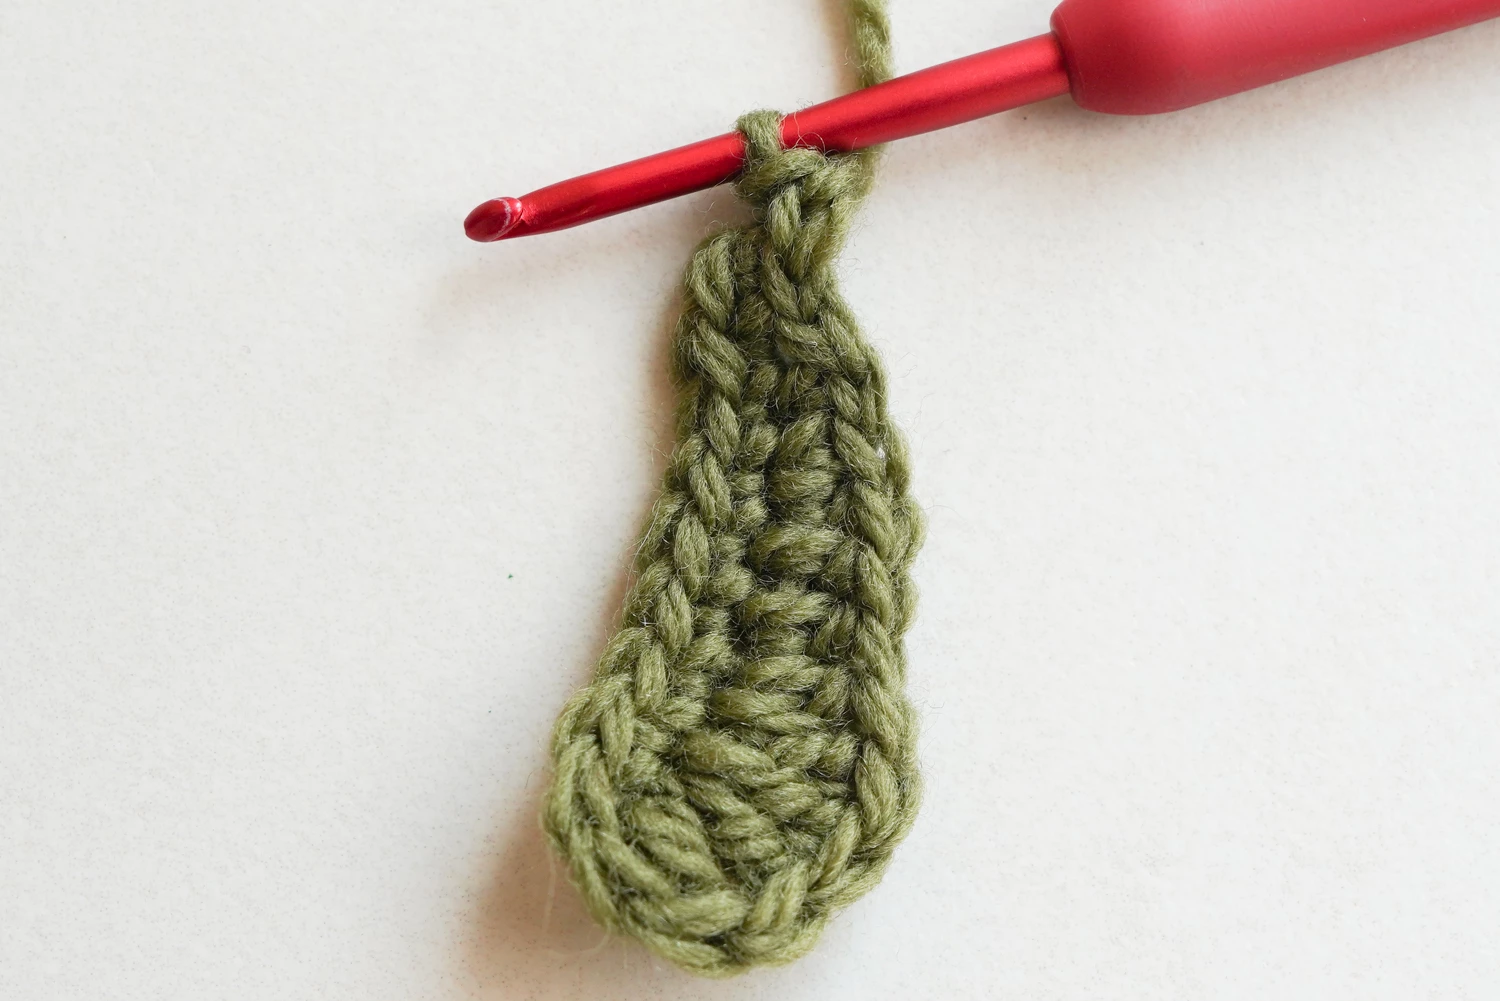
Part 3: The Leaves
The tulip granny square features two leaves that branch off from the stem — a left leaf with a pointed picot tip and a right leaf that is slightly wider. Both leaves use the back loop only and front loop only technique on opposite sides of a chain foundation to create an elongated leaf shape. The left leaf includes a chain-2 picot at the tip for that classic pointed look.
Left Leaf
Chain 10. Working in the back loop only: single crochet in each back loop from the 9th chain to the 2nd chain, then (single crochet plus half double crochet plus double crochet) in the back loop of the 1st chain. Working in the front loop only: from the 1st chain, double crochet increase, (double crochet plus half double crochet), 2 half double crochet, (half double crochet plus single crochet), 2 single crochet, slip stitch in the next 2 front loops. Chain 2 to create a picot stitch, slip stitch to complete the picot, then slip stitch to the 10th chain. Fasten off.
Right Leaf
Here you can see how the stitch work comes together in this section.

Chain 10. Working in the back loop only: from the 9th chain to the 1st chain, slip stitch, single crochet increase, half double crochet, 5 double crochet, (double crochet plus half double crochet plus 2 single crochet). Working in the front loop only: from the 1st chain to the 9th chain, 8 single crochet, slip stitch to the next front loop. Fasten off.
Part 4: Granny Square Background
The granny square background for your tulip granny square is a classic pattern with 5 rounds of double crochet clusters separated by chain-3 corner spaces. It starts with a magic loop, which gives you a perfectly closed center with no hole. If you are not familiar with the magic loop technique, our magic circle crochet guide will walk you through it step by step.
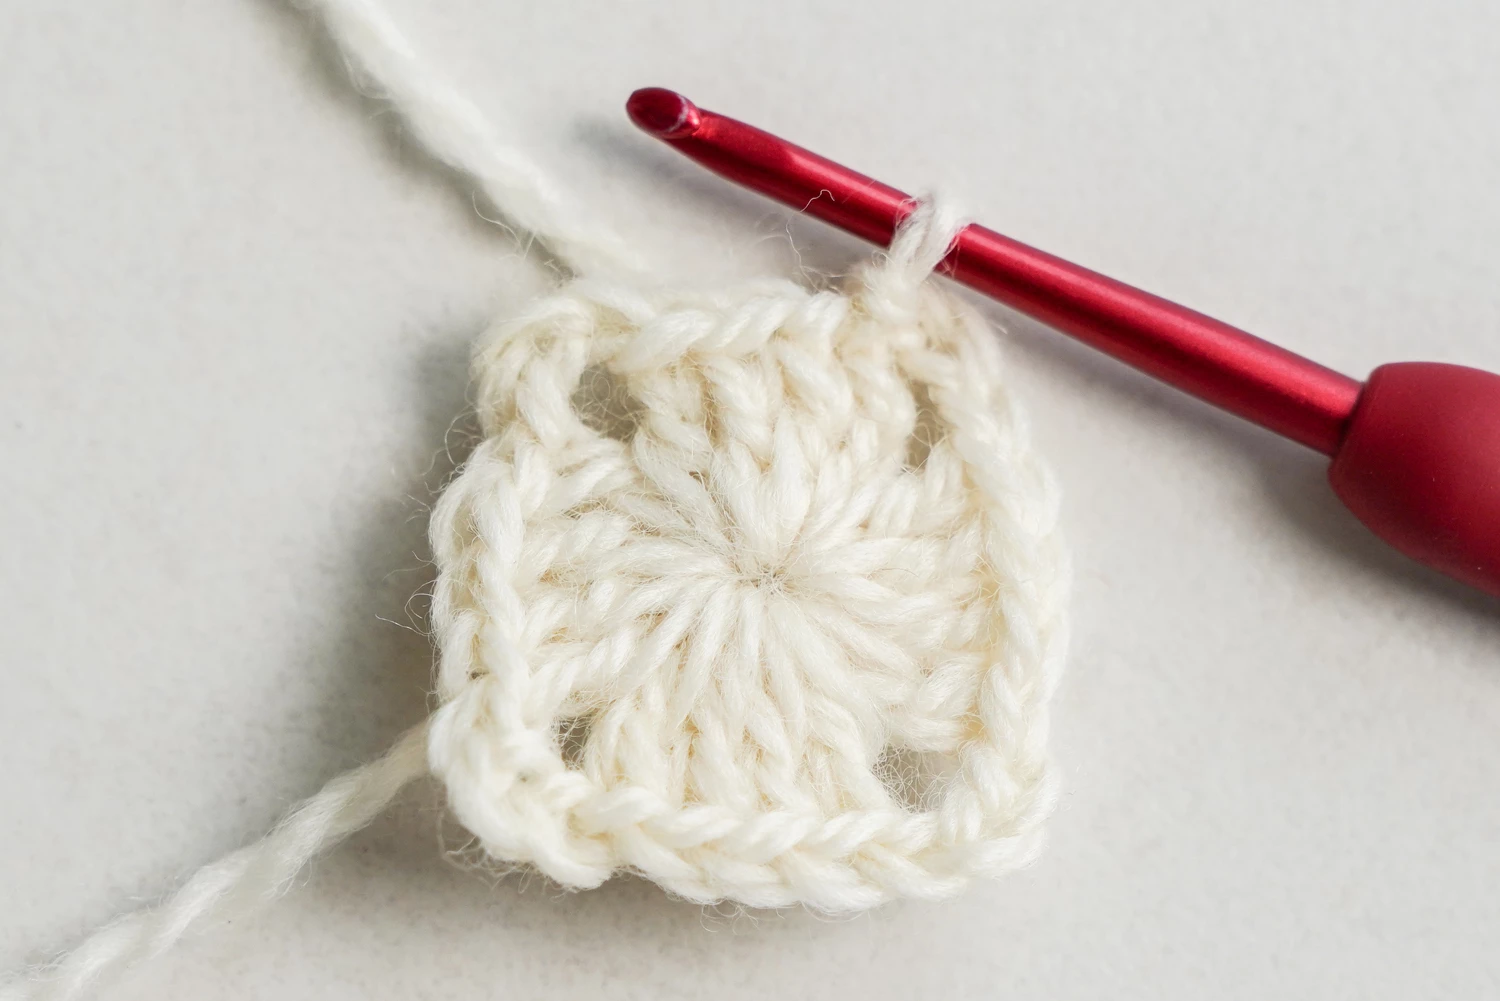
Round 1
Magic loop. Chain 3 (counts as first double crochet), 3 double crochet in the loop, chain 3. Repeat [4 double crochet, chain 3] three more times. Slip stitch to the top of the first chain 3. Pull the magic loop tail tightly to close the center.
Round 2
Chain 3 (counts as first double crochet), 3 double crochet. In the next corner space: 2 double crochet, chain 3, 2 double crochet. Repeat [4 double crochet, 2 double crochet in next corner, chain 3, 2 double crochet in corner] three more times. Slip stitch to the top of the first chain 3.
Round 3
Chain 3 (counts as first double crochet), 5 double crochet. In the next corner space: 2 double crochet, chain 3, 2 double crochet. Then 2 double crochet. Repeat [6 double crochet, 2 double crochet in corner, chain 3, 2 double crochet in corner, 2 double crochet] three more times. Slip stitch to the top of the first chain 3.
Round 4
Chain 3 (counts as first double crochet), 7 double crochet. In the next corner space: 2 double crochet, chain 3, 2 double crochet. Then 4 double crochet. Repeat [8 double crochet, 2 double crochet in corner, chain 3, 2 double crochet in corner, 4 double crochet] three more times. Slip stitch to the top of the first chain 3.
Round 5
Chain 3 (counts as first double crochet), 9 double crochet. In the next corner space: 2 double crochet, chain 3, 2 double crochet. Then 6 double crochet. Repeat [10 double crochet, 2 double crochet in corner, chain 3, 2 double crochet in corner, 6 double crochet] three more times. Slip stitch to the top of the first chain 3. Fasten off.
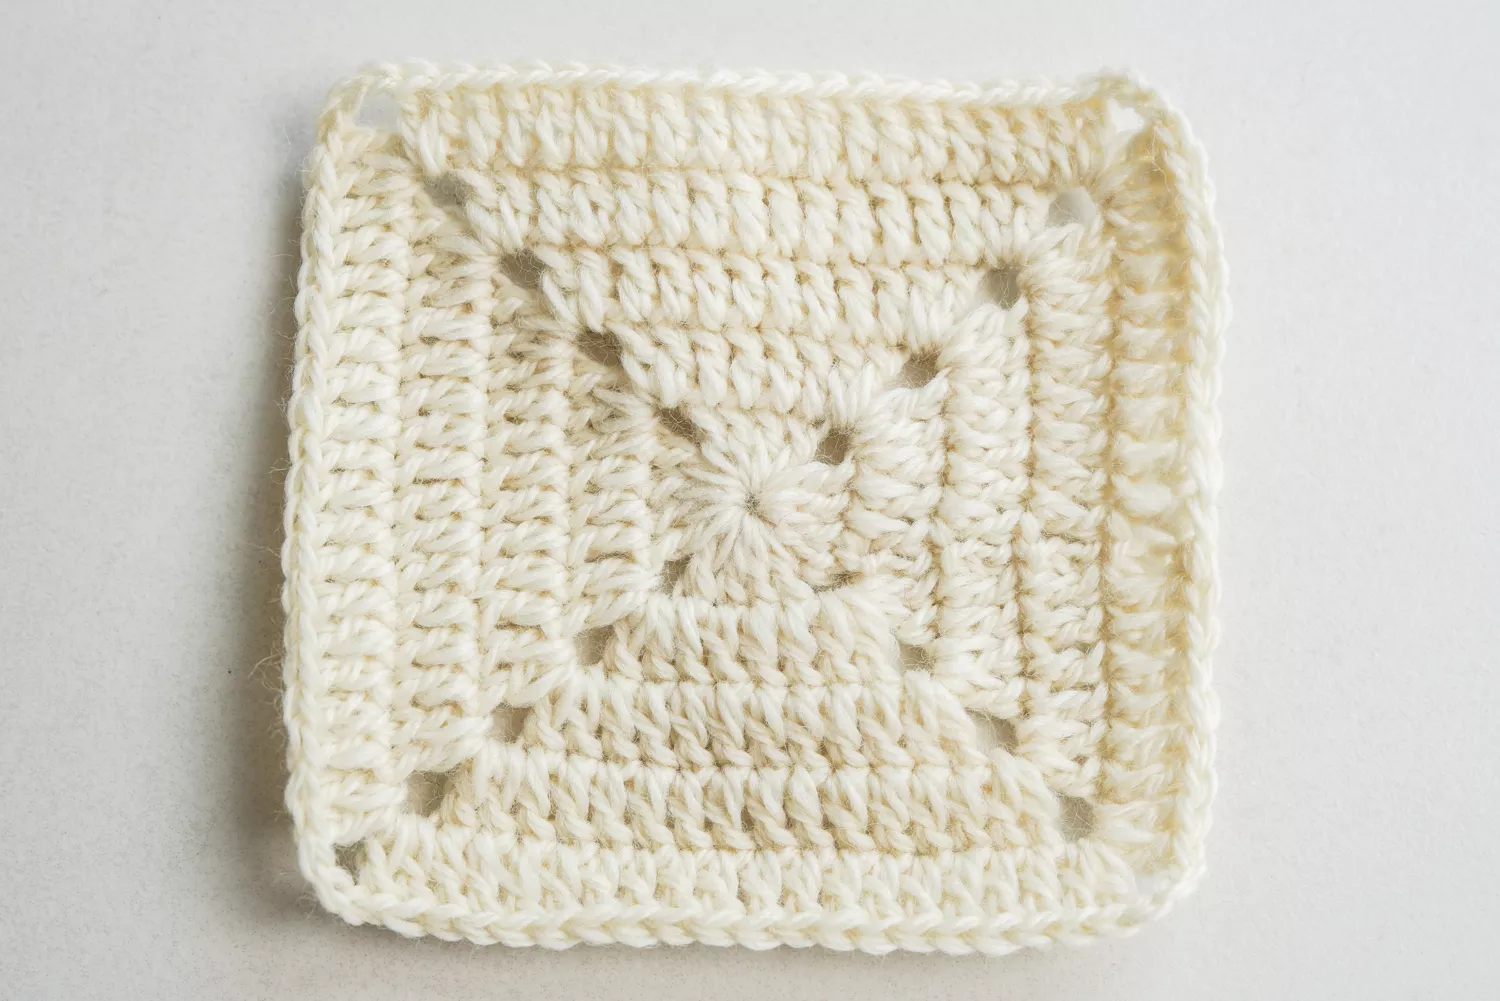
Part 5: Assembling Your Tulip Granny Square
The final step is to attach the tulip motif to the granny square background. Position the flower, stem, and leaves onto the center of your completed background square. Use your darning needle and matching yarn tails to sew each element securely in place. Take a few extra stitches at the base of the stem and along the leaf veins to make sure nothing shifts or flops over. Once everything is sewn down, weave in all your remaining yarn tails on the back of the tulip granny square.
5 Pro Tips for a Perfect Tulip Granny Square
These tips will help your tulip granny square look polished and professional, even if this is your first time working with 3D motifs on granny squares.
KnotToYarn
Subscribe to KnotToYarn!
Get the best free crochet patterns, tutorials & tips delivered straight to your inbox. Join our growing community!
1. Keep consistent tension throughout the flower. The tulip petal uses increases and decreases to create its curved shape, so varying tension will make the petal look lopsided. Practice the stitch pattern on a small swatch first if you are unsure about your tension. Our guide on how to fix crochet tension covers common issues and solutions in detail.
2. Use stitch markers for round starts. With multiple color changes and sections (flower, stem, leaves, background), it is easy to lose your place. Place a stitch marker at the beginning of each new section so you always know where you left off.
3. Block both pieces before assembling. Blocking the granny square background flat and gently shaping the flower petals makes a huge difference in the final look. Spray blocking with a little water and pins works well for cotton and acrylic blends.
4. Weave ends as you go. This pattern has many color changes, which means lots of yarn tails. Instead of leaving them all for the end, weave in your ends as you finish each section. It saves time and keeps your work area tidy.
5. Make a test square first. If you are planning a large project like a blanket with multiple tulip granny squares, make one complete test square first. Check the gauge, make sure you are happy with the colors, and confirm the size matches your other squares. For a refresher on reading patterns, see our how to read a crochet pattern guide.
Project Ideas for Your Tulip Granny Square
Once you have mastered the tulip granny square, the possibilities are nearly endless. Here are some popular ways to use these beautiful spring-themed squares in finished projects.
Spring-themed blanket: Make 20 to 30 tulip granny squares in alternating color schemes and join them with a simple single crochet border. Add a cream or sage green border around the entire blanket for a polished finish. This makes a wonderful baby blanket or throw for a living room.
Decorative pillow covers: Four tulip granny squares sewn together create a 17-inch pillow front that is absolutely gorgeous. Add a solid granny square back and a zipper or button closure for easy washing.
Market tote bag: Line a set of joined tulip granny squares with fabric and attach handles for a reusable grocery bag that turns heads at the farmer’s market. The granny square structure provides natural stiffness, so the bag holds its shape well.
Table runner or placemats: A row of 5 to 7 tulip granny squares joined end-to-end makes a charming spring table runner. Individual squares also work as decorative placemats for a garden party or brunch setting.
For more project inspiration, browse our collection of granny square patterns and solid granny square designs that pair beautifully with floral motifs like this one.
Frequently Asked Questions
Is the tulip granny square suitable for beginners?
This tulip granny square is rated as an intermediate pattern because it uses techniques like working in the third loop only, front loop only, and back loop only. However, if you are a confident beginner who has already completed a few basic granny squares and is comfortable with the double crochet stitch, you can absolutely tackle this pattern. Take it one section at a time and do not rush — the step-by-step photos will guide you through every round.
How many tulip granny squares do I need for a blanket?
For a standard throw blanket measuring about 50 by 60 inches, you would need approximately 120 to 144 tulip granny squares depending on your border and joining method. Since each square takes about 45 to 60 minutes to complete, plan this as a longer-term project. A baby blanket (30 by 40 inches) needs about 45 to 60 squares, which is much more manageable for a first blanket project.
Can I use a different flower instead of a tulip?
The granny square background in this tulip granny square pattern is a standard 5-round granny square, which means you can substitute any crocheted flower applique for the tulip motif. Rose motifs, daisy patterns, and sunflower appliques all work beautifully on the same background. Just make sure your substitute flower is roughly the same size (about 2.5 to 3 inches tall) so it fits nicely within the center of the square. Check out our easy crochet flower pattern for a simpler alternative that works well as a swap.
What yarn weight is best for a tulip granny square?
Worsted weight (category 4) yarn is the best choice for this tulip granny square because it provides enough structure for the 3D flower to hold its shape while keeping the background soft and flexible. DK weight (category 3) also works if you want a slightly smaller, more delicate square — just use a 4.0 mm hook instead of 5.0 mm. Bulky yarn is not recommended because it makes the flower details look chunky and hard to read.
How do I join tulip granny squares together?
There are several methods for joining granny squares, but the most popular options for the tulip granny square are the flat single crochet join and the whip stitch join. The single crochet join creates a visible ridge between squares that adds a nice textured look, while the whip stitch is nearly invisible. Both methods are strong enough to hold up to regular use and washing. Choose the one that matches your aesthetic preference.
Wrapping Up Your Tulip Granny Square
Congratulations on completing your first tulip granny square. This pattern is a wonderful way to practice intermediate techniques while creating something truly beautiful. The combination of a 3D flower applique on a classic granny square background gives you a finished piece that looks impressive and professional, no matter how you choose to use it.
Remember that every crocheter was once a beginner, and even experienced crafters learn something new with each project. If your first tulip granny square is not absolutely perfect, that is completely normal — your skills will improve with every square you make. For more crochet tips and techniques, the Craft Yarn Council is an excellent resource for standards, guidelines, and educational materials. You can also explore creative pattern ideas on Yarnspirations and LoveCrafts.


