Cloud Crochet Cardigan Pattern: 7 Easy Steps
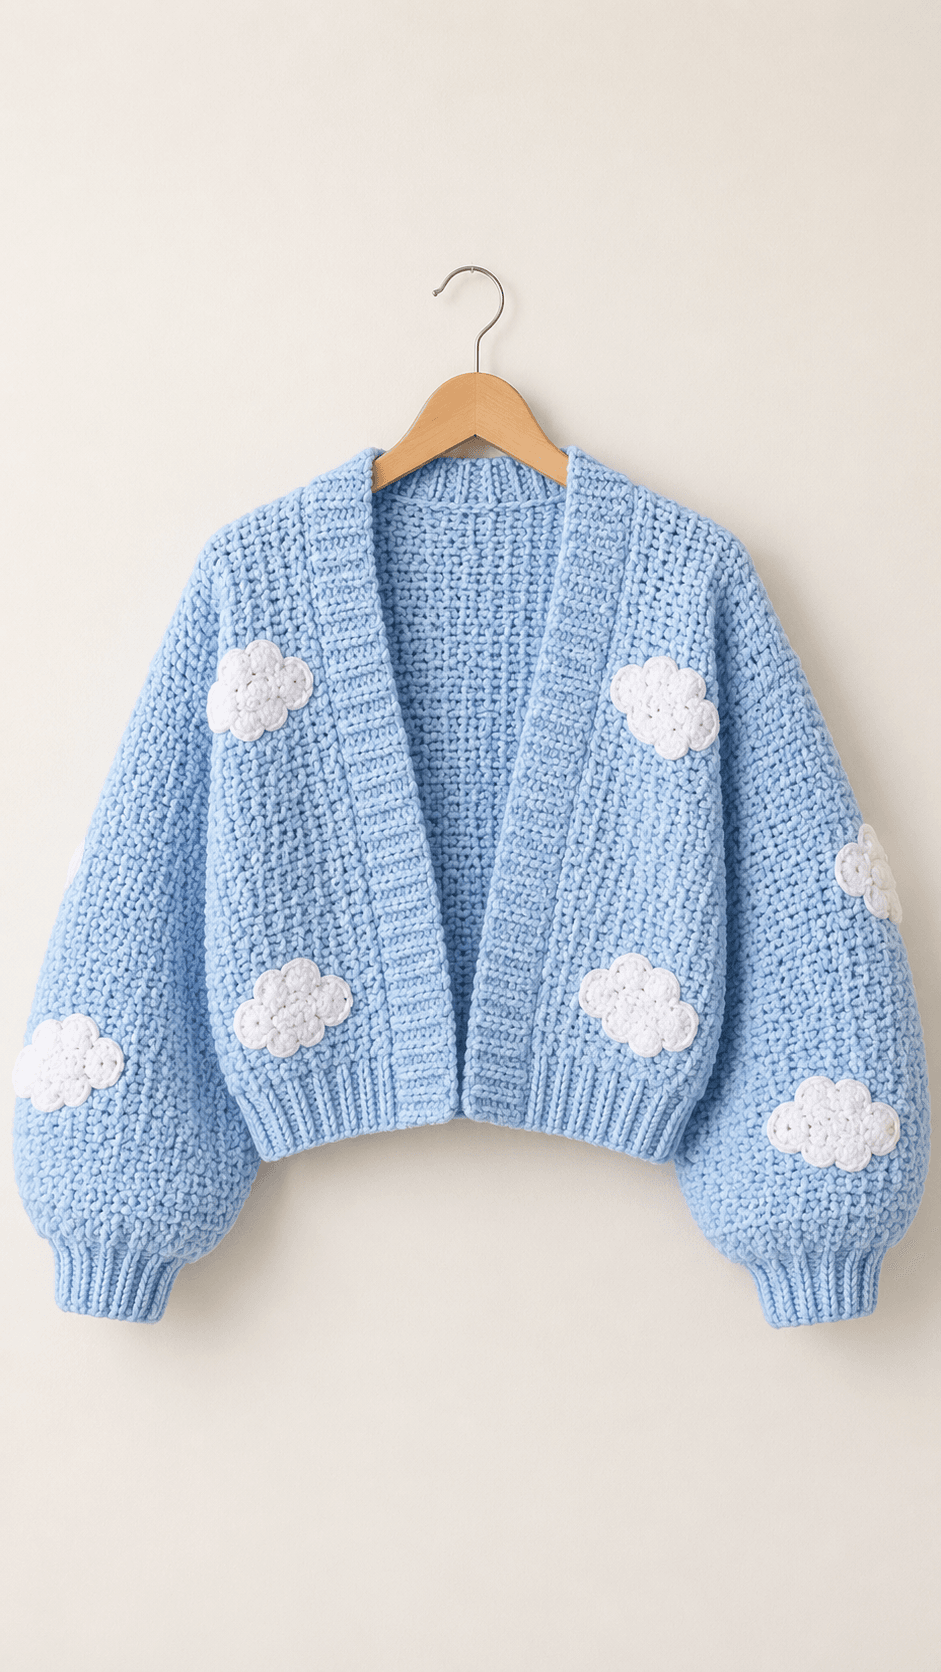
A cloud crochet cardigan pattern is a wearable crochet project that combines a simple mesh-stitch cardigan body with adorable 3D cloud motifs sewn onto the fabric. The result is a cozy, whimsical sweater that looks far more complicated than it actually is. Each section of this cloud crochet cardigan pattern is worked flat and then assembled, making it a great next-step project for beginners ready to try garments.
Tip: Always count your stitches after every row in the mesh section of this cloud crochet cardigan pattern. Skipping a stitch will throw off the openwork pattern and make seaming much harder later.

Materials for Your Cloud Crochet Cardigan Pattern
Before starting your cloud crochet cardigan pattern, gather everything you need so you can work without interruptions. Having all supplies ready will also help you maintain consistent tension throughout the project.
- Main color yarn: 6 skeins of medium-weight acrylic or cotton blend (approximately 800 yards total). A soft blue or dusty rose works beautifully as the base.
- Contrast color yarn: 1 skein of white medium-weight yarn for the cloud appliques.
- Body hook: 5 mm crochet hook for the main cardigan panels.
- Cloud hook: 3 mm crochet hook for the cloud appliques (using a smaller hook keeps the clouds firm and dimensional).
- Stitch markers: At least 4 markers to track shoulder sections and row counts.
- Tapestry needle: For seaming panels and sewing on clouds.
- Scissors and measuring tape.
If you are unsure which hook size to use, check our complete crochet hook size chart for reference. Understanding standard abbreviations will also help, review our crochet abbreviations guide before you begin.
Back Panel
Begin with the ribbing for the bottom of the back panel. Chain 9, then work 1 single crochet into the second chain from the hook and into each remaining chain. You should have 8 single crochet stitches at the end of the row. Chain 1 and turn. For the following rows, work 1 single crochet into the back loop only of each stitch across. Continue working in this way until you have completed 60 rows in total. The finished ribbing should measure approximately 45 cm.
Once the ribbing is complete, turn your work so that you can crochet along the long edge. Chain 1 and work 83 single crochet stitches evenly across the edge of the ribbing. If you are making a larger size, you can increase this number, but make sure the final stitch count remains an odd number.
To begin the main stitch pattern, chain 1 and turn. Work 1 single crochet into the first stitch, chain 1, skip the next stitch, then work 1 single crochet into the following stitch. Continue repeating chain 1, skip 1 stitch, single crochet into the next stitch across the entire row.
For every following row, continue in the same pattern by working a single crochet into each single crochet from the previous row and making a chain 1 over each chain-1 space. Continue until you have completed 55 rows of this mesh pattern.
Once the body section is finished, begin shaping the shoulders. Count 33 stitches or pattern positions inward from each side and place a stitch marker at each point. Starting from one side, continue working in the established mesh pattern until you reach the marker. Work a total of 3 additional rows over this shoulder section, then fasten off and leave a tail for sewing. Repeat the same process on the opposite shoulder.
Front Panels
The cardigan requires two identical front panels. Begin each panel with the same ribbing used for the back. Chain 9 and work 8 single crochet stitches across, starting in the second chain from the hook. Chain 1 and turn, then work single crochet stitches into the back loops only across each row. Continue until you have completed 22 rows. The ribbing should measure approximately 17 cm.
Turn the ribbing so you can work along the long edge. Chain 1 and work 33 single crochet stitches evenly across. Chain 1 and turn. Begin the mesh pattern by working 1 single crochet into the first stitch, chain 1, skip 1 stitch, then single crochet into the next stitch. Repeat this pattern across the row.
Continue working each following row by placing a single crochet into each single crochet and a chain 1 over each chain-1 space. Work a total of 58 rows in the mesh pattern, then fasten off. Make a second front panel in exactly the same way.
Sleeves
Begin each sleeve by making the cuff. Chain 9 and work 8 single crochet stitches across, beginning in the second chain from the hook. Chain 1 and turn. From the second row onward, work single crochet stitches into the back loops only. Continue until you have completed 20 rows. The cuff should measure approximately 15 cm.
Fold the cuff so that the first and last rows meet. Join the two short edges together using slip stitches to form a ring. Once the cuff is joined, fasten off.
Attach the blue yarn along the edge of the cuff and work 65 single crochet stitches evenly around. If you would like the sleeves to have a fuller balloon shape, you can increase this number, but keep the total stitch count odd.
For the next round, chain 1 and turn. Work 1 single crochet into the first stitch, chain 1, skip the next stitch, and work 1 single crochet into the following stitch. Continue this pattern around, then join to the first single crochet with a slip stitch.
For each following round, continue working a single crochet into every single crochet and a chain 1 over every chain-1 space. Turn your work after each round and continue until you have completed 54 rounds in total. Fasten off and leave a long tail for sewing the sleeve to the cardigan. Make the second sleeve in the same way.
Cloud Appliqués
The clouds are made using white yarn and a 3 mm crochet hook. Two different sizes are used throughout the cardigan.
To make a large cloud, chain 11. Beginning in the second chain from the hook, work 1 single crochet into each chain. When you reach the final chain, work 3 single crochet stitches into the same chain. Continue working along the opposite side of the foundation chain, placing 1 single crochet into each chain. Work 3 single crochet stitches into the final chain and join to the first single crochet with a slip stitch.
For the next round, chain 1 and skip 1 stitch. Work 5 double crochet stitches into the next stitch, skip 1 stitch, and slip stitch into the following stitch. Continue repeating this sequence around the cloud: chain 1, skip 1 stitch, work 5 double crochet stitches into the next stitch, skip 1 stitch, then slip stitch into the next stitch. When you reach the beginning, join the round and fasten off, leaving a long tail for sewing.
To make a smaller cloud, follow the exact same instructions but begin with a chain of 9 instead of 11. Make 4 large clouds and 4 small clouds, for a total of 8 cloud appliqués.
Assembly
Once all of the pieces are complete, lay the back panel flat and position the two front panels over it with the correct sides facing each other. Align the shoulder sections and sew them together using the yarn tails you left earlier.
Next, open the cardigan body out flat and position each sleeve along the armhole. Sew each sleeve securely into place, making sure the sleeve is centered evenly between the front and back panels. After attaching the sleeves, continue sewing from the underarm down along the side of the cardigan until you reach the bottom ribbing. Repeat on the opposite side.
Front and Neck Ribbing
To make the ribbing that runs around the front opening and neckline, chain 8. Beginning in the second chain from the hook, work 1 single crochet into each chain across. Chain 1 and turn. For every following row, work single crochet stitches into the back loops only.
Continue until you have completed 122 rows. Once the strip is long enough, fasten off and leave a long tail for sewing.
Position the ribbing around one front edge, continue around the neckline, and then down the opposite front edge. Sew it evenly into place. When attaching the ribbing around the back of the neckline, stretch it slightly as you sew so that the neckline sits neatly and does not flare outward.
Finally, arrange the 4 large and 4 small cloud appliqués over the cardigan. Once you are happy with their placement, use the long white yarn tails to sew carefully around the outer edge of each cloud. Weave in all remaining yarn ends and trim away any excess yarn.
Your cloud cardigan is now complete.
Sizing Guide
This cloud crochet cardigan pattern is easily adjustable for different sizes. Here is a quick reference chart:
- Size S: Back mesh: 83 stitches, back ribbing: 60 rows, front mesh: 33 stitches, sleeve: 65 stitches.
- Size M: Back mesh: 89 stitches, back ribbing: 66 rows, front mesh: 37 stitches, sleeve: 71 stitches.
- Size L: Back mesh: 95 stitches, back ribbing: 72 rows, front mesh: 41 stitches, sleeve: 77 stitches.
- Size XL: Back mesh: 101 stitches, back ribbing: 78 rows, front mesh: 45 stitches, sleeve: 83 stitches.
Always keep the mesh stitch count as an odd number. For more cardigan inspiration, check out our striped crochet cardigan pattern which uses a similar construction method with color-blocking.